HL-1435
FAQs & Troubleshooting |
How do I print on envelopes?
Do not use any of the following types of envelopes, as they will cause paper feed problems:
- Envelopes that are damaged, curled, wrinkled, or irregularly shaped
- Envelopes that are extremely shiny or highly textured
- Envelopes with clasps, snaps or tie strings
- Envelopes with self-adhesive closures
- Envelopes of baggy construction
- Envelopes that are not sharply creased
- Embossed envelopes
- Envelopes that were previously printed by a laser printer
- Envelopes that are pre-printed on the inside
- Envelopes that cannot be arranged uniformly when placed in a pile
- Envelopes constructed with paper that exceeds the paper weight specifications for the printer
- Poorly manufactured envelopes with edges that are not straight or consistently square
- Envelopes with transparent windows, holes, cutouts or perforations.
Before printing envelopes, you must fan the stack of envelopes well to avoid paper jams and misfeeds.
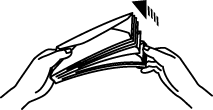
Please use the manual feed slot to print envelopes.
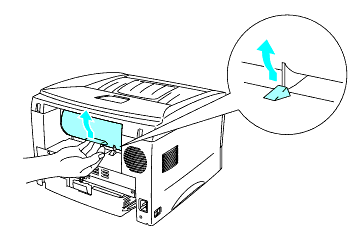
When the rear cover is lifted up, the printer has a straight paper path from the manual feed slot to the back of the printer. Use this paper feed and output method when you want to print envelopes. You cannot feed evelopes from paper casettes.
-
Select the Paper Size, Media Type, Paper Source, and other settings in the printer driver.
Media Type: Thicker paper
Paper Source: Manual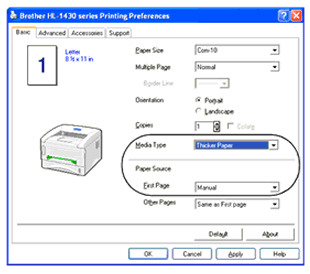
-
Open the rear cover.
-
Send the print data to the printer.
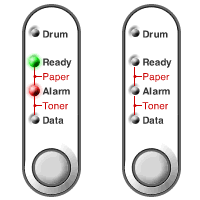
A NO PAPER status is shown by the control panel LEDs until you put a sheet of paper in the manual feed slot.
-
Using both hads, set the width of the manual feed paper guides to the envelope width.

-
Using both hands put the envelope in the manual feed slot until the front edge of the envelope touches the paper feed roller. Hold the envelope in this position until the printer automatically feeds it in for a short distance, and then let go of the envelope.

- Make sure the envelope is straight as you insert it sideways in the manual feed slot. If it is not, the envelope may not be fed properly, resulting in a skewed printout or a jam.
- Do not put more than one envelope in the manual feed slot at any one time, or it may cause a jam.
- Put the envelope in the manual feed slot with the side to be printed face up.
-
After the printed envelope comes out of the printer, the printer will wait until you put in the next envelope. Repeat Step 5 for each envelope you want to printer.
-
After you finish the print job, close the rear cover.
Envelope joints that are sealed by the manufacturer should be secure.
All sides should be properly folded without wrinkles or creases.
