SDX125e
FAQs & Troubleshooting |
Cut a thin fabric for the quilt piece. (How to use the High Tack Adhesive Fabric Support Sheet.)
Use the high tack adhesive fabric support sheet to attach fabrics for quilt piecing to the standard tack adhesive mat. These sheets should only be used with patterns that have a seam allowance. The high tack adhesive fabric support sheet can be repeatedly used until their adhesive strength has decreased. (Once the support sheet has been peeled off the mat, it can no longer be used.)
 |
(1) Standard tack adhesive mat (2) High tack adhesive fabric support sheet |
Attaching the Material
-
Peel off the protective sheet from the adhesive side of the standard tack adhesive mat.

(1) Standard tack adhesive mat- Do not discard the protective sheet peeled off the mat; save it for later use.
- In order to maintain the adhesive strength, attach the protective sheet to the adhesive side of the mat after use.
-
When the mat is not being used, clean the adhesive side and affix the protective sheet before storing it.
For details, see Cleaning the Mat.
-
With the glossy side of the high tack adhesive fabric support sheet facing down, attach it to the mat’s adhesive side.Slowly attach the entire surface of the support sheet from its edges while pressing out any air with a ruler, etc., so that no air is trapped between the mat and the sheet.
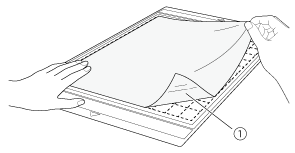
(1) Glossy side of support sheetPlace the support sheet within the attaching area (grid area) on the adhesive side of the mat.
If the sheet extends from the attaching area, it may be damaged by the feed rollers when the mat is fed.
-
Peel off the backing from the top of the support sheet.
(1) Backing
(2) Adhesive
-
Test attaching the material.

Before attaching the material to the mat, use a corner of the adhesive side of the mat to test attach it. If any problems occur when test attaching, the adhesive strength of the mat is too high for the material. Use different material.
-
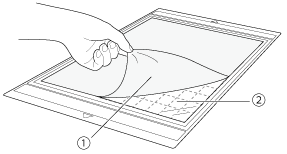
From its edges, attach the material to the adhesive side of the mat so that there are no wrinkles in the material.

- Be sure to first iron the fabric to remove any wrinkles.
- Place the material within the attaching area (grid area) on the adhesive side. If the material extends from the attaching area, it may be damaged by the feed rollers when the mat is fed.
- Insert the mat into the machine in the direction of the arrow. Pay attention to the mat’s orientation to avoid inserting the mat in the wrong direction.
- Be sure that the vertical grain of the attached fabric runs straight up and down. The built-in patterns are automatically arranged suitable for fabric with vertical grain.
- When drawing a seam allowance, attach the fabric to the mat with its wrong side facing up.
-
Firmly move the spatula handle across the surface of the fabric to remove any wrinkles and firmly attach the fabric to the mat.
(1) Spatula
Peeling Off the Material
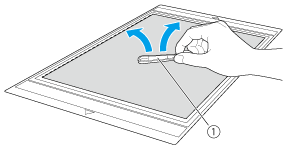
After cutting the material, use a spatula to slowly peel off just the fabric.
Try not to peel off the support sheet.
 |
 |
|
| (1) Support sheet remaining on mat |
(1) Support sheet remaining on mat (3) Spatula |
-
The support sheet may be unintentionally peeled off while you are removing the fabric from the mat under the following conditions:
- The adhesive between the mat and support sheet is becoming weak after repeated uses.
- The support sheet tends to be strongly attached to a certain types of fabrics.
In this case, use the included spatula to hold the support sheet on the mat and remove the fabric using your hand. -
After cutting, carefully remove any fibers remaining on the support sheet.

(1) Tweezers
(available either as optional accessories or commercially)
- Do not leave material attached to a mat with a support sheet attached for a long period of time; otherwise, the adhesive will permeate the material.
- When peeling off the material, insert the spatula as level as possible into the space between the material and mat. Strongly rubbing the adhesive side of the mat may damage it.
Notice on Use of High Tack Adhesive Fabric Support Sheet
- When the sheet’s adhesive strength decreases or fabric becomes twisted while being cut, replace the sheet with a new one.
- When peeling the sheet off the mat or replacing the sheet, use the spatula to carefully remove the old sheet.
- Store the mat in between uses with the protective sheet affixed to the support sheet.
- If a mat with a support sheet attached is not to be used for a certain length of time, peel the support sheet off the mat and affix the protective sheet on the adhesive side of the mat before storing it.
- Do not reuse a support sheet that has been attached to the mat.
- Store the support sheet at room temperature and in a location not exposed to high temperatures, high humidity or direct sunlight.
- Do not bend the support sheet to store it.
- We recommend attaching it to a new cutting mat.