PR670E / PR670EC
FAQs & Troubleshooting |
Why does the upper thread keep breaking?
There could be several reasons why the upper thread keeps breaking.
Check the following points or issues.
-
The needle is not correctly installed. Correctly install the needle.
For details, see "How do I change the needle?" .
-
The needle set screw is loose.
Use the Allen screw driver to tighten the needle set screw.For details, see "How do I change the needle?" .
-
The needle is bent or blunt. Replace the needle with a new one.
For details, see "How do I change the needle?" .
-
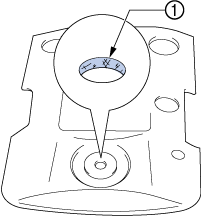
The area around the hole in the needle plate is damaged.
Replace the needle plate or consult your nearest authorized Brother dealer.
(1) Scratches/Burrs -
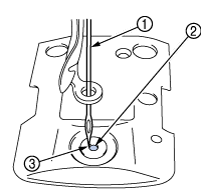
The needle is touching the needle plate.
Consult your nearest authorized Brother dealer.
(1) Needle
(2) Needle plate hole
(3) Needle touching hole
-
The presser foot is set too high and not correctly positioned. The needle hits/touches the presser foot.
Consult your nearest authorized Brother dealer. -
The area around the embroidery foot hole is damaged.
Replace the presser foot.
(1) Scratches/Burrs
Consult your nearest authorized Brother dealer. - Using a specialty thread like a metallic thread. Slow down the machine sewing speed.
-
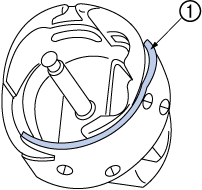
Sliding surface on hook is not smooth. There are burns on it.
Consult your nearest authorized Brother dealer.
(1) Hook race area -
The thread is loose in the hook area.
Remove the loose thread. If the thread is tangled in the hook, clean the hook.For details, see "Maintenance (Clean the hook)" .
-
The play between the hook and the race is too much.
Consult your nearest authorized Brother dealer. -
The hook does not rotate smoothly. Remove lint, clean and apply oil.
For details, see "Maintenance (Clean the hook)" , "Maintenance (Oiling the machine) " .
-
The space between the hook stopper and the hook cannot be adjusted.
Consult your nearest authorized Brother dealer. -
The upper thread is not threaded correctly.

Pull the upper thread by hand from below the presser foot, and check that the thread moves smoothly. If the thread does not move smoothly, it is not correctly threaded. Unthread the machine and rethread the machine. Make sure the thread is correctly positioned in the needle bar thread guide.For details, see "How do I thread the machine? (Threading the upper thread)" .
-
Upper thread is not positioned in upper or middle guide plate.
Make sure thread passes completely under upper and middle guide plate.For details, see "How do I thread the machine? (Threading the upper thread)" .
- There are knots or tangles in the thread. Remove any knots or tangles.
-
The upper thread tension is too high. Decrease the upper thread tension.
For details, see "How do I adjust the tension of the upper thread ?" .
-
The lower thread tension is incorrect. The thread does not roll out of the bobbin case smoothly.
Adjust the lower thread tension.For details, see "How do I adjust the tension of the bobbin thread ?" .
-
The bobbin case is damaged. Replace the bobbin case with a new one.
For details, see "How do I install the bobbin wound with thread?" .
-
The bobbin thread is not wound correctly.
Check that the bobbin is wound so that it is about 80% full and that the thread is evenly wound. If the bobbin is not correctly wound, replace the bobbin with one that is correctly wound or rewind the bobbin.For details, see "How do I wind the bobbin? " .
- A bobbin designed specifically for this machine is not used. Use the correct bobbin.
- The automatic needle-threading mechanism is broken. Consult your nearest authorized Brother dealer.
-
Adhesive is attached to the needle. Replace the needle.
For details, see "How do I change the needle?" .
- The fabric is not taut. Firmly set the fabric in the embroidery frame so that it is taut.
- The thread quality is poor. The thread quality is too weak due to age of thread. Replace thread.
-
The embroidery data contains stitches with a pitch of zero. Delete all stitches with a zero pitch.
For details, see "How do I delete short stitches ?" .
-
The embroidery data contains many stitches with an extremely small pitch. Delete all stitches with a small pitch.
For details, see "How do I delete short stitches ?" .
-
The thread density of the embroidery data is too fine. Three or more overlapping stitches are being sewn.
Using a data design system, correct the thread density and overstitching settings in the embroidery data. -
The thread density of the embroidery data is too fine. Three or more overlapping stitches are being sewn.
Using a data design system, correct the thread density and overstitching settings in the embroidery data.For details, see "About the types of embroidery data that can be used" .
-
Lint or dust has accumulated in the thread tension disc.
Remove the tension dials, and then remove any lint or dust accumulated between the felt washers.For details, see "Maintenance (Cleaning the thread paths of the upper threads) " .
Related FAQs
- How do I install a bobbin into the machine?
- How do I thread the machine? (Threading the upper thread)
- Maintenance (Clean the hook)
- Maintenance (Cleaning the thread paths of the upper threads)
- Maintenance (Oiling the machine)
- How do I wind the bobbin?
- How do I adjust the tension of the bobbin thread ?
- How do I adjust the tension of the upper thread ?
- How do I change the needle?
- Embroidery Data Precautions (About the types of embroidery data that can be used.)
- How do I delete short stitches ?
