CM350R
FAQs & Troubleshooting |
Adjusting the Blade Extension
The appropriate blade extension differs depending on the material type and thickness. Before installing the holder in the carriage, turn the holder cap to adjust the blade extension, and then perform trial cutting.
Use the following table to select the appropriate settings according to the material that will be cut.
|
Material and its thickness |
Blade scale setting |
Cut pressure setting |
Cutting blade | |||
| Standard cut blade
(turquoise) |
Deep cut blade
(purple) |
|||||
| Paper |
Printer paper |
80 g/m² |
3 | -1 | ✓ | - |
|
Scrapbook paper |
120 g/m² |
3.5 | 0 | ✓ | - | |
| Scrapbook paper (medium-thick) |
200 g/m² (0.25 mm) |
4 | 0 | ✓ | - | |
| Cardstock (thin) | 200 g/m² (0.25 mm) |
4 | 0 | ✓ | - | |
|
Cardstock |
280 g/m² |
5 | 0 | ✓ | - | |
| Vellum, tracing paper | 0.07 mm | 3 | 0 | ✓ | - | |
| Poster board (thin) | 280 g/m² (0.35 mm) |
5.5 | 0 | ✓ | - | |
| Poster board (thick) | 400 g/m² (0.5 mm) |
7.5 | 4 | ✓ | - | |
| Fabric |
Thin cotton fabric (for quilt piece) |
0.25 mm | 4 | 4 | ✓ | - |
|
Thin cotton fabric |
0.25 mm | 4 | 4 | ✓ | - | |
|
Flannel (for quilt piece) |
0.6 mm |
6.5 | 4 | ✓ | - | |
|
Flannel |
0.6 mm |
6.5 | 4 | ✓ | - | |
|
Felt |
1 mm |
5 | 5 | - | ✓ | |
|
Denim 14 oz |
0.75 mm | 5.5 | 6 | - | ✓ | |
| Others | Plastic sheet (PP) | 0.2 mm | 4 | 0 | ✓ | - |
|
Vinyl |
0.2 mm |
4 | 0 | ✓ | - | |
| Magnet | 0.3 mm | 5.5 | 0 | ✓ | - | |
|
Sticker or seal |
0.2 mm | 4 | 0 | ✓ | - | |
* Adjust the setting for “Cut Pressure” in the settings screen. For details, see "Settings for Specific Functions".
* Use a high tack adhesive fabric support sheet or a iron-on fabric appliqué contact sheet when you cut a piece of fabric out.
For details, see "Mat and Material Combinations".
The settings indicated in the table are approximations. The setting will differ depending on the type and thickness of the material to be cut. Be sure to perform a trial cutting first.
Adjust the blade extension to slightly exceed the thickness of the material that will be cut. Use the markings on the holder to make the adjustment.
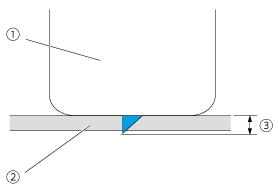 |
(1) End of holder cap (2) Material that will be cut (3) Length of blade tip |
Be careful that the blade does not extend too much. The blade can cut even though it only slightly extends from the holder. If too much of the blade extends, it may break.
-
Remove the protective cap.
After use, be sure to retract the blade into the holder and attach the protective cap.
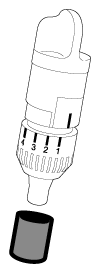
Do not allow infants/children to put the protective caps in their mouths.
-
With the reference line on the holder facing toward you, fully turn the cap to the right to extend the blade tip to its maximum.
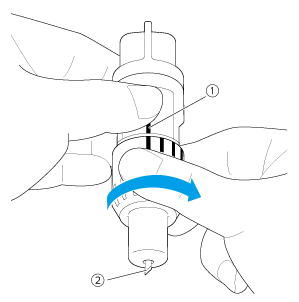
(1) Reference line
(2) Extend the blade tip to its maximum. -
Check the thickness of the material, and then adjust the blade extension. See “Cutting Settings”
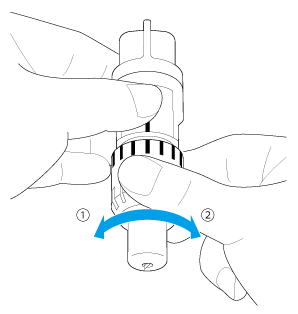
(1) Turn to the left to decrease the blade extension.
(2) Turn to the right to increase the blade extension.
