CM350H
FAQs & Troubleshooting |
Scanning Images (Scan to USB)
A pattern printed on paper or fabric, an image, a pattern template or an original hand-drawn illustration can be scanned and saved as image data on a USB flash drive. This is useful for saving the data of an original image as backup before cutting.
----- Scanning Specifications -----
- Scanning format: Color
- Saved file format: jpg
----- Material That Can be Scanned -----
| with low-tack adhesive mat / standard mat | |
| Thickness | Max. 1.5 mm |
| Type | Paper / Fabric |
| Mat | Mat suitable for the material (For details, see "Mat and Material Combinations".) |
-
Depending on the machine model, the sizes of mats that can be used will differ.
Check the “Maximum Scanning Area” under “Machine Information” in the settings screen. For details, see "Settings for Specific Functions". - Use the optional scanning mat to secure the paper or fabric to be scanned. The mat can be used without attaching the paper or fabric to the mat.
In this tutorial, we will save an illustration drawn on paper as JPEG data to a USB flash drive.
----- Scan Settings -----
-
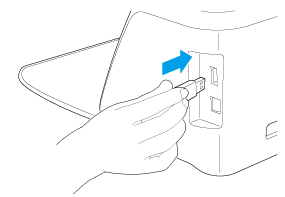
Plug the USB flash drive into the USB port (for a USB flash drive) on this machine.
-
In some flash drive, it may take some time to recognize the drive with the machine.
Operate the key after waiting about 5 to 6 seconds to recognize the drive after inserting the USB flash drive. (This time will differ depending on the flash drive) - When you use the USB flash drive with the LED indicator, wait until the LED stops flashing.
-
In some flash drive, it may take some time to recognize the drive with the machine.
-
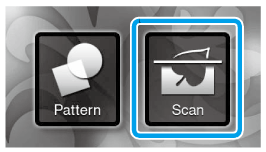
Touch the “Scan” key in the home screen to select the scanning mode.
-
Select “Scan to USB” in the scanning mode selection screen.
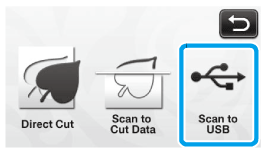
>> A message appears. -
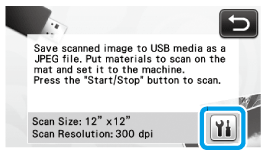
Touch
 to display the scanning settings screen.
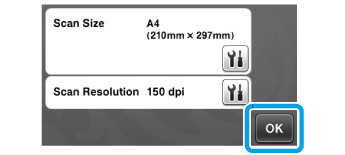
Specify the size of the area to be scanned and the scanning resolution.
-
Touch
 (for “Scan Size”) to display the scanning size settings screen.
-
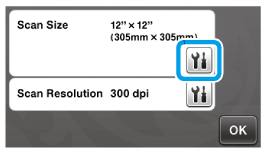
Select the size of the scanning area.
From the list, touch the key for the size of the original to be scanned. For this example, select the A4 size.
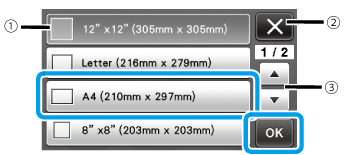
(1) Size selection keys
(2) Touch to cancel the setting and return to the previous screen.
(3) Touch to scroll through the list.
>> After the selected key is highlighted, touch the “OK” key to finish specifying settings. -
Touch
 (for “Scan Resolution”) to display the scanning resolution settings screen.
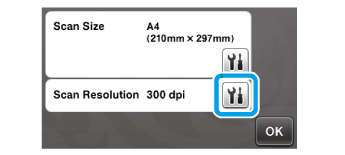
-
Select the scanning resolution.
From the list, touch the key for the scanning resolution. For this example, select 150 dpi.
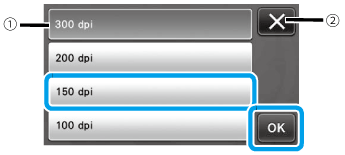
(1) Resolution selection keys
(2) Touch to cancel the setting and return to the previous screen.
>> After the selected key is highlighted, touch the “OK” key to finish specifying settings. -
Check the settings, and then touch the “OK” key.
>> A message appears.
----- Scanning and Saving -----
-
Attach the original that will be scanned to the mat.
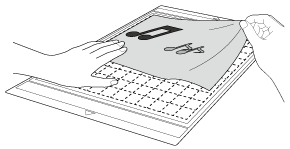
Place the original to be scanned so that it is in the landscape orientation.
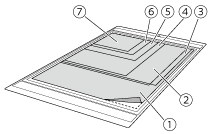
(1) 12" × 12" (305 mm × 305 mm)
(2) Letter (216 mm × 279 mm)
(3) A4 (210 mm × 297 mm)
(4) 8" × 8" (203 mm × 203 mm)
(5) 5" × 7" (127 mm × 178 mm)
(6) 4" × 6“ (102 mm × 152 mm)
(7) 3.5" × 5" (89 mm × 127 mm) -
Load the mat into the feed slot.
For details on loading the mat, see “Loading the mat” -
Press the “Start/Stop” button to start scanning.
- The data is saved at the same time that the original is being scanned.
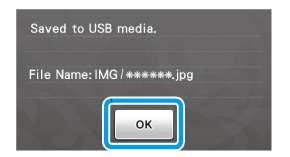
- When scanning and saving is finished, the completion message appears.
-
Touch the “OK” key to exit “Scan to USB” mode.
-
Press
 in the operation panel to feed out the mat.
-
Unplug the USB flash drive from the USB port on this machine.
- From a computer, check the saved image data.