DS-920DW
FAQs & Troubleshooting |
Calibrate your scanner.
Calibrate your scanner only if the scanned images start to look fuzzy, the color looks abnormal (darker than normal), after 8,000 scans, or if the scanner has been stored without being used for a long time. You will need the Calibration Sheet that came with your scanner to successfully perform calibration.
-
Turn on your scanner.
-
Press the Menu.
-
Press the HQ / STD (
 ) or PDF / JPG (
 ) key repeatedly to select CAL on machine's display (hereinafter called LCD).
-
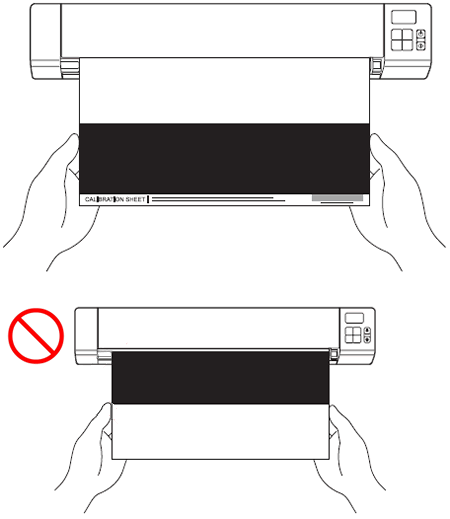
Hold the edges of the Calibration Sheet and insert it with the text face up and the white area feeding first into the scanner.

Hold only the edges of the calibration sheet and be careful not to touch the white or black area. Leaving marks or fingerprints on this sheet can cause errors in calibration.
-
Press the Start / OK.
-
The scanner starts feeding the calibration sheet. The Power LED blinks green.
- After the calibration sheet is ejected, OK appears on the LCD and calibration is finished.
-
Double-click the DSmobileCapture shortcut
 on your desktop.
-
The Select Scanner Model dialog box appears. Select TWAIN under Driver Type and select [model name] under Scanner Model, and then click OK.
-
DSmobileCapture launches.
-
Click Setup
 .
.
-
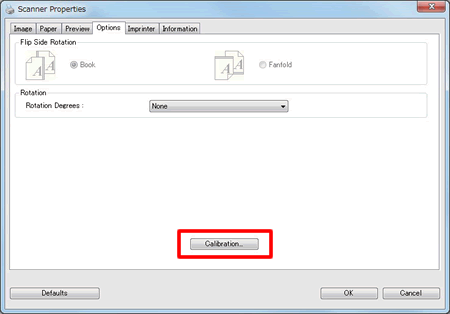
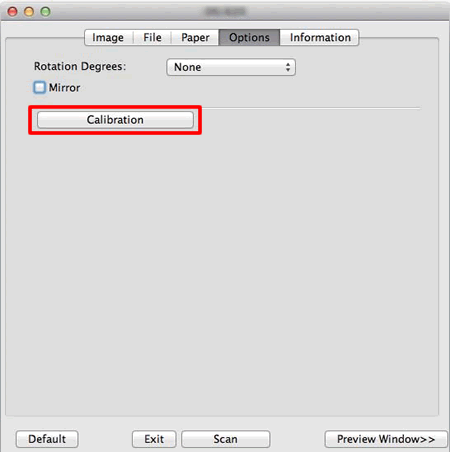
Click the Options tab.
-
Click Calibration to start calibrating the scanner.
-
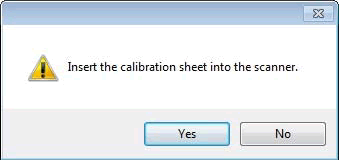
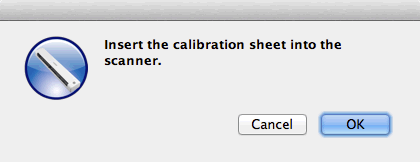
A message appears, prompting you to insert the Calibration Sheet.
-
Hold the edges of the Calibration Sheet and insert it with the text face up and the white area feeding first into the scanner, and then click Yes.
Hold only the edges of the Calibration Sheet and be careful not to touch the white or black area. Leaving marks or fingerprints on this sheet can cause errors in calibration.
-
Scanning starts automatically.
-
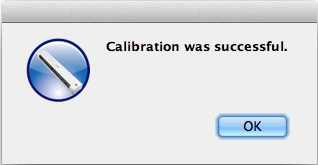
After the Calibration Sheet is scanned, a Calibration was successful message appears on your screen, indicating that the calibration is finished. Click OK to end calibration, and then click OK to close the Options screen.
If a Calibration failed message appears on your screen, remove the Micro USB cable from your computer. Reconnect the Micro USB cable to the computer, and perform the calibration again. If calibration fails again, check the scanner's print head to ensure it is clean.
-
Double-click the DSmobileCapture shortcut
 on your desktop.
-
The DSmobileCapture launches.
-
Click the Options tab.
-
Click Calibration to start calibrating the scanner.
-
A message appears, prompting you to insert the Calibration Sheet.
-
Hold the edges of the Calibration Sheet and insert it with the text face up and the white area feeding first into the scanner, and then click OK.

Hold only the edges of the Calibration Sheet and be careful not to touch the white or black area. Leaving marks or fingerprints on this sheet can cause errors in calibration.
-
Scanning starts automatically.
-
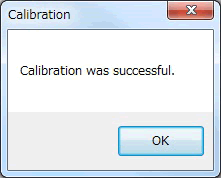
After the Calibration Sheet is scanned, a Calibration was successful message appears on your screen, indicating that the calibration is finished successfully. Click OK to end calibration.
If a Calibration failed message appears on your screen, remove the Micro USB cable from your computer. Reconnect the Micro USB cable to the computer, and perform the calibration again. If calibration fails again, check the scanner's print head to ensure it is clean.