PT-P910BT
FAQs & Troubleshooting |
Using the Device Settings (for Windows)
To use the Device settings, please follow the steps below:
-
Open the Printer Setting Tool.
Refer to the FAQ: "Using the Printer Setting Tool (for Windows)". -
Click Device Settings.

-
Specify or change the settings in the Device Settings window.
See below for detailed information:
> Device Settings Dialog Box
> Menu Bar
> Basic Tab
> Label Settings Tab
Device Settings Dialog Box

-
Menu Bar
Provides access to various commands grouped under each menu title (the File, Maintenance, and About menus) according to their functions. -
Current Settings
Retrieves the settings from the currently connected printer and displays them in the dialog box. Settings can also be retrieved for the parameters on tabs with .
. -
Disable these settings
When this check box is selected, appears on the tab, and the settings can no longer be specified or changed. Settings in a tab where appears are not applied to the printer even if Apply is clicked. In addition, the settings in the tab are not saved or exported when you use the Save in Command File or Export command. -
Parameters
Displays the current settings. -
Exit
Exits the Device Settings window and returns to the main window of the Printer Setting Tool. -
Apply
Applies the settings to the printer. To save the specified settings in a command file, select the Save in Command File option from the drop-down list. -
Settings Tabs
Contains settings that may be specified or changed.If
appears in the tab, the settings cannot be changed. In addition, the settings in the tab with the icon are not applied to the printer even if you click Apply. The settings in the tab are not saved when you use the Save in Command File command. -
Printer
Specifies the printer you want to configure.
Menu Bar
[File] Menu Options

-
Apply Settings to the Printer
Applies the settings to the printer. -
Check Setting
Displays the current settings. -
Save Settings in Command File
Saves the specified settings in a command file. -
Import
Imports an exported file. -
Export
Saves the current settings in a file. -
Exit
Exits the Device Settings window and returns to the main window of the Printer Setting Tool.
[Maintenance] Menu Options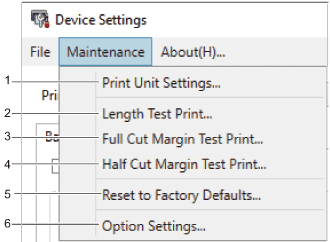
You must have administrator privileges for the computer or the printer to display some items. Check if you have administrator privileges for the printer by clicking the Printer properties menu, and then clicking the Security tab.
-
Print Unit Settings
Prints a report containing the current firmware version and device setting information. -
Length Test Print
Performs a test print with the setting values specified in the Length Adjustment option. -
Full Cut Margin Test Print
Performs a test print with the setting values specified in the Full Cut Margin Adjustment option. -
Half Cut Margin Test Print
Performs a test print with the setting values specified in the Half Cut Margin Adjustment option. -
Reset to Factory Defaults
Resets all the settings to the factory settings, including device settings. -
Option Settings
If the Do not display an error message if the current settings cannot be retrieved at startup check box is selected, a message is not displayed next time.
Basic Tab

-
Auto Power On
Specifies whether the printer turns on automatically when connected to a USB AC Adapter or a computer. -
Auto Power Off (USB Connection)
Specifies the period of time that passes before the printer turns off automatically when connected to a USB AC Adapter or a computer.The printer automatically enters Auto Power Off mode when the specified time elapses under the following conditions:
- The printer does not receive data.
- In idle mode.
The printer automatically leaves Auto Power Off mode when:
- Any of the printer buttons are pressed.
- The printer receives data.
- The battery is removed and inserted.
- The printer is connected via Bluetooth®.
- The USB cable is disconnected and then reconnected.
-
Auto Power Off (Li-ion)
Specifies the period of time that passes before the printer turns off automatically when the printer is using battery power.The printer automatically enters Auto Power Off mode when the specified time elapses under the following conditions:
- The printer does not receive data.
- In idle mode.
The printer automatically leaves Auto Power Off mode when:
- Any of the printer buttons are pressed.
- The printer receives data.
- The battery is removed and inserted.
- The printer is connected via Bluetooth.
-
Contents
Selects the information you want to include in the printer Information Report. -
Special Tape Feed
If Enable is selected when the Special Tape (No Cut) option in the printer driver is selected, the printer feeds tape for manual cutting.
Label Settings Tab

-
Length Adjustment
Adjusts the length of the printed label. -
Full Cut Margin Adjustment
Adjusts the margin of the printed label when cutting the tape at full length. -
Half Cut Margin Adjustment
Adjusts the margin of the printed label when cutting the tape at half length.
-
Menu Bar
- After changing the settings, click Apply - Exit, and then click Exit in the main window.