HL-L9200CDWT
FAQs & Troubleshooting |
What is Storage PC Print Data using Active Directory®? (Windows)
When Active Directory Authentication is enabled, the machine can store all print jobs sent from computers using the standard Brother Driver for Windows.
After a user logs on, the device will then print jobs sent from the logged on user.
You can change the Active Directory Authentication settings using Web Based Management or BRAdmin Professional 3 (Windows).
Follow the steps below to use this function.
A. Update the machine's firmware to the latest version.
Click here to update the machine's firmware using Firmware Update Tool.
B. Configure the Active Directory Authentication settings.
You can configure the Active Directory Authentication settings using BRAdmin Professional or Web Based Management. Click the following link to configure the settings.
- Open a web browser (such as Internet Explorer).
-
Enter in the IP address of the Brother machine as http://XXX.XXX.XXX.XXX.
- Where XXX.XXX.XXX.XXX is the IP address of the Brother machine.
- You can find your machine's IP address on the Network Configuration Report. Click here to see how to print the Network Configuration Report.
-
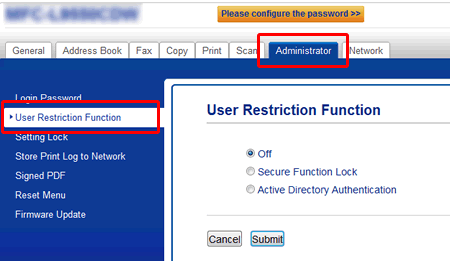
Click Administrator tab and then User Restriction Function.
-
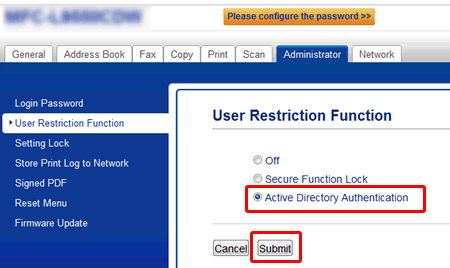
Choose Active Directory Authentication in User Restriction Function. Click Submit.
-
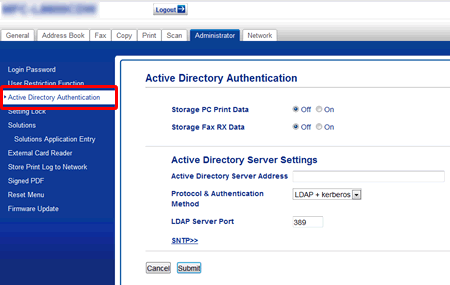
Choose Active Directory Authentication.
-
Choose On next to Storage PC Print Data in Active Directory Authentication.
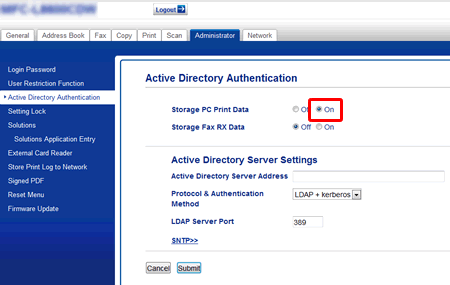
-
Configure Active Directory® server settings.Active Directory® settings vary depending on environment you are using the machine.
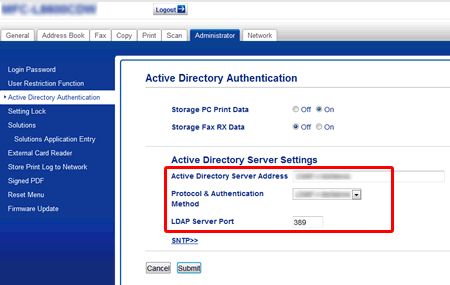
- Click Submit. Your machine will store the print data without printing them soon. Go to step C to print data stored in the machine.
- Update BRAdmin Professional to the latest version. Click here to update BRAdmin Professional.
- Launch BRAdmin Professional.
- Right click on a model you want to change the settings and choose Configure Device.
-
Enable Active Directory Authentication settings.
- Click Device Settings tab
- Click User Restriction Function.
- Check the box for User Restriction Function.
- Choose Active Directory Authentication in User Restriction Function.
-
Click Send Settings.
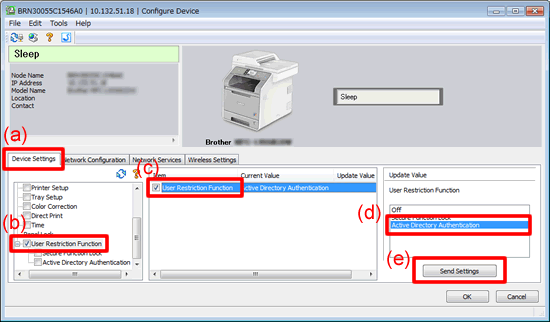
-
Enable Store PC Print Data settings.
-
Click Active Directory Authentication under User Restriction Function.
- Check the box for Storage PC Print Data.
- Choose On in Storage PC Print Data.
-
Click Send Settings.
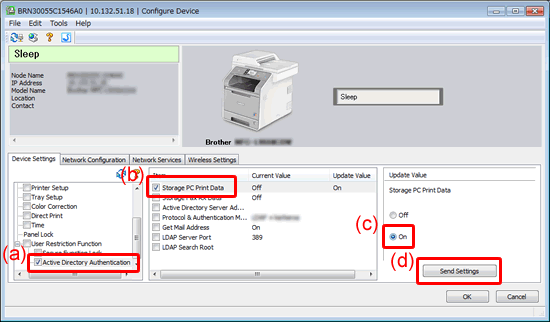
-
Configure Active Directory® server settings.
Active Directory® settings vary depending on environment you are using the machine.
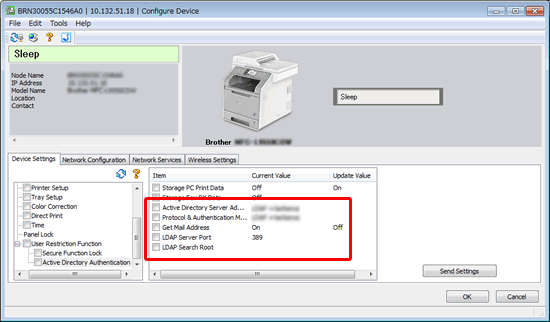
- Click OK. Your machine will store the print data without printing them soon. Go to step C to print data stored in the machine.
-
C. Print jobs stored in the machine.
When the Active Directory Authentication setting is enabled, the machine's control panel is locked and the message which asks you to enter domain name, user name and password will be shown on the machine's display.
Print jobs stored in the machine as follows:
- Enter domain name, user name and password using the Touchscreen.
- Click OK.
- When the user authentication completes, the machine's control panel will be unlocked and the stored data in the machine will be printed.
