MFC-J4310DW
FAQs & Troubleshooting |
Set my most frequently used fax, copy, and scan settings as Shortcuts
You can set your most frequently used fax, copy, and scan settings as Shortcuts, which you can then quickly and easily recall and apply. You can store three Shortcuts on your Brother machine. Click the link below for your case.
To add copy Shortcuts
You can include the following settings in a copy Shortcut:
- Quality
- Paper Type
- Paper Size
- Tray select (for some model's)
- Enlarge/Reduce
- Density
- Stack/Sort
- Page Layout
- 2-sided Copy
- Advanced Settings
Follow the steps below to add copy Shortcuts:
-
Press
 (Settings).
-
Press the Up or Down arrow key to display Shortcut Settings.
-
Press Shortcut Settings.
-
Press
 ,
,  , or
, or  to select an empty Shortcut slot.
Empty Shortcut slots will be named -Blank- on the machine's display (hereinafter called LCD). -
Read the information on the LCD.
-
Press Next.
-
Press Copy.
-
Press the Up or Down arrow key to display the available settings.
-
Press the setting you want to change.
-
Press the Up or Down arrow key to display the available options for the setting you selected.
-
Press the option you want to set.
-
Do one of the following:
-
If you want to select another setting, repeat Steps 8 through 11.
- If you have finished selected settings, go to Step 13.
-
If you want to select another setting, repeat Steps 8 through 11.
-
Press OK.
-
Do one of the following:
-
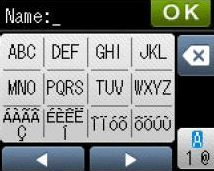
Use the keyboard on the LCD to enter a name for the Shortcut.
- If you want to use the default Shortcut name, go to Step 15.

-
Use the keyboard on the LCD to enter a name for the Shortcut.
-
Press OK.
-
Press the Up or Down arrow key to review the displayed list of your chosen settings.
-
Do one of the following:
-
To save the Shortcut, press Yes.
- To change the Shortcut, go back to Step 8.
-
To save the Shortcut, press Yes.
-
Read the information on the LCD.
-
Press OK.
-
Press
 (Home).
To add fax Shortcuts
You can include the following settings in a fax Shortcut:
- Address
- Fax Resolution
- Contrast
- Color Setting
- Batch TX
- Real Time TX
- Overseas Mode
- Glass scan Size
Follow the steps below to add fax Shortcuts:
-
Press
 (Settings).
-
Press the Up or Down arrow key to display Shortcut Settings.
-
Press Shortcut Settings.
-
Press
 ,
,  , or
, or  to select an empty Shortcut slot.
Empty Shortcut slots will be named -Blank- on the machine's display (hereinafter called LCD). -
Read the information on the LCD.
-
Press Next.
-
Press Fax.
-
Press the Up or Down arrow key to display the available settings.
-
Press the setting you want to change.
-
Press the Up or Down arrow key to display the available options for the setting you selected.
-
Press the option you want to set.
-
Do one of the following:
-
If you want to select another setting, repeat Steps 8 through 11.
- If you have finished selected settings, go to Step 13.
-
If you want to select another setting, repeat Steps 8 through 11.
-
Press OK.
-
Do one of the following:
-
Use the keyboard on the LCD to enter a name for the Shortcut.
- If you want to use the default Shortcut name, go to Step 15.

-
Use the keyboard on the LCD to enter a name for the Shortcut.
-
Press OK.
-
Press the Up or Down arrow key to review the displayed list of your chosen settings.
-
Do one of the following:
-
To save the Shortcut, press Yes.
- To change the Shortcut, go back to Step 8.
-
To save the Shortcut, press Yes.
-
Read the information on the LCD.
-
Press OK.
-
Press
 (Home).
To add scan Shortcuts
You can include the following settings in a scan Shortcut:
Scan to Media:
- Scan Type
- Resolution
- File Type
- File Name
- Remove Background
Scan to Network
Scan to FTP
Follow the steps below to add scan Shortcuts:
-
Press
 (Settings).
-
Press the Up or Down arrow key to display Shortcut Settings.
-
Press Shortcut Settings.
-
Press
 ,
,  , or
, or  to select an empty Shortcut slot.
Empty Shortcut slots will be named -Blank- on the machine's display (hereinafter called LCD). -
Read the information on the LCD.
-
Press Next.
-
Press Scan.
-
Press the Up or Down arrow key to display scan to Media, scan to Network, or scan to FTP.
-
Press to Media, scan to Network, or Scan to FTP.
- Do one of the following:
-
Press the Up or Down arrow key to display the available settings.
-
Press the setting you want to change.
-
Press the Up or Down arrow key to display the available options for the setting you selected.
-
Press the option you want to set.
-
Do one of the following:
-
If you want to select another setting, repeat Steps 11 through 14.
- If you have finished selected settings, go to Step 16.
-
If you want to select another setting, repeat Steps 11 through 14.
-
Press OK.
-
Do one of the following:
-
Use the keyboard on the LCD to enter a name for the Shortcut.
- If you want to use the default Shortcut name, go to Step 18.
-
Use the keyboard on the LCD to enter a name for the Shortcut.
-
Press OK.
-
Press the Up or Down arrow key to review the displayed list of your chosen settings.
-
Do one of the following:
-
To save the Shortcut, press Yes.
-
To change the Shortcut, go back to Step 11.
-
To save the Shortcut, press Yes.
-
Read the information on the LCD.
-
Press OK.
-
Press
 (Home).