MFC-J4335DW
FAQs & Troubleshooting |
Copy an ID Card
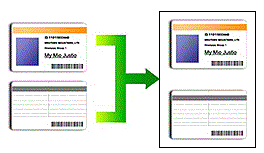
Use the [2in1(ID)] feature to copy both sides of an identification card onto one page, keeping the original card size.

- Make sure the paper size is set to Letter or A4.
- You may copy an identification card to the extent permitted under applicable laws. For more detailed information, see the Product Safety Guide.
MFC-J4335DW/MFC-J4345DW
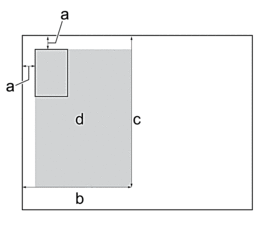
- Place your identification card face down near the upper-left corner of the scanner glass.
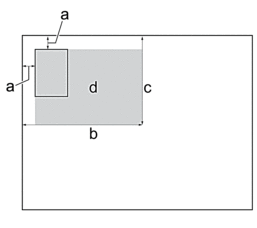
2 in 1 ID (Vertical) 2 in 1 ID (Horizontal) 

- 0.12 in. (3 mm) or greater (top, left)
- 5.4 in. (137 mm)
- 2 in 1 ID (Vertical): 8.4 in. (213 mm)
2 in 1 ID (Horizontal): 4.1 in. (105 mm)
- Scannable area
- Press
 (COPY).
 - Enter the number of copies using the dial pad.
- Press
 or
or  to select the following:
 - Select [Page Layout]. Press OK.
- Select [2in1 ID Vertical] or [2in1 ID Horizontal]. Press OK.
- Press Black Start or Color Start.The machine starts scanning one side of the identification card.
- After the machine has scanned the first side, turn over the identification card and press
 to scan the other side.
MFC-J4535DW
- Place your identification card face down near the upper-left corner of the scanner glass.
2 in 1 ID (Vertical) 2 in 1 ID (Horizontal) 

- 0.12 in. (3 mm) or greater (top, left)
- 5.4 in. (137 mm)
- 2 in 1 ID (Vertical): 8.4 in. (213 mm)
2 in 1 ID (Horizontal): 4.1 in. (105 mm)
- Scannable area
- Press
 [Copy].
 - Enter the number of copies in one of the following ways:
- Press [-] or [+] on the touchscreen.
- Press
 to display the keyboard on the touchscreen, and then enter the number of copies using the touchscreen keyboard. Press [OK].
- Press
 or [2in1 ID Horizontal].
  You can also press [ID] for the [2in1 ID Vertical] setting.
 - Read and confirm the displayed list of settings you have selected. When you have finished changing settings, press [OK].
- Press [Black Start] or [Color Start].The machine starts scanning one side of the identification card.
- After the machine has scanned the first side, turn over the identification card and press [Continue] to scan the other side.
Content Feedback
To help us improve our support, please provide your feedback below.
