MFC-J6910DW
FAQs & Troubleshooting |
Print from a computer using Print Profiles.
Print Profiles allow you to choose from a range of pre-defined and user customizable print settings, helping you to save the time and effort of having to manually change them yourself every time you want to print.
- Within the application you wish to print from choose the print option.
- Click PROPERTIES to open the Printing Preferences window.
The steps may vary depending on your application.
- On the Print Profiles Tab, choose the desired Print Profile from the list and then click OK. The default Profiles are as follows:
The available options may vary depending on your model.
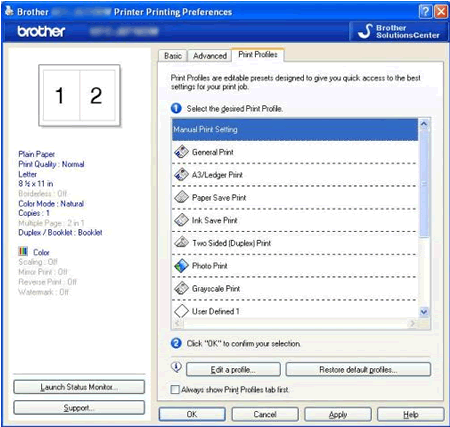
- General Print: Suitable for general, everyday printing using standard paper.
- A3/Ledger Print: Easily print on standard A3/Ledger paper.
- Paper Save Print: Suitable for printing presentations and rough copies of your documents. The driver will combine 8 pages to every piece of paper (4 on each side).
- Ink Save Print: Ideal for less important documents that do not require a professional finish. Printouts will appear fainter than in any other profile but will use less ink.
- Two Sided (Duplex) Print: The driver will automatically print on both sides of the paper.
The items displayed differ depending on your model.
- Photo Print: (3.5 x 5 in) Suitable when printing photographs on glossy paper.
- Grayscale Print: The Grayscale Print Profile will print your documents in black and white.
- User Defined: Available for you to store your own frequently used print settings.
- General Print: Suitable for general, everyday printing using standard paper.
- Once you are in the Print Dialog box for your application, click OK or Print (depending on your application). The document will print using the settings from the chosen Print Profile.
- Open Printing Preference. (Click here to see the details of how to open Printing Preferences.)
- Make any desired print adjustments on the Basic and Advanced Tab and then click Apply.
- Click on the Print Profiles Tab.
- Click Edit a Profile. This will allow you to save your current print settings to a profile for easy selection later.
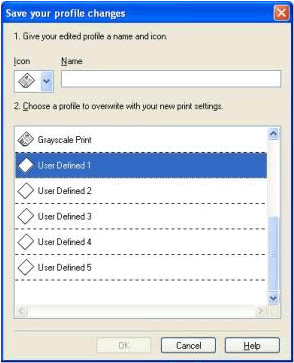
- Give your edited profile a name and choose an icon.
- Choose a profile to overwrite with your new print settings.
- Click OK twice.
The following settings cannot be saved to a Print Profile:
- Copies
- Orientation
- Copies
- Give your edited profile a name and choose an icon.
- If you want to restore all Print Profiles back to how they were when you first installed the driver, click Restore default profiles. This will delete all your custom settings or any changes you made to the pre-defined ones.
- If you want the Print Profiles tab to always appear first when you enter the printer driver, place a check in Always show Print Profiles tab first.
- Click Apply => OK.
Content Feedback
To help us improve our support, please provide your feedback below.