MFC-990CW
FAQs & Troubleshooting |
How do I clear the message "No Paper Fed" from the display?
To clear the message "No Paper Fed" from the display, follow the steps listed below:
NOTE: Illustrations shown below are from the representative product and may differ from your Brother machine.
-
Install the paper in the paper tray by following the steps listed below:
-
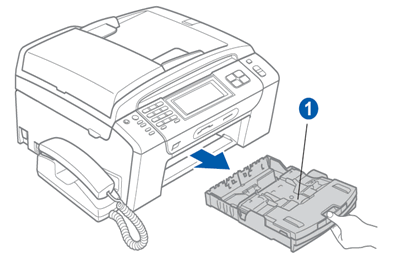
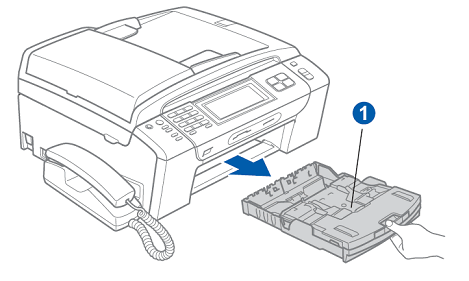
Remove the paper tray (1) from the machine.
-
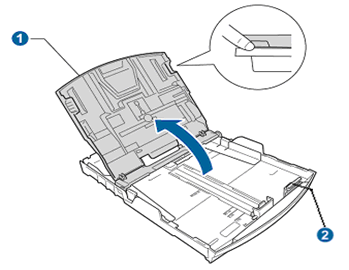
Lift the Photo Bypass Tray Cover (1) and remove the paper from the tray. Press and hold the green universal guide release (2) and push the front of the paper tray towards the back of the tray.
-
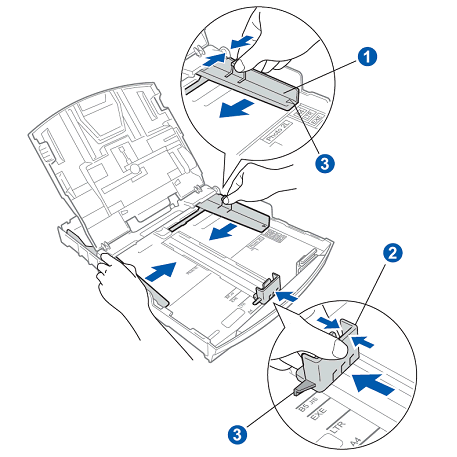
Adjust the paper width (1) and length (2) guides to fit the paper. The pointers (3) should line up with the indicator marks on the tray.
-
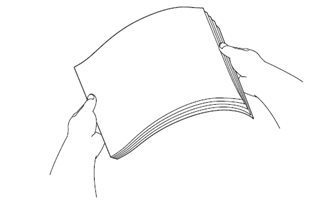
Fan the stack of paper well to avoid paper jams and miss-feeds.
- The paper must be uniformly stacked (same size, type and weight)
- Do not use paper that is damaged, curled, wrinkled, irregularly shaped, extremely shiny, highly textured, or paper that was previously printed by a printer.
- Be sure to follow the paper specifications and paper tray capacity.
- Be careful NOT to overfill the tray. Doing so may cause miss-feeds or paper jams and could damage your machine.
-
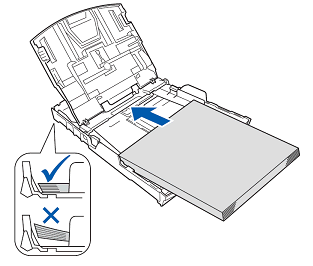
Gently insert the paper into the paper tray. The paper must be completely flat in the paper tray or feed problems may occur. Be careful not to push the paper too far into the tray. The paper must be completely flat in the paper tray or feed problems may occur.
-
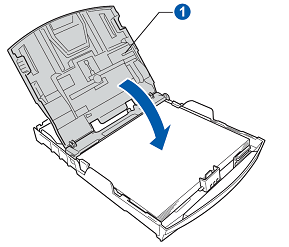
Close the paper tray cover (1).
-
Reinstall the paper tray by slowly pushing the tray all the way in. You should hear a slight snap or click once the tray is seated properly.
-
Remove the paper tray (1) from the machine.
-
With the paper tray installed in the machine, the paper inside the paper tray should be covered. See photo #1 below.

#1. Photo Bypass Tray in correct position #2. Photo Bypass Tray in wrong position
If photo #1 matches your machine, go to STEP 8.If photo #2 matches your machine, continue to STEP 3 to adjust the photo bypass tray.
-
Remove the paper tray from the machine.
-
Adjust the Photo Bypass Tray to the Normal Printing position shown below, by squeezing the photo bypass tray release button (1) with your thumb and forefinger and slide the Photo Bypass tray toward you (2) until it clicks into position at the front of the paper tray.

Photo Printing Position Normal Printing Position
-
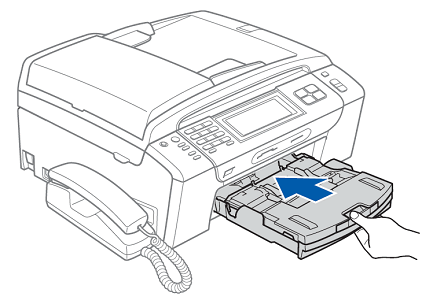
Reinstall the paper tray by slowly pushing the tray all the way into the machine. You should hear a slight snap or click once the tray is seated properly.
-
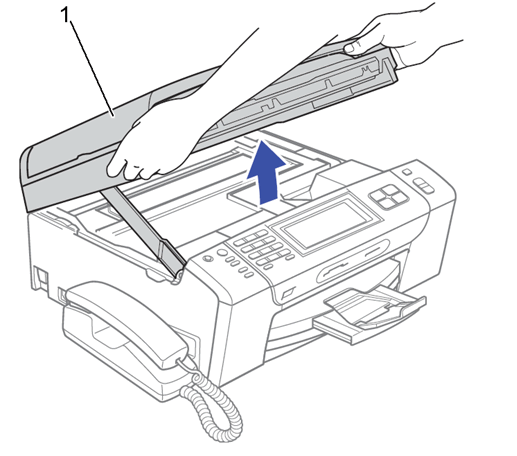
Raise the flatbed unit (1) until the LCD displays "Cover is Open." Close the flatbed to reset the machine.
-
Test the machine by printing the Print Quality Check Sheet.
- Press the Ink / Ink Management key or press the 4 Color Columns on the right side of the Touch Screen.
- Press OK. (For touchscreen models, skip this step.)
- Select Test Print.
- Press OK. (For touchscreen models, skip this step.)
-
Select Print Quality.
- Press the Color (Colour) Start key. The machine will print out the Print Quality Check Sheet.
-
If the page prints correctly and ejects completely from the machine the problem is resolved. Press 1 and Stop/Exit to return to the standby mode.
-
If the page prints and ejects but the print quality is not good, follow the prompts on the LCD to clean the print head and reprint the Print Quality Check Sheet.
For further instruction on improving Print Quality refer to the FAQ"How can I improve poor print quality?" -
If the message "No Paper Fed" continues to appear on the display continue to STEP 8.
- If a different message is displayed on the LCD refer to "FAQs & Troubleshooting" for information on the error message you are receiving.
-
Verify the paper tray is installed correctly.
-
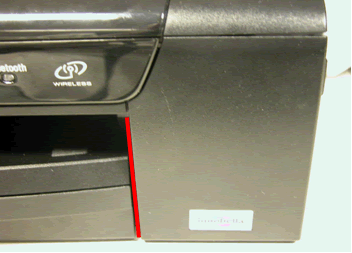
On the front right side of the machine is the ink cartridge cover. We will use the left side edge of the cover as a reference point to determine if the paper tray is installed correctly. See the picture below. The red line indicates the left side edge of the ink cartridge cover.
-
If the edge on the right side of the paper tray is sticking out further than the edge of the ink cartridge cover (see photo #1), go to STEP 10.
-
If the edge on the right side of the paper tray is pushed in past the edge of the ink cartridge cover (see photo #2), continue to STEP 9.

#1: Tray not in correct position side view #2: Tray is in the correct position side view
-
The red line indicates the left side edge of the ink cartridge cover.
-
The red arrow indicates the paper tray.
-
On the front right side of the machine is the ink cartridge cover. We will use the left side edge of the cover as a reference point to determine if the paper tray is installed correctly. See the picture below. The red line indicates the left side edge of the ink cartridge cover.
-
Verify the paper is installed correctly in the paper tray:
-
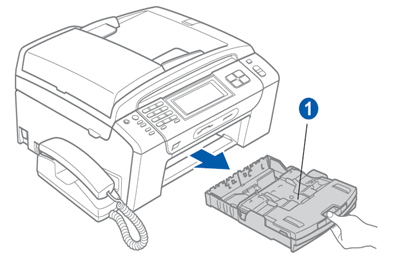
Remove the paper tray (1) from the machine.
-
Lift the Photo Bypass Tray Cover. .
-
Adjust the paper width (1) and length (2) guides to fit the paper. The pointers (3) should line up with the indicator marks on the tray.

-
Fan the stack of paper well to avoid paper jams and miss-feeds.
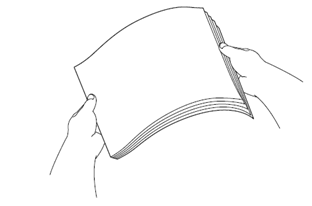
- The paper must be uniformly stacked (same size, type and weight)
- Do not use paper that is damaged, curled, wrinkled, irregularly shaped, extremely shiny, highly textured, or paper that was previously printed by a printer.
- Be sure to follow the paper specifications and paper tray capacity.
- Be careful NOT to overfill the tray. Doing so may cause miss-feeds or paper jams and could damage your machine.
-
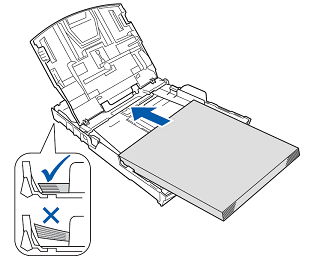
Gently insert the paper into the paper tray. The paper must be completely flat in the paper tray or feed problems may occur. Be careful not to push the paper too far into the tray. The paper must be completely flat in the paper tray or feed problems may occur.
-
Close the paper tray cover (1).
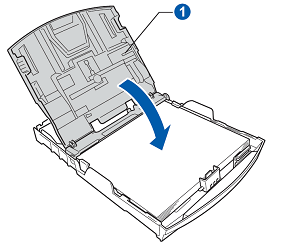
- Reinstall the paper tray by slowly pushing the tray all the way in. You should hear a slight snap or click once the tray is seated properly. Go to STEP 18.
-
Remove the paper tray (1) from the machine.
-
Check the paper tray alignment:
Apply a slight amount of force to the center of the paper tray and try to push it into the machine. The front corner edges of the paper tray should be even with the sides of the machine.
-
If the edge on the right side of the paper tray is in further than the edge of the ink cartridge cover, go to STEP 18
-
If the edge of the paper tray is still sticking out further than the edge of the ink cartridge cover, continue to STEP 11.
-
If the edge on the right side of the paper tray is in further than the edge of the ink cartridge cover, go to STEP 18
-
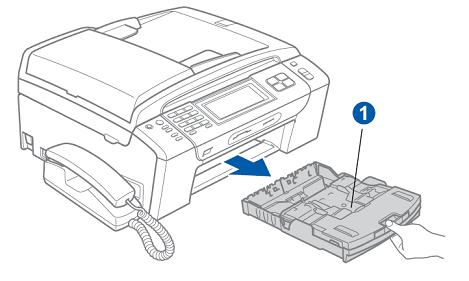
Remove the paper tray (1) from the machine.
-
Look inside the cavity towards the back of the machine where the paper tray was installed and remove any debris (paper scrap, paper clip, pen cap etc.) that may be preventing the tray from being pushed in. You should see 2 gray rollers and a small white piece of plastic in the center rear of the machine.
-
Reinstall the paper tray by slowly pushing the tray all the way in, you should hear a slight snap or click once the tray is seated properly. Check to see if the paper tray is all the way in.
-
If the edge of the paper tray is in further than the edge of the ink cartridge cover, go to STEP 18
-
If the edge of the paper tray is still sticking out further than edge of the ink cartridge cover, continue to STEP 14.
-
If the edge of the paper tray is in further than the edge of the ink cartridge cover, go to STEP 18
-
Remove the paper tray from the machine.
-
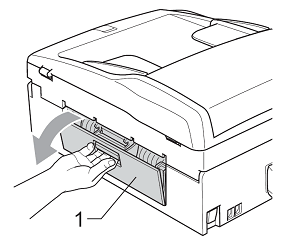
Turn the Brother machine around and open the Jam Clear Cover (1) at the back of the machine by lifting the handle at the center.
-
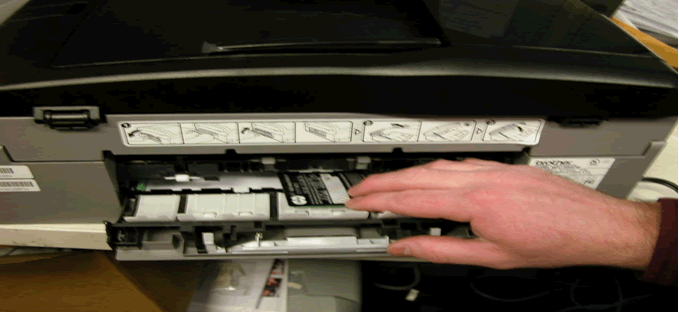
In the center of the opening, there are two gray feed rollers with a white piece of plastic in the middle.
-
Place a flat, thick piece of plastic under the gray rollers. Below is a picture of lifting the gray rollers with a piece of plastic.:
-
With one hand, lift the gray rollers using a credit card or driver's license and use your other hand to push the tray all the way in.
-
In the center of the opening, there are two gray feed rollers with a white piece of plastic in the middle.
-
Close the jam clear cover and turn the machine back around until the front of the machine facing you.
-
Reinstall the paper tray into the machine.
-
If the edge of the paper tray is still sticking out further than the edge of the ink cartridge cover, please contact Brother Customer Service from "Contact Us".
-
If the edge of the paper tray is in further than the edge of the ink cartridge cover, continue to STEP 18.
-
If the edge of the paper tray is still sticking out further than the edge of the ink cartridge cover, please contact Brother Customer Service from "Contact Us".
-
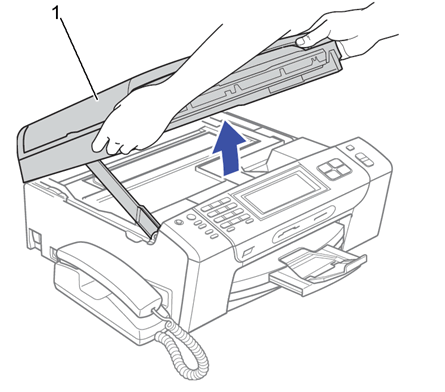
Raise the flatbed (1) until the LCD displays "Cover is Open". Close the flatbed to reset the machine.
-
Test the machine by printing the Print Quality Check Sheet.
- Press the Ink / Ink Management key or press the 4 Color Columns on the right side of the Touch Screen.
-
Press OK. (For touchscreen models, skip this step.)
-
Select Test Print.
- Press OK. (For touchscreen models, skip this step.)
- Select Print Quality.
-
Press the Color (Colour) Start key. The machine will print out the Print Quality Check Sheet..
- If the page prints, ejects completely from the machine and the print quality is good, the problem is resolved. Press 1 and Stop/Exit to return to standby mode.
-
If the page prints and ejects but the print quality is not good, follow the prompts on the LCD to clean the print head and reprint the Print Quality Check Sheet.
For further instructions on improving Print Quality refer to the FAQ "How can I improve poor print quality?"
-
If the message No Paper Fed continues to appear on the LCD please contact Brother Customer Service from "Contact Us".
-
If a different message is displayed on the LCD refer to "FAQs & Troubleshooting" for information on the error message you are receiving.
