HL-L9310CDW
FAQs & Troubleshooting |
Carry out calibration to improve the color density
The output density and print position for each color may vary depending on the machine's environment, such as temperature and humidity.
Calibration helps you improve the color density.
NOTE: The screens may differ depending on operating system being used and your Brother machine.
- If you print by using the Direct Print feature or the Windows printer driver, click here to see how to perform the calibration from the control panel.
-
(macOS v10.10 - v10.15)
If you print by using the Macintosh printer driver, click here to see how to perform the calibration from the status monitor.
Calibration from the control panel:
Follow the steps listed below to carry out calibration from the control panel.
-
Press
 (Toner) => Calibration => Calibrate.
 -
Press Yes to confirm.
Calibration starts automatically, and will take a few minutes -
Press
 (Home).
Calibration from the status monitor:
Follow the steps listed below to carry out calibration from the status monitor.
-
For macOS v10.10 - v10.15:
- Run System Preferences, select Printers & Scanners, and then select the machine.
- Click Options & Supplies.... Click the Utility tab, and then click Open Printer Utility. The Status Monitor will start up.
-
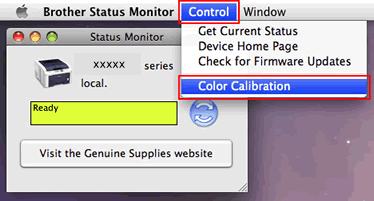
Now the status monitor is turned on.
-
Go to the menu bar, click Control => Color Calibration.

- Color Calibration dialog appears. Read the message and click OK. The machine starts color calibration and then the printer driver attempt to get the calibration data from the machine.
Content Feedback
To help us improve our support, please provide your feedback below.
