MFC-4800
FAQs & Troubleshooting |
I'm using Windows XP. When I try to install PaperPort® 8.0, I get an error message "PaperPort Setup Wizard Terminated". I can find PaperPort® 8.0 in "Add or Remove Programs", however I can't remove it. What can I do?
This issue may be caused by an insufficient amount of memory installed on your computer. PaperPort® requires a minimum of 128MB of memory with 256MB recommended. If you have less than 128MB, Brother recommends that you add more memory to your computer. If you try to reinstall PaperPort® without adding additional memory to your computer, the same situation will occur. To correct the situation, follow the instructions below:
Verify the amount of installed memory:
-
Click the "Windows" key plus the "E" key on your keyboard to open MY COMPUTER. The "Windows" key is the key with the Windows logo on it.

-
Under "Folders" on the left, right click MY COMPUTER and then click on PROPERTIES.
-
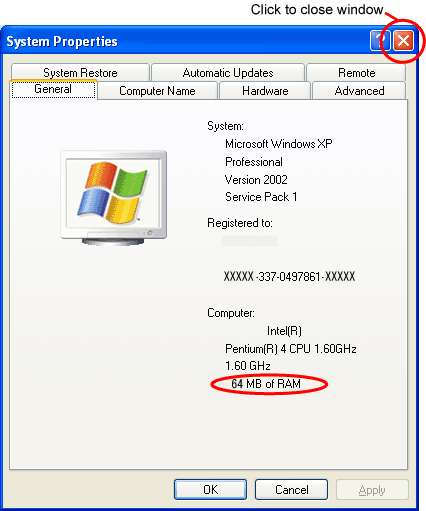
On the General tab you will find the amount of memory installed on the computer at the bottom of the window.

-
To close the System Properties and My Computer windows, click the red "X" on the upper right side of each windows.
Remove PaperPort® 8.0:
To remove PaperPort® 8.0 from your computer, you will need to download and run an uninstall utility. Follow the steps below:
- Make a temporary folder on your desktop to save the downloaded self-extracting file.
- Right click on a blank area on your desktop, click NEW and then click FOLDER. A folder titled "New Folder" will appear on your desktop.
- To rename the new folder, right click the folder, click RENAME from the drop down options and type Brother.
-
Click here to download the file. "File Download" will appear.
-
Click Save. "Save as" will appear.
-
Click Desktop, double click the Brother folder and then click Save.
If "Download Complete" appears, click CLOSE. -
On your desktop, double click the Brother folder and locate the executable file named PP_Clr(.EXE may also appear at the end of the file name.)
-
Double click PP_Clr. "Zip Self-Decompression" will appear.
-
Leave the file name in the window as is and click DECOMPRESS(X). "The decompression process was successful" will appear.
-
Click OK.
-
Two files named pp_clean (.exe-MFC icon) and pp_clean (.ini-Notepad icon) should now be in the Brother folder.
-
Double click on the file pp_clean (exe-MFC icon) to start the program.
-
Click on the START button. "Working..." will appear.
-
Click on the FINISH button.
-
To close all open windows, click the red "X" on the upper right corner of each window.
-
Restart your PC.
Once you have the recommended amount of memory installed on your computer, you will need to reinstall the Brother software and drivers by following the instructions in the Quick Setup Guide. If you do not have the Quick Setup Guide, you can download it from the download section for this model on this website.
If you do not want to add more memory to your computer or do not need PaperPort®, then you must follow the steps below to complete the full uninstall procedure. You can then download and install the Brother printer and scanner drivers for Windows XP from the download section of this website.
Remove ScanSoftTM PaperPort® 8.0 from the All Programs menu:
Click START, click PROGRAMS or ALL PROGRAMS, right click ScanSoft PaperPort8.0 and then click DELETE.
Remove the My PaperPort Documents folder from the computer:
- Click the "Windows" key plus the "E" key on your keyboard to open MY COMPUTER. The "Windows" key is the key with the Windows logo on it.

-
Under "Folders" on the left, click MY DOCUMENTS, right click on the My PaperPort Documents folder and then click DELETE.
Remove the PaperPort icon from the Printers and Faxes folder:
-
Click the "Windows" key plus the "E" key on your keyboard to open MY COMPUTER. The "Windows" key is the key with the Windows logo on it.

-
Under "Folders" on the left, click CONTROL PANEL, then click on PRINTERS AND FAXES.
-
Right click on PaperPort and then click DELETE.
-
Click YES.
Remove the SmartUI Shortcut from the Startup folder in All Programs:
- Click START, click Programs or All Programs, click STARTUP, right click on SmartUI and then click DELETE.
-
"Confirm Shortcut Delete" will appear. Click DELETE SHORTCUT.
Remove the SmartUI icon from your desktop:
- Right click on the SmartUI icon on your desktop and click DELETE.

-
"Confirm Shortcut Delete" will appear. Click DELETE SHORTCUT.
