HL-4570CDWT
FAQs & Troubleshooting |
Colors are light or unclear on the whole page

Please check the following points to solve the problem:
NOTE: Illustrations shown below are from a representative product and operating system, and may differ from your Brother machine and operating system.
- Make sure toner save mode is off in the control panel or the printer driver. Click here to see the details of how to change the toner save mode setting.
- Make sure that the media type setting in the driver matches the type of paper you are using.
- Choose the Vivid option for Color Mode in the printer driver.
For Windows printer driver:
- Open Printing Preferences. Click here to see the details of how to open Printing Preferences.
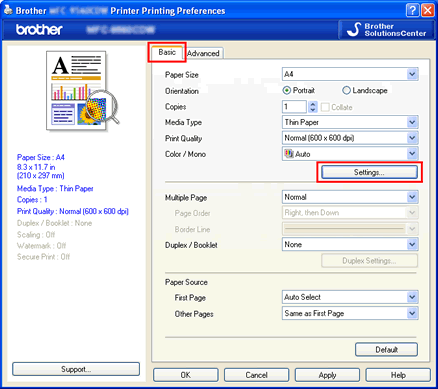
- Click the Basic tab and click Settings....
- Choose the Vivid option and click OK.
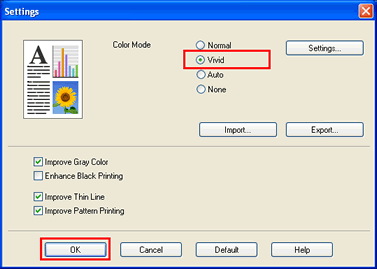
- Click Apply => OK.
- Open Printing Preferences. Click here to see the details of how to open Printing Preferences.
- Click Advanced....
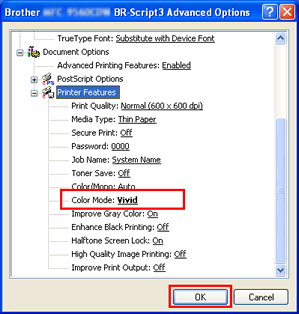
- Choose Vivid for Color Mode in Printer Features, and click OK.
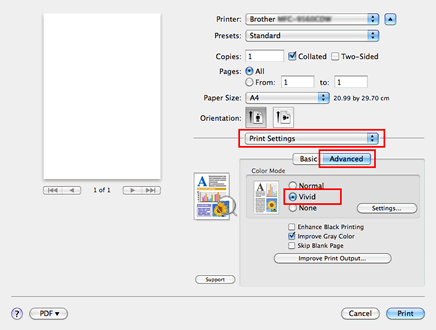
- Open the Print dialog. Click here to see the details of how to open Print dialog.
- Choose Print Settings from the pane pop-up menu. Click the Advanced tab and choose the Vivid option.
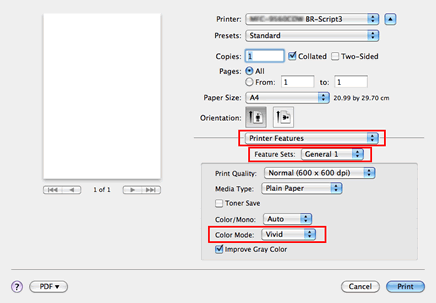
- Open the Print dialog. Click here to see the details of how to open Print dialog.
- Choose Printer Features from the pane pop-up menu. Choose General 1 (Set 2 for Mac OS X 10.4) for Feature Sets, and choose Vivid for Color Mode.
- If shaded areas look dull, disable the Improve Gray Color mode of the printer driver.
For Windows printer driver:
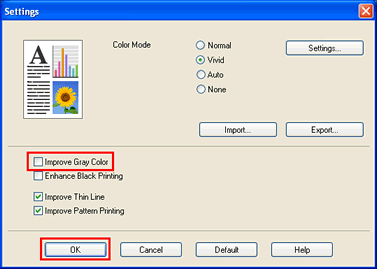
- Open Printing Preferences. Click the Basic tab and click Settings....
- Remove the check from the Improve Gray Color check box, and click OK.
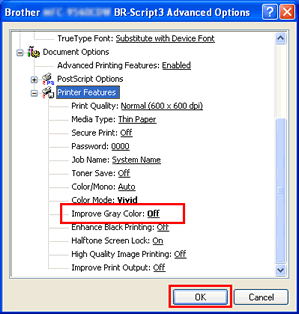
- Open Printing Preferences. Click Advanced....
- Choose Off for Improve Gray Color in Printer Features, and click OK.
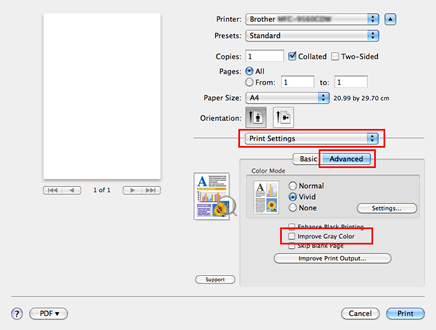
- Open the Print dialog. Choose Print Settings from the pane pop-up menu and click the Advanced tab.
- Remove the check from the Improve Gray Color check box.
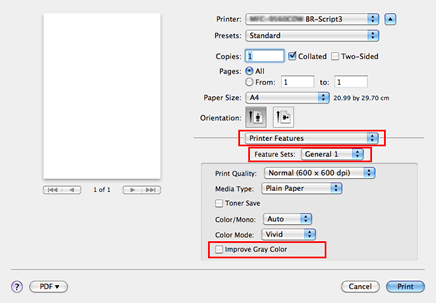
- Open the Print dialog. Choose Printer Features from the pane pop-up menu and choose General 1 (Set 2 for Mac OS X 10.4) for Feature Sets.
- Remove the check from the Improve Gray Color check box.
- If a printed black graphic is too light, choose Enhance Black Printing mode in the printer driver.
For Windows printer driver:
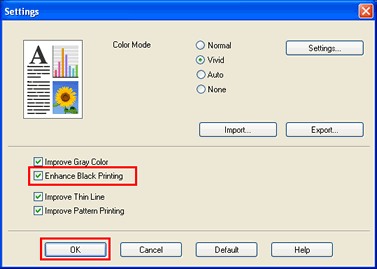
- Open Printing Preferences. Click the Basic tab and click Settings....
- Check the Enhance Black Printing option, and click OK.
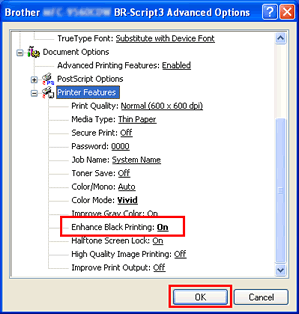
- Open Printing Preferences. Click Advanced....
- Choose On for Enhance Black Printing in Printer Features, and click OK.
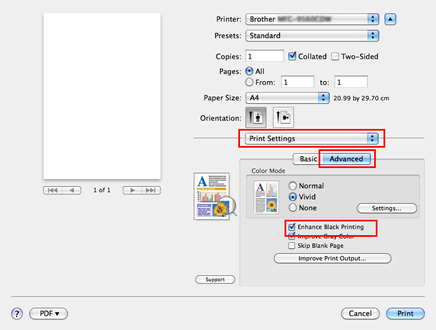
For Mac OS X CUPS printer driver:
- Open the Print dialog. Choose Print Settings from the pane pop-up menu and click the Advanced tab.
- Check the Enhance Black Printing option.
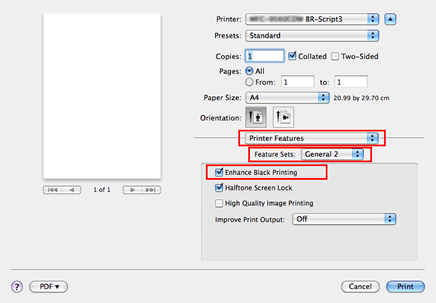
- Open the Print dialog. Choose Printer Features from the pane pop-up menu and choose General 2 (Set 3 for Mac OS X 10.4) for Feature Sets.
- Check the Enhance Black Printing option.
- Perform the calibration. Click here to see the details of how to carry out calibration.
- Shake all four toner cartridges gently.
- Wipe the scanner windows with a dry lint-free soft cloth. Click here to see the details of how to clean the inside of the machine.
- The toner cartridge may be damaged. Put in a new toner cartridge as follow:
- Click here to print the chart. [345KB/ PDF]
- Compare your printed document with the printed chart to identify the color causing the problem.
- Replace the toner cartridge of the color. Click here to see the details of how to replace the toner cartridge.
- The drum unit may be damaged. Put in a new drum unit. Click here to see the details of how to replace the drum unit.
- The belt unit may be damaged. Put in a new belt unit. Click here to see the details of how to replace the belt unit.
Content Feedback
To help us improve our support, please provide your feedback below.
