MFC-J825DW
常見問題&故障排除 |
Improve poor print quality.
Brother strongly recommends that customers use only genuine Brother ink for best results. Using non-Brother supplies may affect the hardware performance, print quality and machine reliability since the ink formulation in genuine Brother ink cartridges prevent smearing and clogging of the print head. The Brother limited warranty does not apply to any problem that was caused by the use of third party ink and/or cartridges.
> Click here for more information about Genuine Brother Supplies.
Cleaning the four color print heads (black, cyan, magenta and yellow) and/or adjusting the vertical alignment may improve the print quality. To determine if the alignment needs to be set and to identify which print heads need to be cleaned, print the Print Quality Check sheet and the Alignment Check sheet.
Below are instructions for improving the following:
- Horizontal lines in text or graphics
- Blank text
- Blurred or faded text and images
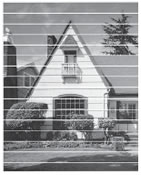
- If your printed pages have a horizontal line in the text or graphics (as shown in the illustration below) or blank text, some of the nozzles may be clogged and need to be cleaned. Go to Section 1 for instructions on how to print the Print Quality Check sheet and clean the clogged print head.
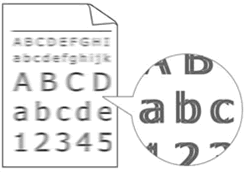
- If your printed pages have text that become blurred or images that become faded (as shown in the illustration below), you may need to adjust the print alignment. Go to Section 2 for instructions on how to print the Alignment Check sheet and adjust the print alignment.
Section 1: Checking the print quality and cleaning the print head
*If your Brother machine has a touchscreen, please click here and follow the steps under "For Touchscreen models".
- Press Menu.
- Press the Up or Down arrow key or the dial pad to choose Ink or Ink Management and press OK.
- Press the Up or Down arrow key or the dial pad to choose Test Print and press OK.
- Press the Up or Down arrow key or the dial pad to choose Print Quality and press OK.
- Press Color (Colour) Start. The machine will start printing the Print Quality Check sheet.
- Once it prints out, check the quality of the four color blocks on the sheet.
- The LCD will ask you if the print quality is OK.
Do one of the following based on the print quality of the check sheet:
- If all lines are clear and visible, choose Yes to finish the Print Quality check and go to STEP 13.
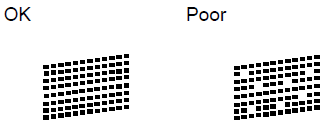
- If you can see missing short lines as shown below, choose No and go to STEP 8.

- If all lines are clear and visible, choose Yes to finish the Print Quality check and go to STEP 13.
- The LCD will ask you if the print quality is OK for Black and each of the three colors. Choose Yes or No depending on the print quality of each color.
- The LCD will ask you if you want to start cleaning. Choose Yes. The machine will start cleaning the necessary print head.
- After the cleaning is finished, press Color (Colour) Start. The machine will start printing another Print Quality Check sheet.
- Once it prints out, check the quality of the four color blocks on the sheet.
- The LCD will ask you if the print quality is OK.
Do one of the following based on the print quality of the check sheet:
- If all lines are clear and visible, choose Yes to finish the Print Quality check and go to STEP 13.
- If the print quality continues to be poor and you have tried to clean the print head less than five times, choose No and return to STEP 8 to repeat the print head cleaning. You should complete the Print Quality Check sheet and print head cleaning process up to five times.
- If the print quality continues to be poor and you have tried cleaning the print head up to five times, press Stop/Exit and contact Brother Customer Service from "Contact Us".
- If all lines are clear and visible, choose Yes to finish the Print Quality check and go to STEP 13.
<For Touchscreen models>
- Press the Left or Right arrow key to display Ink. (This step might be skipped in some models.)
- Press
 (Ink).
- Press the Up or Down arrow key to display Test Print. (This step might be skipped in some models.)
- Press Test Print.
- Press Print Quality.
- Press Color (Colour) Start or Start. The machine will start printing the Print Quality Check sheet.
- Once it prints out, check the quality of the four color blocks on the sheet.
- The LCD will ask you if the print quality is OK.
Do one of the following based on the print quality of the check sheet:
- If all lines are clear and visible, press Yes to finish the Print Quality check and go to STEP 14.
- If you can see missing short lines as shown below, press No and go to STEP 9.
- If all lines are clear and visible, press Yes to finish the Print Quality check and go to STEP 14.
- The LCD will ask you if the print quality is OK for Black and each of the three colors. Press Yes or No depending on the print quality of each color.
- The LCD will ask you if you want to start cleaning. Press Color (Colour) Start. The machine will start cleaning the necessary print head.
- After the cleaning is finished, press Color (Colour) Start. The machine will start printing another Print Quality Check sheet.
- Once it prints out, check the quality of the check sheet.
- The LCD will ask you if the print quality is OK.
Do one of the following based on the print quality of the check sheet.
- If all lines are clear and visible, press Yes to finish the Print Quality check and go to STEP 14.
- If the print quality continues to be poor and you have tried to clean the print head less than five times, press No and return to STEP 9. You should complete the Print Quality check and print head cleaning process up to five times.
- If the print quality continues to be poor and you have tried cleaning the print head up to five times, press Stop/Exit and contact Brother Customer Service from "Contact Us".
- If all lines are clear and visible, press Yes to finish the Print Quality check and go to STEP 14.
Section 2: Checking the Print Alignment
*If your Brother machine has a touchscreen, please click here and follow the steps under "For Touchscreen models".
- Press Menu.
- Press the Up or Down arrow key or the dial pad to choose Ink or Ink Management and press OK.
- Press the Up or Down arrow key or the dial pad to choose Test Print and press OK.
- Press the Up or Down arrow key or the dial pad to choose Alignment and press OK.
- Press Black (Mono) or Color (Colour) Start. The machine will start printing the Alignment Check sheet.
- For the "A" pattern, enter the number of the test print that has the least visible vertical stripes (1-9).
- For the "B" pattern, enter the number of the test print that has the least visible vertical stripes (1-9).
- For the "C" pattern, enter the number of the test print that has the least visible vertical stripes (1-9).
- For the "D" pattern, enter the number of the test print that has the least visible vertical stripes (1-9).
- Press Stop/Exit.
<For Touchscreen models>
- Press the Left or Right arrow key to display Ink. (This step might be skipped in some models.)
- Press
 (Ink).
- Press the Up or Down arrow key to display Test Print. (This step might be skipped in some models.)
- Press Test Print.
- Press Alignment.
- Press Black (Mono) Start, Color (Colour) Start or Start. The machine will start printing the Alignment Check sheet.
- For the "A" pattern, press the number of the test print that has the least visible vertical stripes (1-9).
- For the "B" pattern, press the number of the test print that has the least visible vertical stripes (1-9).
- For the "C" pattern, press the number of the test print that has the least visible vertical stripes (1-9).
- For the "D" pattern, press the number of the test print that has the least visible vertical stripes (1-9).
- Press Stop/Exit.
If the print quality continues to be poor, go to Section 1 to clean the print head.