The technical term for the lights on the front of your Brother machine is Light Emitting Diodes (LED's).
This FAQ explains the meaning of those different LED indications.
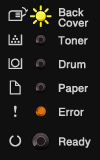
When all the LEDs are off, the power switch is off.
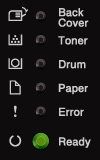
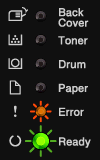
When the Ready LED is dimmed (Green), the printer is in the Sleep mode (Power Save mode) or the Deep Sleep mode (reducing more power consumption than Sleep mode). Pressing Go wakes up the printer from the Sleep mode to the Ready mode.
Deep Sleep The machine is in the Deep Sleep mode, reducing more power consumption than Sleep mode. Receiving a print job will automatically wake up the achine to start printing.
Cooling Down The machine is cooling down. Wait for a few seconds until the inside of the machine has cooled down.
Receiving Data The machine is either receiving data from the computer or processing data in the memory.
Data Remaining There is remaining print data in the machine's memory. If the Ready LED is flashing for a long time and nothing has printed, press Go to print the remaining data in the memory.
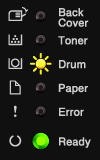
Drum End Soon The drum unit will need to be replaced soon. We recommend that you get a new drum unit to replace the current one. Please refer to the FAQ "Replace Drum".
If the toner cartridge is placed in the machine without the drum unit, put the toner cartridge into the drum unit, and then reinstall the drum unit and toner cartridge assembly in the machine.
Cover is Open Close the fuser cover located behind the back cover of the machine. Make sure paper is not jammed inside the back of the machine, and then close the fuser cover and press Go.
No Tray The machine cannot detect the standard paper tray. Re-install the standard paper tray, or ensure it is installed correctly.
Jam MP Tray / Jam Tray 1 or Jam Tray 2 / Jam Inside Clear the paper jam. Please refer to the FAQ "Clear paper jams". If the machine does not start printing, press Go. If the toner cartridge is placed in the machine without the drum unit, put the toner cartridge into the drum unit, and then reinstall the drum unit and toner cartridge assembly in the machine.
Size Error DX The paper size defined in the printer driver is not available for automatic 2-sided (duplex) printing. Press Cancel. Choose a paper size which is supported by the duplex tray. The paper in the tray is not correct size and is not available for automatic 2-sided (duplex) printing. Load the correct size of paper in the tray. The paper size you can use for automatic 2-sided (duplex) printing is A4, Letter, Legal or Folio.
Size Mismatch Put the same size paper in the paper tray that is selected in the printer driver, and then press Go, or choose the size of paper that you loaded in the paper tray.
Log Access Error (HL-5450DN only) The machine could not access the print log file in the server. Contact your administrator to check the Store Print Log to Network settings.
Access Denied (HL-5450DN only) Printing is restricted by Secure Function Lock 2.0. Contact your administrator to check your Secure Function Lock Settings.
Limit Exceeded (HL-5450DN only) The printing limit set by Secure Function Lock 2.0 was reached. Contact your administrator to check your Secure Function Lock Settings.
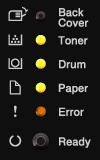
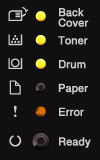
The Back Cover LED is on. The Toner LED is on. The Drum LED is on. The Error LED is on.
Meaning of LED Indication:
DIMM Error (HL-5450DN only) The DIMM (Dual In-Line Memory Module) is not installed correctly. Or the DIMM is broken or does not meet the required specifications. Turn off the machine and remove the DIMM. Please refer to the FAQ "Install additional memory". Confirm that the DIMM meets the required specifications. Re-install the DIMM correctly. Wait a few seconds, and then turn the machine on again. If this indication continues, replace the DIMM with a new one.
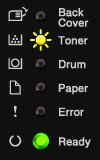
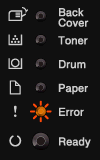
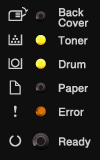
The Back Cover LED is flashing. The Toner LED is flashing. The Drum LED is flashing. The Paper LED is flashing. The Error LED is flashing. The Ready LED is flashing.
Meaning of LED Indication:
SERVICE CALL
If you see the service call indication, turn off the power switch, and then turn it back on and try to print again.
If the error is not cleared after turning the power switch off and then back on, press Go and Cancel together, the LEDs will light up as the images below to identify the error. Report the error status to your dealer or Brother Customer Service.
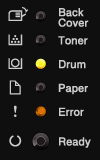
Main PCB failure: The Toner LED is on. The Drum LED is on. The Error LED is on.
Fuser unit failure: The Toner LED is on. The Error LED is on.
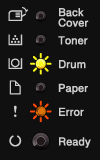
Laser unit failure: The Drum LED is on. The Error LED is on.
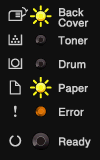
Main motor failure: The Paper LED is on. The Error LED is on.
High voltage failure: The Drum LED is on. The Paper LED is on. The Error LED is on.
FAN failure: The Error LED is on.
Zero Cross Error: The Toner LED is on. The Drum LED is on. The Paper LED is on. The Error LED is on.


 Main PCB failure:
 Fuser unit failure:
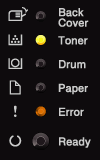
 Laser unit failure:
 Main motor failure:
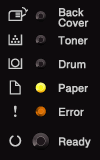
 High voltage failure:
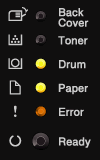
 FAN failure:
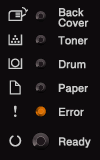
 Zero Cross Error: