VR
FAQs & Troubleshooting |
How do I adjust the tension of the bobbin thread ?
This procedure describes how to adjust the thread tension if the correct thread tension was not used.
-
Be sure to check the tension of the bobbin thread each time that the bobbin is changed.
Depending on the bobbin thread type and whether a prewound bobbin is used, the tension of theobbin thread may differ. For example, when replacing an empty prewound bobbin with one of thesame type, be sure to check the tension of the bobbin thread and adjust the tension if necessary. - Be sure to adjust the tension of the bobbin thread before adjusting the tension of the upper thread.
-
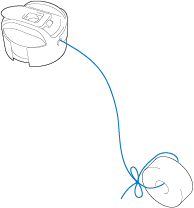
Tie the included weight to the end of the thread extending from the bobbin case.

- Different weights are used to adjust prewound bobbins and metal bobbins. Pre-wound bobbins: Only weight (L) Metal bobbins: Weight (L) and weight (S)
- If necessary, refer to “Disassembling and cleaning the tension unit” on page 167 for reassembling the tension unit.
-
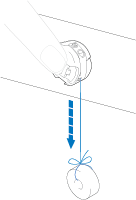
As shown in the illustration, hold the bobbin case against a smooth vertical surface.

If the thread with the weight attached is slowly pulled out, the thread tension is correct.
-
Use the included standard screwdriver to turn the tension-adjusting screw and adjust the thread tension.

(1) Tension-adjusting screw (2) Tighter (3) Looser - After making the adjustments, try embroidering to check the thread tension.
Content Feedback
To help us improve our support, please provide your feedback below.
