LS-2125/2160
FAQs & Troubleshooting |
How do I sew a blind hem?
Secure the bottoms of skirts and pants with a blind hem. Sew a blind hem according to the following procedure.
Be sure to turn off the main power before replacing the pressor foot. Otherwise, injuries may occur if Start/Stop button is accidentally pressed and the machine starts sewing.
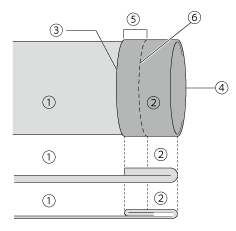
When the size of cylindrical pieces is too small to slide onto the arm or the length is too short, the fabric will not feed and desired results may not achieved.
-
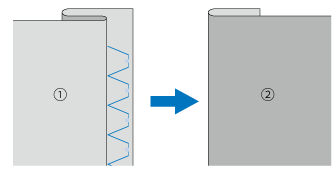
Reverse the skirt or pants.

 Wrong side of fabric
 Right side of fabric
 Edge of fabric
 Bottom side
 -
Fold the fabric along the desired edge of the hem, and press.

<Seen from the side> Wrong side of fabric
Right side of fabric
Edge of fabric
Desired edge of hem
<Thick fabric>
<Normal fabric> -
Use a chalk to mark on the fabric about 5mm(3/16 inch) from the edge of the fabric, and then baste it.
<Seen from the side> Wrong side of fabric
Right side of fabric
Edge of fabric
Desired edge of hem
 5mm (3/16 inch)
 Basting
<Thick fabric>
<Normal fabric> -
Fold back the fabric inside along the basting.
<Seen from the side>
Wrong side of fabric
Right side of fabric
Edge of fabric
Desired edge of hem
5mm (3/16 inch)
Basting
 Basting point
<Thick fabric>
<Normal fabric> -
Unfold the edge of fabric, and position the fabric with the wrong side facing up.

<Seen from the side> Wrong side of fabric
Right side of fabric
Edge of fabric
Desired edge of hem
Basting point
Basting
<Thick fabric>
<Normal fabric> -
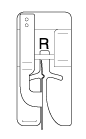
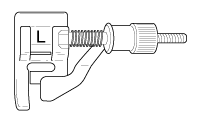
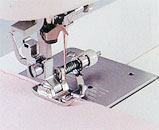
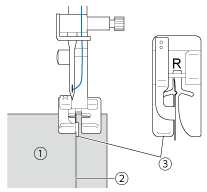
Attach Blind Stitch Foot "R" or the optional accessory Blind Stitch Foot "L".
-
Select a stitch. ( ex.

 )
) - Depending on your machine, remove the flat bed attachment and make free-arm sewing possible.
-
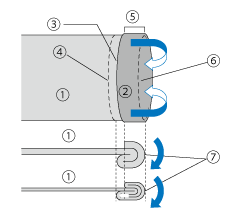
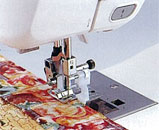
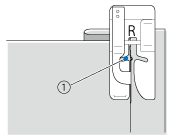
Slide the part that you wish to sew onto the arm, make sure that the fabric feeds correctly, and then start sewing.
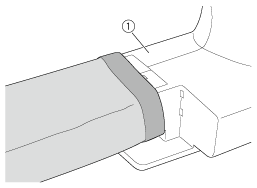 Arm
Arm
>> Blind Stitch Foot "R" ⇒ Step 10
>> Blind Stitch Foot "L" ⇒ Step 14
Blind Stitch Foot "R" -
Position the fabric with the edge of the folded hem against the guide of the presser foot, and then lower the presser foot lever.
 Wrong side of fabric
Fold of hem
Guide -
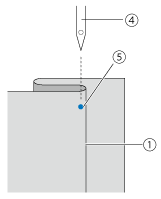
Adjust the stitch width until the needle slightly catches the fold of the hem.
 Needle drop point
When you change the needle drop point, raise the needle, and then change the stitch width. Thick fabric
Normal fabric-
If the needle catches too much of the hem fold
<Thick fabric>
<Normal fabric>
Wrong side of fabric
Right side of fabric
The needle is too far to the left.
Press to decrease the stitch width so that the needle slightly catches the fold of the hem.
 -
If the needle does not catch the hem fold
<Thick fabric>
<Normal fabric>
Wrong side of fabric
Right side of fabric
The needle is too far to the right.
Press to increase the stitch width so that the needle slightly catches the fold of the hem.
-
If the needle catches too much of the hem fold
- Sew with the fold of the hem against the presser foot guide.
-
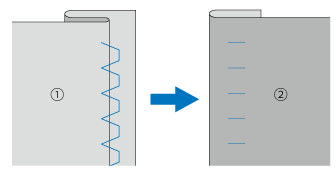
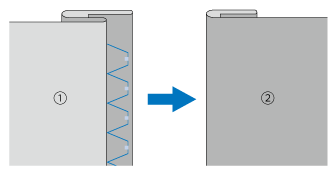
Remove the basting stitching and reverse the fabric.
Wrong side of fabric
Right side of fabric
***** Procedure of Blind Stitch Foot "R" is Ends here. *****
Blind Stitch Foot "L" -
Position the needle the distance you want the stitch to be from the edge of the fabric, and then lower the needle in that position.
Turn the foot guide screw and carefully adjust to guide the fabric.
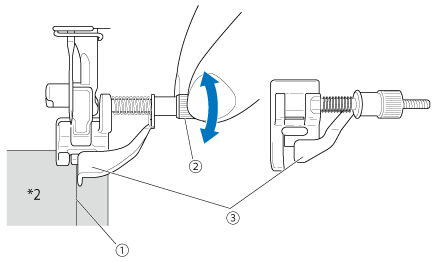
 folded hem
screw
guide
needle
needle position
*1 Right side of fabric
*2 Wrong side of fabric - Lower the foot.
- Sew with the fold of the hem against the presser foot guide.
-
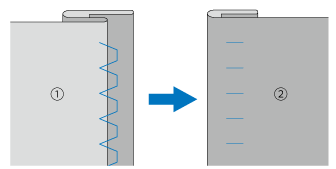
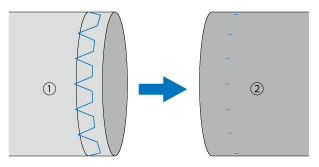
Remove the basting stitching and reverse the fabric.
Wrong side of fabric
Right side of fabric