Innov-is NV180
FAQs & Troubleshooting |
Upper thread breaks.
When the upper thread breaks, check the following possible causes and solutions.
-
The upper thread was not threaded correctly.
(For example, the spool is not installed correctly, the spool cap is too big for the spool being used, or the thread has come out of the needle bar thread guide.)
Rethread the machine correctly.
For details on threading the upper thread, refer to "How do I thread the machine (Threading the upper thread)?".-
Slide the spool cap as far as possible to the right, as shown, with the rounded side on the left.

-
Choose a spool cap that best fits the size of spool being used.

If the spool or the spool cap is not positioned correctly, the thread may become tangled around the spool pin or the needle may break.
-
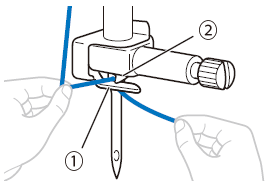
Make sure that the thread is passed through to the left of the tab of the needle bar thread guide when threading the upper thread.

(1) Needle bar thread guide
(2) Tab
-
Slide the spool cap as far as possible to the right, as shown, with the rounded side on the left.
-
There are knots or tangles in the thread.
Remove any knots or tangles.
-
The selected needle is not appropriate for the thread being used.
Sewing : Select the needle that is appropriate for the type of thread being used.
For more information on the proper needle for the selected thread, refer to "Combination of fabric, thread and needle".
-
The improper needle or thread is used for the selected fabric.
Sewing : Select the needle and thread that are appropriate for the type of fabric you are using.
For more information on the proper needle and thread for the selected fabric, refer to "Combination of fabric, thread and needle".
-
Upper thread tension is too tight.
Adjust the thread tension to the proper tension.
For details on adjusting the thread tension, refer to the followings.
Sewing : Refer to "How to adjust the thread tension".
Embroidery : Refer to "How do I adjust thread tension for embroidering?".
-
Thread is tangled.
Use scissors, etc., to cut the twisted thread and remove it from the race, etc.
-
The needle was bent or the tip of the needle was dull.
Replace it with a new one.
For details on replacing the needle, refer to "How do I change the needle ?".
-
Needle was installed incorrectly.
Reinstall the needle correctly.
Refer to "How do I change the needle ?".
-
There are scratches around the opening in the needle plate.
Replace the needle plate. To obtain parts, contact your authorized Brother dealer.
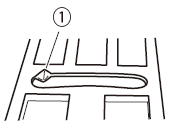
*There is a notch on the left side of the opening in the needle plate. This is not a scratch.
(1) Notch
-
There are scratches around the opening in the presser foot.
Replace the presser foot. To obtain parts, contact your authorized Brother dealer.
-
There are scratches on the bobbin case.
Replace the bobbin case. To obtain parts, contact your authorized Brother dealer.
-
A bobbin designed specifically for this machine is not used.
Incorrect bobbins will not work properly.
Be sure to use the included bobbins (part code: SA156, SFB: XA5539-151) or the same type.
SA156 is Class 15 type bobbin.
The bobbin's height is 11.5 mm (approx. 7/16 inch).
(1) 11.5 mm (approx. 7/16 inch)
-
Using improper needle, thread or the fabric prepared insufficiently for embroidering.
Embroidery : Use a ball point needle 75/11 for embroidery.
Use embroidery thread and embroidery bobbin thread.
Attach a stabilizer material for embroidery to the fabric.
-
While sewing, the thread became knotted or tangled.
Rethread upper thread and the bobbin.
For details on threading the machine and setting the bobbin, refer to "How do I thread the machine (Threading the upper thread)?" and "How do I set the bobbin?".
-
Thread is weak, dry rotted, or of poor quality.
Try sewing with different thread of good quality.
-
Stabilizer is not attached to fabric being embroidered.
Use a stabilizer material for embroidery.
Refer to "Attaching Iron-on Stabilizers (Backing) to the Fabric" described in "How do I hoop the fabric in the embroidery frame?".
Content Feedback
To help us improve our support, please provide your feedback below.
