HL-5270DN
FAQs & Troubleshooting |
Print on both sides of the paper.
[Guidelines for printing on both sides of the paper]
- If the paper is thin, it may wrinkle.
- If paper is curled, straighten it and then put it back in the paper tray or the MP tray.
- If the paper is not feeding properly, it may be curled. Remove the paper and straighten it.
- When you use the manual 2-sided(duplex) function, it is possible that there may be paper jams or poor print quality.
Automatic 2-Sided(Duplex) printing
- The screens in this section are from Windows XP. The screens on your PC may vary depending on your operating system.
- Use A4, Letter or Legal size paper when you use the automatic 2-sided(duplex) printing function.
- Make sure that the back cover is closed.
- Make sure that the duplex tray is installed correctly in the printer.
- If paper is curled, straighten it and then put it back in the paper tray.
- You should use regular paper. Do not use bond paper or thin paper.
- Put paper in the paper tray or MP tray.
- For the Windows printer driver
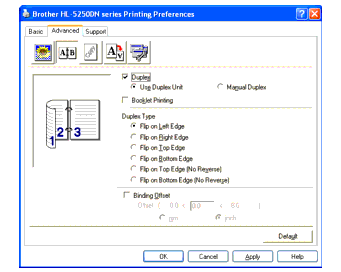
- Open the Properties dialog box in the printer driver.
- From the General tab, click the Printing Preferences icon.
- From the Advanced tab, click the Duplex icon.
- Make sure that Use Duplex Unit has been chosen.
- Click OK. The printer will print on both sides of the paper automatically.
- For the BR-Script Driver
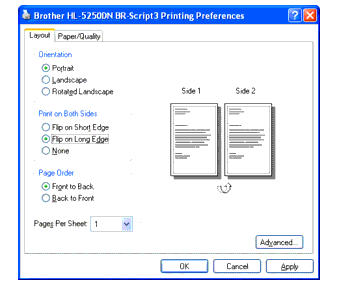
- Open the Properties dialog box in the printer driver.
- From the General tab, click the Printing Preferences icon.
- From the Layout tab, choose Orientation, Print on Both Sides (Duplex) and Page Order.
- Click OK. The printer will print on both sides of the paper automatically.
Manual 2-Sided(Duplex) Printing
- The BR-Script printer driver (PostScript® 3™ emulation) does not support manual 2-sided(duplex) printing.
- Use plain paper or recycled paper. Do not use bond paper.
[Manual 2-sided(duplex) printing from the paper tray]
-
In the printer driver choose the Advanced tab, then choose the Manual Duplex printing mode, and from the Basic tab choose the Paper Source to be Tray1.
-
Send the data to the printer.
The printer will automatically print all the even-numbered pages on one side of the paper first. -
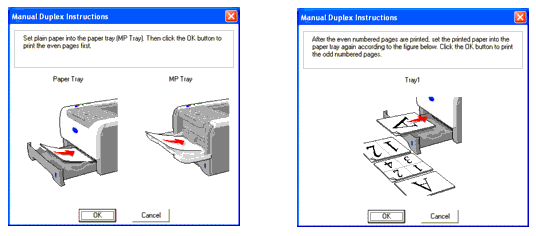
Remove the printed even-numbered pages from the output tray and put them back in the paper tray with the side to be printed on (blank side) face down. Follow the instructions on the PC screen.
-
The printer will now automatically print all the odd-numbered pages on the other side of the paper.
- If you choose the Paper Source to be Auto Select, put the printed even-numbered pages in the MP tray.
- When you put paper in the paper tray, first empty the tray. Next, put the printed pages in the tray, with the printed side face up. (Do not add the printed pages to the top of a stack of unprinted paper.)
[Manual 2-sided(duplex) printing from the MP tray]
Before putting the sheets back in the MP tray, you will have to straighten them or you may get paper jams.
-
From the Advanced tab choose the Manual Duplex printing mode, and from the Basic tab choose the Paper Source to be MP Tray.
-
Put the paper in the MP tray with the side to be printed on first facing up. Follow the instructions on the PC screen. Repeat this step until you have printed all the even-numbered pages.
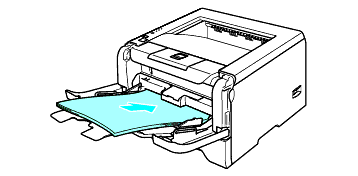
-
Remove the printed even-numbered pages from the output tray and then, in the same order, put them back into the MP tray. Put the paper with the side to be printed on (the blank side) face up. Follow the instructions on the PC screen.
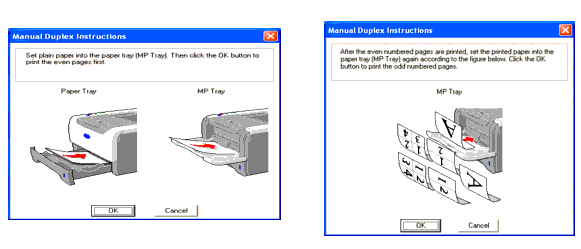
-
Repeat Step3 until you have printed all the odd-numbered pages on the other side of the paper.
Paper orientation for manual 2-sided(duplex) printing
The printer prints the second page first.
If you print 10 pages on 5 sheets of paper, it will print page 2 and then page 1 on the first sheet of paper. It will print page 4 and then page 3 on the second sheet of paper. It will print page 6 and then page 5 on the third sheet of paper, and so on.
When doing manual 2-sided(duplex) printing, the paper must be put in the paper tray in the following way:
For the paper tray:
- Put the side to be printed on face down with the leading edge (top) of the paper at the front of the tray.
- To print on the second side, put the paper face up, with the leading edge (top) of the paper at the front of the tray.
- If letterhead paper is used, put the paper in the tray with the heading face up at the front of the tray.
- To print on the second side, put the heading face down at the front of the tray.
For the multi-purpose tray (MP tray):
- Put the side to be printed on face up with the leading edge (top) of the paper in first.
- To print on the second side, put the paper face down, with the leading edge (top) of the paper in first.
- If letterhead paper is used, put it in with the heading face down and in first.
- To print on the second side, put the heading face up and in first.
