QL-820NWB
FAQs & Troubleshooting |
How do I connect the printer to my mobile device using the Infrastructure mode or the Wireless Direct mode?
|
Do one of the following:
> If you have a wireless router/access point:
> If you do not have a wireless router/access point:
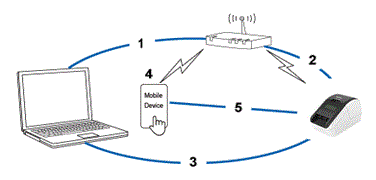
If you have a wireless router/access point:
Connect using a wireless router/access point (Infrastructure mode)
If you have a wireless router/access point, do the following:
(e.g. QL-820NWB)
- Connect your printer to your wireless router/access point.
- Connect your mobile device to the same wireless router/access point. (You can skip this step if your device is already connected to a Wi-Fi® network.)
- You can now print from your mobile device wirelessly.
Set the Infrastructure Mode using iPrint&Label
Make sure your printer's firmware version is 1.21 or later. To confirm your printer's firmware version, see "How to identify the printer's firmware version".
To update the firmware, download the Firmware Update Tool from the [Downloads] section of this website.
-
Do the following:
▪ Android™: go to Step 2.
▪ iPhone, iPad or iPod touch: Activate the Wi-Fi function as follows:
- On your mobile device, tap [Settings] - [Wi-Fi], and then slide the toggle button to turn the Wi-Fi function On.
-
Select your printer's SSID from the list to connect the mobile device and the printer.
If your printer's SSID cannot be found in the list, go to "Connect using Wireless Direct".
-
Start iPrint&Label and select your printer from [Settings] - [Printer].
If your printer cannot be found in the list, go to "Connect using Wireless Direct".
- Tap [Settings] - [Wi-Fi Network Setup].
- Enter the SSID and password of your wireless access point/router.
- Tap [Connect] and do not leave this screen until the setup is complete.
Connect using a wireless router/access point (WPS)
If your wireless router/access point supports WPS (Wi-Fi Protected Setup™), do the following:
If you cannot use the wireless router/access point, go to "Connect the printer to the wireless router/access point using your computer".
-
First, confirm that your wireless router/access point has the WPS symbol, and place the printer close to the wireless router/access point.

-
Turn on the printer. -
QL-810W: Press and hold the [WPS] button for one second. -
QL-820NWB: Press the [Menu] button and the [  ] button to select the [WLAN] menu, and then press the [OK] button. Press the [] button to select the [WPS Button Push] menu, and then press the [OK] button.
-
-
Press the WPS button on your WLAN router/access point.
-
When the connection is established, the Wi-Fi (  ) LED is lit blue or the WLAN () icon appears on the LCD.
If you cannot connect using a wireless router/access point using your computer:
Connect the printer and the wireless router/access point using your computer.
Go to "Connect the printer to the wireless router/access point using your computer".
-
Connect your mobile device to the wireless router/access point. (You can skip this step if your device is already connected to a Wi-Fi network. Go to Step6.)
a. Tap [Settings] - [Wi-Fi] on the mobile device, and slide the toggle button to activate the Wi-Fi function.
b. Select the SSID (Network Name) of the wireless router/access point that you connected to in step 4, and then enter the password. The connection between your mobile device and the wireless router/access point will be established.
-
Start the application in your mobile device, and tap the settings icon.
-
Select the printer from the list.
-
You can now print from your mobile device wirelessly.
Connect the printer to the wireless router/access point using your computer
|
Before you proceed, make sure your computer is equipped with a Wi-Fi interface that is connected to a wireless network. If it is not, the computer will not be able to connect to your printer wirelessly. |
(e.g. QL-820NWB)
-
Connect your computer to your wireless router/access point.
-
Connect your printer to the same wireless router/access point.
-
Connect your printer and computer.
-
Connect your mobile device to the same wireless router/access point. (You can skip this step if your device is already connected to a Wi-Fi network.)
- Connect your mobile device and printer.
Before you begin, confirm the SSID (Network Name) and the password (Network Key) of your wireless router/access point.
-
Download the printer driver from the [Downloads] section of this website.
-
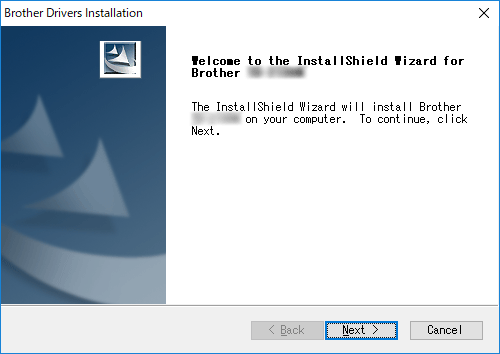
Double-click the downloaded file to begin the installation.
-
Click [Next].
-
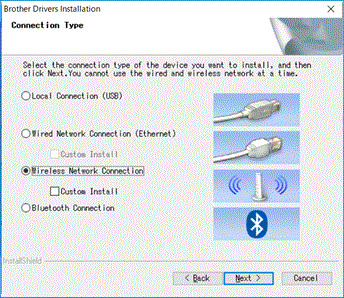
When the screen for selecting the connection method appears, select [Wireless Network Connection], and then click [Next].
-
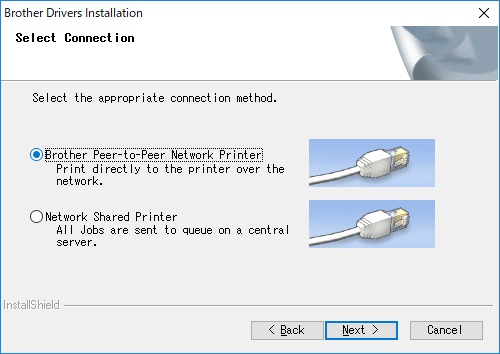
Select [Brother Peer-to-Peer Network Printer] and then click [Next].
-
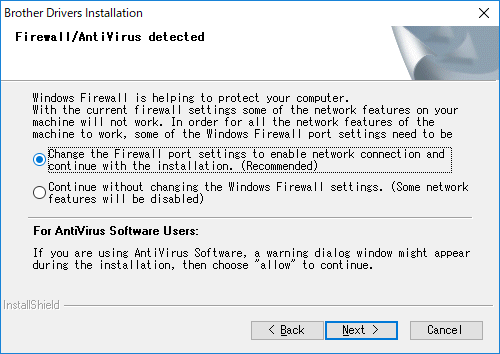
Select [Change the Firewall port settings to enable network connection and continue with the installation. (Recommended)], and then click [Next].
-
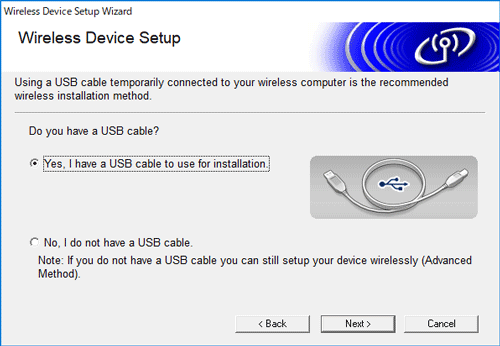
Prepare the USB cable, select [Yes, I have a USB cable to use for installation], and then click [Next].
Follow the on-screen instructions.
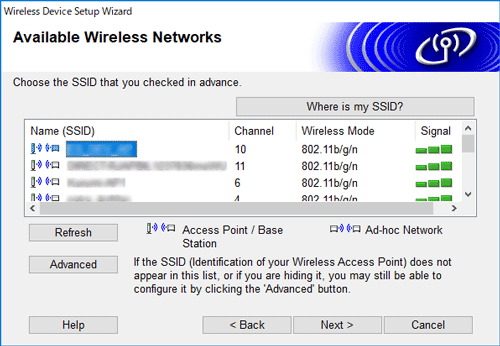
- The wizard will search for wireless networks available to your printer.
-
Select the SSID (Network Name) noted beforehand, and then click [Next].
-
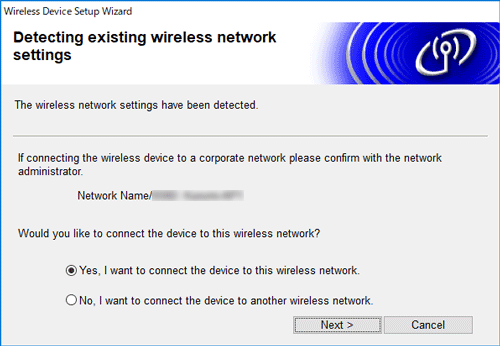
Confirm the wireless network settings, and then click [Next]. The settings will be sent to your printer.
-
Follow the on-screen instructions to complete the software installation.
- When the installation is complete, click [Finish] to close the installer window.
-
When the printer is connected to your wireless router/access point, the Wi-Fi LED lit in blue or the Wi-Fi () icon appears on the LCD.
-
Connect your mobile device to the wireless router/access point. (You can skip this step if your device is already connected to a Wi-Fi network. Go to Step15.)
a. Tap [Settings] - [Wi-Fi] and slide the toggle button to activate the Wi-Fi function.
b. Select the SSID you connected to in step 9. Your device and the wireless router/access point will be connected. - Start your mobile application, and then tap the Settings icon.
- Select the printer from the list.
-
You can now print from your mobile device wirelessly.
Before you begin, confirm the SSID (Network Name) and the password (Network Key) of your wireless router/access point.
-
Download the Full Software Package from the [Downloads] section of this website.
- Double-click the downloaded file.
- Open the [Utilities] folder and find the Wireless Device Setup Wizard.
- Double-click [Wireless Device Setup Wizard.app].
-
Follow the on-screen instructions to configure the wireless settings between the printer and your wireless router/access point.
We recommend using a USB cable to complete the connection.
-
When selecting the wireless router/access point, make sure you select the SSID that you confirmed previously.
-
Connect your mobile device to the wireless router/access point:
Tap [Settings] - [Wi-Fi] and slide the toggle button to activate the Wi-Fi function.If your device is already connected to a Wi-Fi network, go to Step 9.
-
Select the SSID that you used previously. The connection between your device and your wireless router/access point will be established.
-
Start your mobile application and tap the Settings icon.
-
Select the printer from the list.
- You can now print wirelessly from your device.
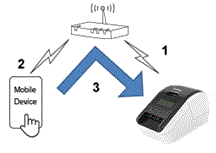
If you do not have a wireless router/access point:
Connect using Wireless Direct
If your printer uses the latest firmware, "Wireless Direct" is already selected.
-
Confirm the Wireless Direct settings of the printer from the computer using the Printer Setting Tool, or from the printer (QL-820NWB only).
-
Specifying the settings from the computer using the Printer Setting Tool:
For Windows
-
Connect the printer and computer with a USB cable.
-
Start the Printer Setting Tool on your computer, and click [Communication Settings].
-
Select [Infrastructure and Wireless Direct] or [Wireless Direct] for [Selected Interface] in [Communication Settings] in the [General] tab, and confirm the [Wireless Direct] tab.
For Mac
-
Connect the printer and computer with a USB cable.
-
Launch the Printer Setting Tool on your computer.
-
Click the [Wireless LAN] tab.
-
Confirm that [Wireless Direct] is set to [On].
-
-
Specifying the settings from the printer (QL-820NWB only):
-
Press the [Menu] and [
] buttons to select the [WLAN] menu, and then press the [OK] button. Set [WLAN (On/Off)] to [On]. -
Press the [Menu] and [
] buttons to select the [WLAN] menu, and then press the [OK] button. -
Press the [
 ] button to select the [Network Mode] menu, and then press the [OK] button.
 -
Select [Direct Mode], and then press the [OK] button. The Wireless Direct icon appears on the LCD.
-
-
- Turn on the printer.
-
QL-810W: Press and hold the [Wi-Fi (
 )] Button on the printer for one second to turn the Wi-Fi function On. The Wi-Fi LED starts flashing blue every three seconds.
 -
QL-820NWB: Press the [Menu] Button and the [] Button to select the [WLAN] menu, and set [WLAN (On/Off)] to [On].
-
Connect your mobile device to the printer.
a. Tap [Settings] - [Wi-Fi] and slide the toggle button to activate the Wi-Fi function.
b. Select the printer from the list. The connection between your mobile device and the printer will be established. - Make sure that your printer is listed on the Settings page of the application and select it.
-
You can now print with Wireless Direct from your mobile device.
The default SSID and password are as follows:
- SSID: "DIRECT-*****_QL-810W" or "DIRECT-*****_QL-820NWB" where ***** is the last five digits of the product serial number. (You can find the product serial number label in the DK Roll Compartment of the printer.)
- Password: 810***** or 820***** where ***** is the last five digits of the product serial number.
- If you cannot find the serial number label, see "Where can I find my Brother printer's serial number?".
- If you set the password with the communication settings, enter the password.