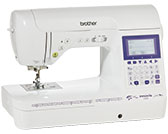
Innov-is F420
FAQs & Troubleshooting |
Fabric is caught in the machine and cannot be removed
If the fabric is caught in the machine and cannot be removed, the thread may have become tangled under the needle plate. Follow the procedure described below to remove the fabric from the machine. If the operation cannot be completed according to this procedure, instead of attempting to remove it forcefully, contact your nearest Brother authorized service center.
Removing the fabric from the machine
-
Immediately stop the sewing machine.
-
Turn off the sewing machine.
-
Remove the needle.
Refer to How do I change the needle?If the needle is lowered into the fabric, turn the handwheel away from you (clockwise) to raise the needle out of the fabric, and then remove the needle.
-
Remove the presser foot and presser foot holder.
Refer to How do I remove or attach the presser foot? and How do I remove or attach the presser foot holder? -
Lift up the fabric and cut the threads below it.
If the fabric can be removed, remove it. Continue with the following steps to How do I clean the race? -
Remove the needle plate cover.
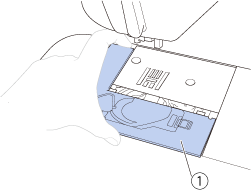
(1) Needle plate cover
Refer to How do I clean the race?
-
Cut out the tangled threads, and then remove the bobbin.
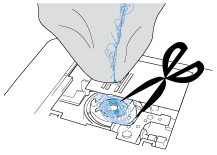
-
Remove the bobbin case.
If threads remain in the bobbin case, remove them.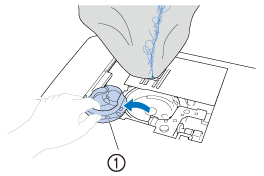
(1) Bobbin case
-
Use the cleaning brush or a vacuum cleaner mini attachment to remove any lint or dust from the race and its surrounding area.
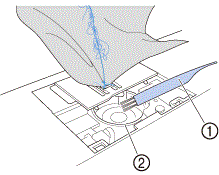
(1) Cleaning brush
(2) Race
> If the fabric could be removed, continue with step16.
> If the fabric could not be removed, continue with step10.Compressed can air is not recommended to be used.
-
Use the included disc-shaped screwdriver to loosen the two screws on the needle plate.

-
For models that include the L-shaped screwdriver
You can also use the L-shaped screwdriver to remove the screw in the needle plate cover.
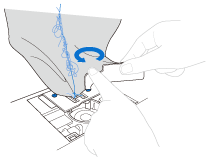
- Be careful not to drop the removed screws in the machine.
-
For models that include the L-shaped screwdriver
-
Slightly lift up the needle plate, cut any tangled threads, and then remove the needle plate.
Remove the fabric and threads from the needle plate.
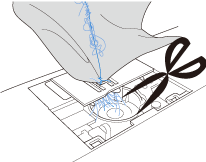
If the fabric cannot be removed, even after completing these steps, contact your authorized Brother dealer or the nearest Brother authorized service center.
-
Remove any threads in the race and around the feed dogs.
-
Turn the handwheel to raise the feed dogs.
-
Align the two screw holes in the needle plate with the two holes at the needle plate mounting base, and then fit the needle plate onto the machine.
-
Lightly finger-tighten the screw on the right side of the needle plate. Then, use the disc-shaped (or L-shaped) screwdriver to firmly tighten the screw on the left side. Finally, firmly tighten the screw on the right side.
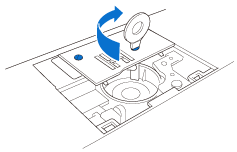
Turn the handwheel to check that the feed dogs move smoothly and do not contact the edges of the slots in the needle plate.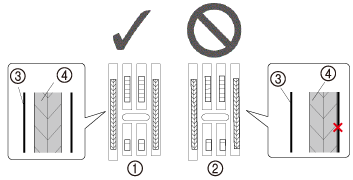
(1) Correct position of feed dogs
(2) Incorrect position of feed dogs
(3) Needle plate
(4) Feed dogs
Be careful not to drop the removed screws in the machine.
-
Insert the bobbin case so that the
 mark on the bobbin case aligns with the
  mark on the machine as shown below.
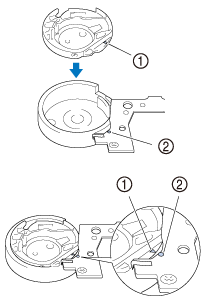
Align the
 and
and  marks.
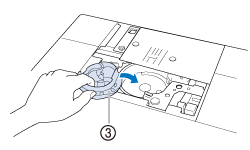
(1)
 mark
mark(2)
 mark
mark(3) Bobbin case
Make sure that the indicated points are aligned before installing the bobbin case.
- Never use a bobbin case that is scratched; otherwis, the upper thread may become tangled, the needle may break, or sewing performance may suffer.
- Make sure that you fit the bobbin case properly, otherwise the needle may break.
-
Attach the needle plate cover.

(1) Needle plate cover
-
Check the condition of the needle, and then install it.
If the needle is in a poor condition, for example, if it is bent, be sure to install a new needle.Before using the needle, place the flat side of the needle on a flat surface and check that the distance between the needle and the flat surface is even.
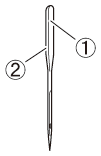
(1) Flat side
(2) Needle type marking
If the distance between the needle and the flat surface is not even, the needle is bent. Do not use a bent needle.

(1) Flat surface
Never use bent needles. Bent needles can easily break, possibly resulting in injuries.
- After completing this procedure, continue with the following procedure in Checking machine operations to check that the machine is operating correctly.
- Since the needle may have been damaged when the fabric was caught in the machine, we recommend replacing it with a new one.
Checking machine operations
If the needle plate has been removed, check machine operations to confirm that installation has been completed correctly.
- Turn on the machine.
-
Select stitch
 .
.Do not yet install the presser foot and thread.
-
Slowly turn the handwheel toward you (counterclockwise), and look from all sides to check that the needle falls at the center of the hole in the needle plate.
If the needle contacts the needle plate, remove the needle plate, and then install it again, starting with step13 in “Removing the fabric from the machine”.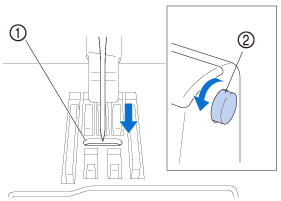
(1) Opening in the needle plate
(2) Handwheel
-
Select stitch
 . At this time, increase the stitch length and width to their maximum settings.
For details on changing the settings, refer to How do I adjust a stitch width or length?.
-
Slowly turn the handwheel toward you (counterclockwise) and check that the needle bar and feed dogs operate correctly.
If the needle or feed dogs contact the needle plate, the machine may be malfunctioning; therefore, contact your nearest Brother authorized service center. -
Turn off the machine, and then install the bobbin and presser foot.
Refer to How do I set the bobbin? and How do I remove or attach the presser foot? -
Correctly thread the machine.
Refer to How do I thread the machine?The thread may have become tangled as a result of incorrect upper threading. Make sure that the machine is correctly threaded.
-
Perform trial sewing with cotton fabric.
Incorrect sewing may be the result of incorrect upper threading or sewing thin fabrics. If there are poor results from the trial sewing, check the upper threading or the type of fabric being used.
