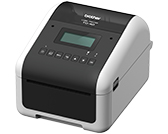
TD-4550DNWB
FAQs & Troubleshooting |
How do I connect the printer to my computer using both the Infrastructure mode and the Wireless Direct mode?
To connect the printer to your computer using both the Infrastructure mode and the Wireless Direct mode, follow the procedure below:
Before installing the software, make sure that your computer is connected to the Wireless access point/router.
- Turn on the printer.
-
Download Software/Document Installer from the [Downloads] section of this website and then start the installer.
P-touch Editor, Printer Setting Tool, and other software are installed in addition to the printer driver.
-
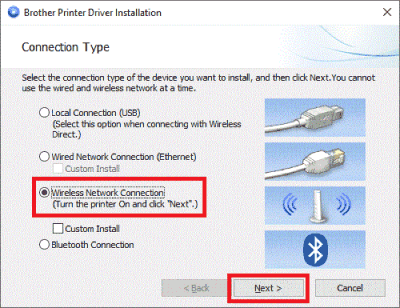
When the [Connection Type] dialog box is displayed after the printer driver installation starts, select [Wireless Network Connection] and click [Next].
-
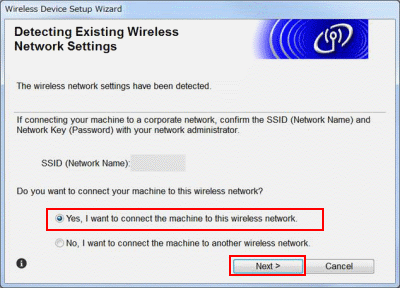
When this screen is displayed, select [Yes, I want to connect the machine to this wireless network.].
Click [Next] and follow the instructions.
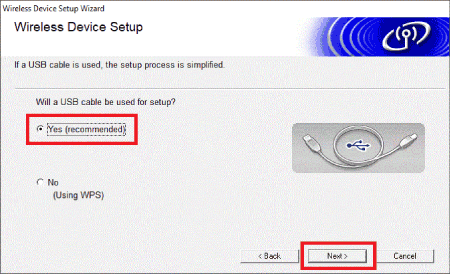
If this screen is displayed instead, select [Yes (recommended)]. Click [Next], and then follow the instructions.
-
When the installation is complete, the computer is connected to the printer in the Infrastructure mode.
To use the printer in the Wireless Direct mode, change the settings on the printer.- Press Menu.
-
Press
 or
or  to select [WLAN], and then press OK.
 -
Press
 or
or  to select [Network Mode], and then press OK.
 -
Press
 or
or  to select [Infra/Direct Mode], and then press OK.
-
Connect the printer to your computer using a USB cable. Start the Printer Setting Tool on the computer, and click the [Communication Settings] button.
Confirm the SSID (network name) and password (network key) in the [Wireless Direct] tab.
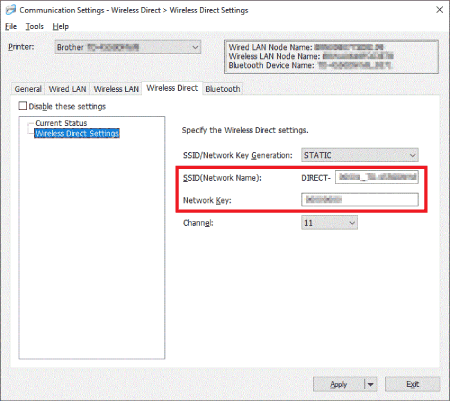
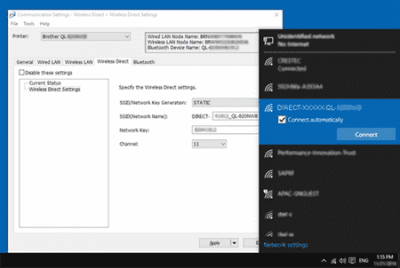
To use the Wireless Direct mode, select the SSID you confirmed from the computer.
-
The factory default SSID and password are as follows:
SSID: "DIRECT-*****_TD-4550DNWB" where ***** is the last five digits of the
product serial number.
The password: 455***** where ***** is the last five digits of the product serial number. - For Windows 10 or later, select the [Connect automatically] check box.
- It may take several minutes until the connection is complete.
- You cannot connect to the Internet on your computer via Wi-Fi® while using Wireless Direct.
-
The factory default SSID and password are as follows:
-
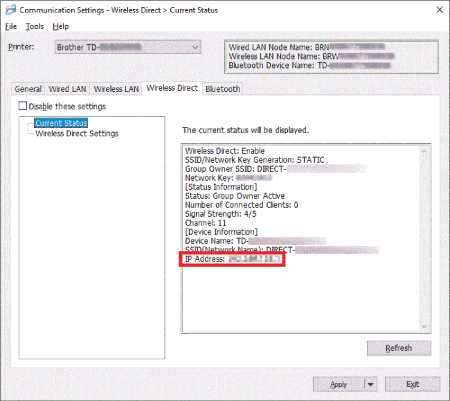
Start the Printer Setting Tool on your computer again, and click the [Communication Settings] button.
Confirm the IP address in [Current Status] in the [Wireless Direct] tab.
-
Open the [Devices and Printers] window. (Refer to the FAQ: "How to open the Devices and Printers window".)
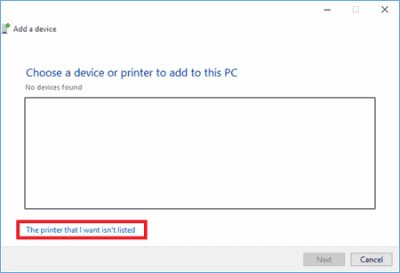
Click [Add a printer].
For Windows 8 or later:
Click [The printer that I want isn't listed] on the bottom of the window instead of selecting the displayed printer icon for the TD-4550DNWB.
-
For Windows 8 or later:
Select the [Add a local printer or network printer with manual settings] option, and then click [Next].
For Windows 7 or earlier:
Click [Add a local printer].
-
Select the [Create a new port] option, select [Standard TCP/IP Port], and then click [Next].
-
Enter the IP address you confirmed in step 7, and then click [Next]. The computer will start searching for the TCP/IP port.
-
When the dialog box with [Which version of the driver do you want to use?] appears, select the [Use the driver that is currently installed (recommended)] option, and then click [Next]. Confirm the printer name, and then click [Next]. The connection is complete.
-
Open the [Devices and Printers] window again, click the [Ports] tab in the [Printer Properties] dialog box, confirm that the IP address for the printer is the same as the address you confirmed in step 7 and that the [Standard TCP/IP Port] option (not WSD port) is selected.
Now you can use P-touch Editor to create and print labels.If you want to change to the Infrastructure mode when using the Wireless Direct mode, use the computer to select the SSID of the wireless LAN you want to connect to.
[  Back To Top ]
Content Feedback
To help us improve our support, please provide your feedback below.
