TD-4410D
FAQs & Troubleshooting |
How to use the Paper Size Setup (for Windows)
Using the Paper Size Setup in the Printer Setting Tool, you can add paper sizes not listed in the Paper Size list of the printer driver.
Printing with a paper size not registered with the printer may produce incorrect print results.
Check the following items:

-
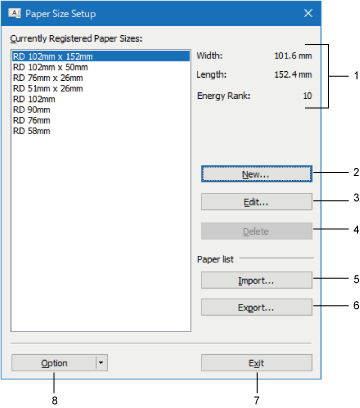
Current settings
Displays the current settings for the selected paper format.The [Energy Rank] setting affects the print density. It takes priority over the [Print Density] setting in the Device Settings.
Available values: 1 – 30 -
New
Click this button to display the [New] dialog box and register a new paper format.
For TD-4420DN(FC)/4550DNWB(FC)
From the [Paper Types:] drop-down menu, select Continuous Length Tape option, configure the tape settings, and then, click Add.
When you change the Paper Type, some settings remain unchanged.![[New] dialog box [New] dialog box](/g/b/img/faqend/faqp00100304_001/sg/en/2537507/new-dialog-box.jpg)
- Cut Every (1 label), Cut at end settings remain ON.
- The Use Peeler function option remains OFF.Do not register a paper size already registered to avoid incorrect print results. To use paper of the same size as one that is currently registered, select the size you want from the [Currently Registered Paper Sizes] list in the [Paper Size Setup] dialog box, and then change and overwrite the settings from the [Exit] dialog box.
-
Edit
Edits the settings for the selected paper format.
To save the selected paper format with the new settings, click [Overwrite]. To add a paper format with the new settings, change the name in the [Paper Size Name] box, and then click [Add]. -
Delete
Deletes the selected paper format. A deleted paper format cannot be restored. -
Import
Reads the text file containing the paper format settings and uses it to replace the contents of the [Currently Registered Paper Sizes] list.
For TD-4420DN(FC) / 4550DNWB(FC)
See "How to use a linerless roll list" to get the linerless label roll list file.When the list is imported, the entire contents of the [Currently Registered Paper Sizes] list will be replaced with the imported paper formats.
-
Export
Exports the paper formats in the [Currently Registered Paper Sizes] list to a file. The exported formats can then be distributed to other computers. -
Exit
Exits the [Paper Size Setup] window and returns to the main window of the Printer Setting Tool. -
Option
Click the button, and then select an operation.
Click [Register Paper Size With Printer] to register the settings for the selected paper format in your printer.
Click [Save in Command File] to export the paper settings as a command file. (The file extension is “.bin”.)- When the paper format is registered with the printer and [Exit] is clicked, the [Paper Size Setup] dialog box appears with the added paper size in the [Currently Registered Paper Sizes] list. If the software is running, exit the software, and then restart it for the new paper format to appear in the list.
-
If the following functions are being used, you can quickly apply their settings to the printer.
- Mass storage feature
- Bluetooth® (Object Push Profile (OPP)) (For Bluetooth models only)
- Wi-Fi® (File Transfer Profile (FTP)) (For Wi-Fi models only)
- These commands are only intended to be used to apply settings to a printer. These commands cannot be imported into the Paper Size Setup.
Auto media configuration allows the printer to automatically detect the characteristics of the installed paper, and then select the correct paper size settings.
Press the [Auto media configuration] button in the [New] or [Edit] dialog box to detect the paper size.

* The automatically detected paper size may differ from that of the paper set in the printer.
