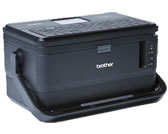
PT-D800W
FAQs & Troubleshooting |
How do I connect my printer via Wi-Fi®?
The following Wi-Fi connection methods are available:
To print using a wireless network connection from your computer, you must download and install the printer driver and P-touch Editor.
Infrastructure mode allows you to connect the printer to a computer via a wireless access point/router.
Before You Begin
First you must configure the Wi-Fi settings of your printer to communicate with your wireless access point/router. After the printer has been configured, computers on your network will have access to the printer.
- If you are going to connect the printer to your network, we recommend contacting your system administrator prior to installation. You must confirm your Wi-Fi settings (SSID (network name) and password (network key)) before you proceed with this installation.
-
To configure the Wi-Fi settings again, or if the status of the Wi-Fi connection for your printer is not clear, reset the Wi-Fi settings of the printer.
For resetting the Wi-Fi settings, see the FAQ: “How do I reset network setting?". - To achieve the best results with everyday document printing, use the printer as close to the wireless access point/router as possible with minimal obstructions. Large objects and walls between the two devices and interference from other electronic devices can affect the data transfer speed of your documents.
You can configure the Wi-Fi settings while installing the printer driver and the software. If you start with the installation, click here to see the procedure.
If you did not configure a wireless communication setting while installing the software, or if you want to change the connection method or settings, see the followings:
- [Method 1] Configuring using the Setup Wizard
- [Method 2] Connecting the printer to your wireless access point/router using a computer
- [Method 3] WPS (Wi-Fi Protected Setup™)
- [Method 4] Configuring by entering the PIN
Configuring a wireless network connection while installing the printer driver and software (recommended)
- Install the software on a computer wirelessly connected to your network and configuring the printer using a USB cable.
- Make sure you are logged on with administrator rights.
- Visit the [Downloads] section of this website and download the installer for the software and manuals.
- Double-click the downloaded .exe file and follow the on-screen instructions to proceed with the installation.
- Follow the on-screen instructions to proceed with the installation.
-
Close the dialog box when the installation is complete.
[Method 1] Configuring using the Setup Wizard
-
Select [Settings] in the Home screen using the
 ,
,  ,
,  or
or  key, and then press the OK or Enter key.
 -
Select [WLAN] using the
 or
or  key, and then press the OK or Enter key.
 -
Select [Infrastructure Mode] using the
 or
or  key, and then press the OK or Enter key.
 -
Select [Network Setting] using the
 or
or  key, and then press the OK or Enter key.
 -
Select [Setup Wizard] using the
 or
or  key, and then press the OK or Enter key.
 -
If any messages appear, press the OK or Enter key for each message.
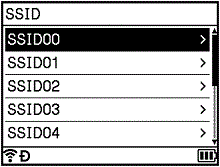
The SSIDs for the available networks appear.

-
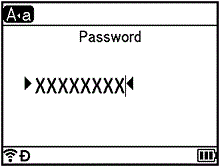
Select the SSID using the
 or
or  key, or select [Other…] and enter the SSID (from 1 to 32 characters), and then press the OK or Enter key. The [Password] screen appears.

- Enter the password (from 8 to 63 characters or, when using WEP, from 5 to 13 characters), and then press the OK or Enter key.
-
The screen returns to the [Settings] menu screen, and
 blinks while the connection is being established.
After 90 seconds, the indicator will change to , but your printer will continue trying to connect to the network.
 -
When connected, depending on the strength of the wireless signal, the wireless connection indicator shows of the following symbols:

If you start the setup wizard for the Infrastructure mode or select the network settings for the Direct mode when the wireless function of the printer is turned off, [Turning on Wi-Fi Radio] appears and the wireless function turns itself on automatically (or after the OK key is pressed). It is no longer necessary to turn the Infrastructure mode or Direct mode on manually.
[Method 2 ] Connecting the printer to your wireless access point/router using a computer
- First, write down the SSID (network name) and password (network key) of your wireless access point/router.
- Connect the printer and computer with a USB cable.
-
Press and hold the
 (Wi-Fi) button on your printer for one second to turn the Wi-Fi function on. The
  (Wi-Fi) indicator starts flashing in green once every three seconds.
 -
Configure the Infrastructure Mode settings of the printer using the computer.
<For Windows>
Start the Wireless Device Setup Wizard included in the Software Package, and then follow the on-screen instructions. If you have not downloaded the Software Driver Package, visit your model's [Downloads] page to download the package. Double-click the downloaded file. The Wireless Device Setup Wizard can be found in the [Utilities] folder.
Start the Printer Setting Tool on your computer, and click [Communication settings]. Select [Infrastructure or Ad-hoc] or [Infrastructure and Wireless Direct] for [Selected Interface] in [Communication settings] in the [General] tab, and select [Infrastructure] for [Communication Mode] in [Wireless Settings] in the [Wireless LAN] tab.
For details, see the FAQ: “Using the Printer Setting Tool (for Windows)”.
<For Mac (D800W, E800W only)> - Enter the SSID that you wrote down, or click [Search] and select the SSID from the displayed list.
-
Enter the password in the [Passphrase] field.
The required information depends on the authentication method and encryption mode; enter only the information relevant to your network environment.
-
To send the settings to the printer, click [Apply].
When the connection between the printer and your wireless access point/router is established, the (Wi-Fi) indicator lights in green. Computers on the same network as the printer will have access to the printer.
To change any other network settings, use the Printer Setting Tool.
For details, see the FAQ: “Using the Printer Setting Tool”.
[Method 3] WPS (Wi-Fi Protected Setup™)
If your wireless access point/router supports WPS, you can configure settings and connections wirelessly.
-
First, confirm that your wireless access point/router has the WPS symbol.

-
Select [Settings] in the Home screen using the
 ,
,  ,
,  or
or  key, and then press the OK or Enter key.
 -
Select [WLAN] using the
 or
or  key, and then press the OK or Enter key.
 -
Select [Infrastructure Mode] using the
 or
or  key, and then press the OK or Enter key.
 -
Select [Network Setting] using the
 or
or  key, and then press the OK or Enter key.
 - Place your printer within the range of your wireless access point/router. The range may differ depending on your environment. See the instructions provided with your wireless access point/router.
-
Select [Button Push] using the
 or
or  key, and then press the OK or Enter key.
 -
Press the OK or Enter key for a message that appears before the [Start WPS on Your Wireless Access Point].
The [Start WPS on Your Wireless Access Point] message appears. -
Press the WPS button on your wireless access point/router, and then press the OK or Enter key on your printer.
To return to the previous step, press the Esc key
- [Connecting…] appears for a while, and then [Connected!] appears.
-
Press the OK or Enter key.
The screen returns to the [Settings] menu screen.
Depending on the strength of the wireless signal, the wireless connection indicator may show one of the following symbols:

- If you start the setup wizard for the Infrastructure mode or select the network settings for the Direct mode when the wireless function of the printer is turned off, [Turning on Wi-Fi Radio] appears and the wireless function turns itself on automatically (or after the OK key is pressed). It is no longer necessary to turn the Infrastructure mode or Direct mode on manually.
-
Your printer will try to connect using WPS for two minutes. If the
 (Wi-Fi) button is pressed and held during that time, the printer will continue trying to connect for an additional two minutes.
 -
If your printer could not connect to the network, a message indicating that the connection failed appears.
[Method 4] Configuring by entering the PIN
-
Select [Settings] in the Home screen using the
 ,
,  ,
,  or
or  key, and then press the OK or Enter key.
 -
Select [WLAN] using the
 or
or  key, and then press the OK or Enter key.
 -
Select [Infrastructure Mode] using the
 or
or  key, and then press the OK or Enter key.
 -
Select [Network Setting] using the
 or
or  key, and then press the OK or Enter key.
 -
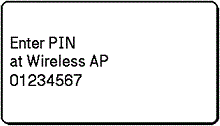
Select [PIN Code] using the
 or
or  key, and then press the OK or Enter key.
 -
If some messages appear, press the OK or Enter key for each message.
-
Type the PIN displayed on the screen into your wireless access point/router, and then press the OK or Enter key.

-
[Connecting…] appears for a while, and then [Connected!] appears.
-
Press the OK or Enter key.
Depending on the strength of the wireless signal, the wireless connection indicator may show one of the following symbols:
The screen returns to the [Settings] menu screen.
If you start the setup wizard for the Infrastructure mode or select the network settings for the Direct mode when the wireless function of the printer is turned off, [Turning on Wi-Fi Radio] appears and the wireless function turns itself on automatically (or after the OK key is pressed). It is no longer necessary to turn the Infrastructure mode or Direct mode on manually.
Wireless Direct allows you to connect the printer to your computer or mobile device directly without a Wi-Fi access point/router; the printer serves as a Wi-Fi access point.
[Method 1] Connecting using the printer's keyboard
-
Select [Settings] in the Home screen using the
 ,
,  ,
,  or
or  key, and then press the OK or Enter key.
 -
Select [WLAN] using the
 or
or  key, and then press the OK or Enter key.
 -
Select [Direct Mode] using the
 or
or  key, and then press the OK or Enter key.
The printer displays the
 symbol.
 -
Select [Network Setting] using the
 or
or  key, and then press the OK or Enter key.
 - The current SSID appears on-screen. Enter the new SSID if needed, and then press the OK or Enter key.
- The current password appears on-screen. Enter the new password if needed, and then press the OK or Enter key.
- The screen to confirm the entered SSID and password appears. Press any key to continue.
- In the Wi-Fi settings screen of your computer or mobile device, select the SSID of the printer and enter the password.
- You have completed the Wireless Direct network setup.
[Method 2] Connecting using the Printer Setting Tool
-
Confirm the Wireless Direct settings of the printer.
For Windows:
Connect the printer and computer with a USB cable. Start the Printer Setting Tool on your computer, and click [Communication settings]. Confirm that [Infrastructure and Wireless Direct] or [Wireless Direct] is selected for [Selected Interface] in [Communication settings] in the [General] tab.
For more information, see the FAQ: “Using the Communication Settings (for windows)”.For Mac (for D800W, E800W only):
For more information, see the FAQ: “Using the Printer Setting Tool (for Mac)”.
Connect the printer and computer with a USB cable. Start the Printer Setting Tool on your computer, and confirm that [WirelessDirect] is set to [On] in the [Wireless LAN] tab. -
Press and hold the (Wi-Fi) button on your printer for one second to turn the Wi-Fi function on.
The (Wi-Fi) indicator starts flashing in green once every three seconds.
 - In the Wi-Fi settings screen of your computer or mobile device, select the SSID of the printer and enter the password.
-
The factory settings for the SSID and password are as follows:
SSID:- E850TKW: “PT-E850TKW” or “DIRECT-*****_PT-E850TKW”
- D800W: “PT-D800W” or “DIRECT-*****_PT-D800W”
- E800W: “PT-E800W” or “DIRECT-*****_PT-E800W”
where “*****” is the last five digits of the product serial number.
(You can find the serial number label on the bottom of the printer.)
Password (network key): 00000000 - You cannot connect to the Internet via Wi-Fi while using Wireless Direct. To use the Internet, connect using Infrastructure mode.
Ad-hoc mode allows you to connect the printer to your computer or mobile device directly without a Wi-Fi access point/router.
-
Press and hold the
 (Wi-Fi) button on your printer for one second to turn the Wi-Fi function on.
The (Wi-Fi) indicator starts flashing in green once every three seconds.
 -
Use a Windows PC or Mac to configure the Ad-hoc mode settings of the printer.
-
For Windows :
Connect the printer and your computer with a USB cable. Start the Printer Setting Tool, and click the [Communication Settings] button. Select [Infrastructure or Ad-hoc] for [Selected Interface] in the [General] tab, and select [Ad-hoc] for [Communication Mode] in [Wireless Settings] in the [Wireless LAN] tab.
See the FAQ: “Using the Communication Settings (for Windows)” for more information on the Communication Settings. -
For Mac :
Start the Wireless Device Setup Wizard included in the Full Software Package, and then follow the on-screen instructions.
If you have not downloaded the Full Software Package, visit the [Downloads] page to download the package. Double-click the downloaded file. The Wireless Device Setup Wizard can be found in the [Utilities] folder.
-
For Windows :
-
Use your computer or mobile device to select the SSID of your printer and, if required, enter the password. When the connection is established, the
 (Wi-Fi) indicator lights in green.
