PT-E850TKW
FAQs & Troubleshooting |
What options are available for label / tube feeding and cutting?
> For labels
> For Tubes (PT-E800T, E800TK, E850TKW only)
For labels
You can select the following 11 options.
Cut Option Table
"Cut Option No." is displayed only when selecting options using the printer's keyboard.
| Cut Option No. | Auto Cut | Half Cut | Chain Printing | Image |
|---|---|---|---|---|
| 1 | No | Yes | No |  |
| 2 | Yes | Yes | No |  |
| 3 | No | No | No |  |
| 4 | Yes | No | No |  |
| 5 | No | Yes | Yes |  |
| 6 | Yes | Yes | Yes |  |
| 7 | No | No | Yes |  |
| 8 | Yes | No | Yes |  |
| 9 | Special tape |  |
||
| (FLe Label)* | No | - | - |  |
| (FLe Label)* | Yes | - | - |  |
* Set this cut option from a computer using the printer driver. These options cannot be set using the keyboard.
* When printing from a mobile device, these options can only be set using Mobile Cable Label Tool.
- When printing multiple copies of different labels, you can select the chain printing to reduce the blank space between the labels. The chain printing is used for cutting option numbers 5 - 8.
-
When using the chain printing, press the
 (Feed and Cut) button after the last label is printed.
Setting Procedure:
Use the printer driver or the printer’s keyboard to select the settings.
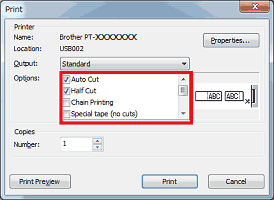
Using the printer driver:
Select the settings in the following dialog box.

Using the printer’s keyboard (for models equipped with the keyboard):
-
Select [Settings] in the Home screen using the
 ,
,  ,
,  or
or  key, and then press the OK or Enter key.
 -
(Except for PT-D800W/E800W) Select [Label Adjustment] using the
 or
or  key, and then press the OK or Enter key.
 -
Select [Cut Options] using the
 or
or  key, and then press the OK or Enter key.
 -
Select the setting using the
 or
or  key, and then press the OK or Enter key to apply the settings.
- New settings are NOT applied unless you press the OK or Enter key.
- To return to the previous step, press the Esc key.
For Tubes (PT-E800T, E800TK, E850TKW only)
You can select the following 4 options.
Cut Option Table
| Cut Option | Description | Image |
|---|---|---|
| No Half Cut | The tubes are fully cut only after the last tube is printed. |  |
| Half Cut | The tubes are half cut in the margin before the first tube is printed and after each of the remaining tubes is printed. The tubes are fully cut after the last tube is printed. |  |
| Dot | A dotted line is printed in the margin before the first tube is printed and after each of the remaining tubes is printed. The tubes are fully cut after the last tube is printed. |  |
| Line | A solid line is printed in the margin before the first tube is printed and after each of the remaining tubes is printed. The tubes are fully cut after the last tube is printed. |  |
-
If the tube is jammed or not cut completely, use the
 (Feed and Cut) button to manually cut the tube completely. Press and hold the button for 2 to 10 seconds until the
  (Power) indicator changes from being lit in green to flashing in green, and then release it. The tube will be cut when the button is released.
Setting Procedure:
Use the printer driver and the Printer Setting Tool, or the printer’s keyboard to select the settings.
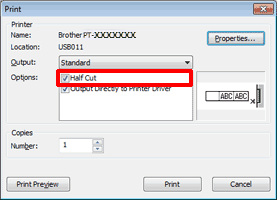
Using the printer driver and the Printer Setting Tool:
-
Select “Half cut” setting (on / off) in the printer driver.

-
Select “Cut Mark Type” setting (None / Dot / Line) using the Device Settings in the Printer Setting Tool.
For using the Device Settings, see the FAQ: “Using the Device Settings (for Windows)”.
Using the Printer’s keyboard (for models equipped with the keyboard):
-
Select [Settings] in the Home screen using the
 ,
,  ,
,  or
or  key, and then press the OK or Enter key.
 -
Select [Tube Adjustment] using the
 or
or  key, and then press the OK or Enter key.
 -
Select [Cut Options] using the
 or
or  key, and then press the OK or Enter key.
 -
Select the setting using the
 or
or  key, and then press the OK or Enter key to apply the settings.
- New settings are NOT applied unless you press the OK or Enter key.
- To return to the previous step, press the Esc key.
- You can use the tube half-cut adjuster to adjust the depth of half cuts to one of three settings.
