HL-2600CN
FAQs & Troubleshooting |
Creating and using a Macro from a Windows PC
The printer can store electronic forms (macro's) in it's memory or optional HD-EX/Compact Flash. For example, you could store your company stationary design in the printer memory, then when users with to print, the Brother printer driver can overlay the data that is already stored within the Brother printer with the data that they have sent from their computer. This approach reduces the amount of data sent from each individual computer and also improves the overall printing speed.
It is NOT possible to create or use a Macro using the BR-Script printer driver.
Follow the steps below to use macros:
Step 1 - Creating the macro using the PCL driver
From a Windows applications such as Microsoft® Word, click the "File" menu, and then select the "Print" option. You will see a dialogue similar to the one below:
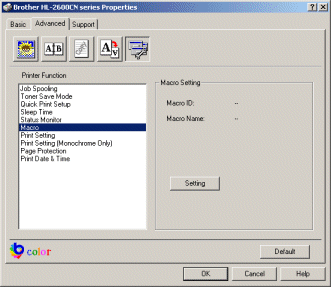
- Check the "Properties" button to display the printer driver setting.

- Click the "Advanced" Tab.
- Select the "Macro" option and then click "Setting".
- On the "Macro" setting screen enter a Macro ID number (the number must be between 0 and 32767) and enter a descriptive name for the Macro you wish to store.
- Then specify if you wish to save the macro to the printer memory, or to the Storage device (HD-EX or Compact Flash memory). Please note that you can only select the "to storage device" if you have told the driver that the HD-EX or Compact Flash memory is installed.
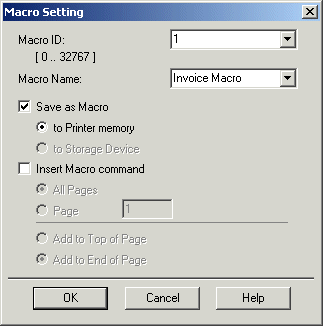
You will then see a warning message warning you that any macro that already uses the Macro ID that you specified will be overwritten. Click the OK button to return back to the printer properties screen you saw in step 3.
When you now send your print job, the printer will NOT print the data as it would normally. Instead, it will save the informaton in the printer memory as a macro. This macro can then be recalled at a later date. To recall this macro information, go to the Step 2:
Step 2 - Using the macro using the PCL driver
- Check the "Properties" button to display the printer driver setting.

- Click the "Advanced" Tab.
- Select the "Macro" option and then click "Setting".
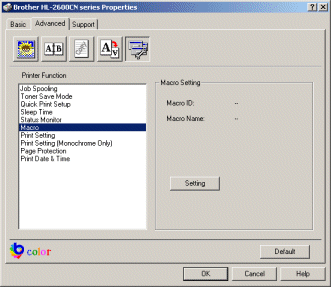
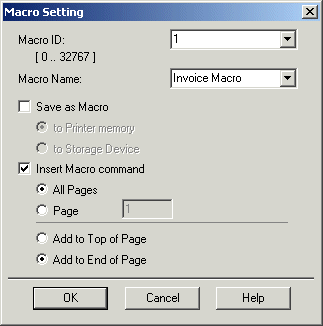
- On the "Macro" setting screen enter the Macro ID number (the number must be between 0 and 32767) you wish to use (the macro must have already been created as described in step 1).
- Then specify if you wish the macro to be printed on "All pages" or on an individual page. You can also specify if the macro will be added to the top of the page or at the bottom of the page.
