MFC-990CW
FAQs & Troubleshooting |
How do I clear the message "Unable to..." or "... Unable" ?
If one of the following messages is displayed on the LCD, the machine may have a mechanical problem, a dirty encoder strip or a foreign object such as a clip or ripped paper inside the machine.
- Unable to Clean (Clean Unable)
- Unable to Init. (Init Unable)
- Unable to Print (Print Unable)
- Unable to Scan (Scan Unable)
To solve the problem please follow the steps below:
If the following solutions do not solve the problem, your machine require repair. Please contact Brother Customer Service from "Contact Us".
A. Checking for debris or paper scraps
NOTE: The images shown below are from the representative product. Your model may look different from the picture.
- Disconnect the machine from the power Outlet.
- Lift the scanner cover using the plastic tabs or finger holds, located on the left and right side of the machine until it locks securely into the open position.

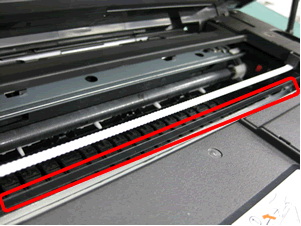
DO NOT touch the encoder strip. The encoder strip is a clear plastic strip in front of the white vinyl band (surrounded in red shown in the picture below). If the encoder gets markings or debris on its surface, it may cause other problems.
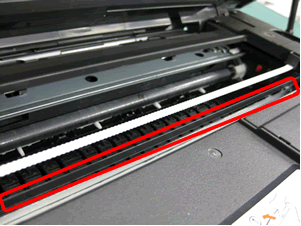
- Look inside the machine for jammed paper or foreign objects and remove. The paper may be jammed under the print head. If the print head is in the middle, use your fingers to slide the print head to right or left side and check for paper scraps underneath the print head.
- If the print head is on the left side, go to the steps of "If the print head is on the left side".- If the print head is on the right side, go to the steps of "If the print head is on the right side".
[If the print head is on the left side]
- Move the print head to the middle using your fingers.
* DO NOT touch the encoder strip (marked in red shown below).
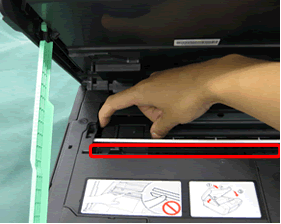
- After moving the print head check to see if there is ripped paper or a foreign object in the left corner and remove.
The ripped paper may be very small. Using a flashlight will help you to find the ripped paper.
- Close the scanner cover and connect the machine back into the power outlet.
Be careful not to trap your fingers under the scanner cover. Always use the finger holds provided on both sides of the scanner cover when opening and closing it.
If the error message continues, or if no debris was found, the encoder strip will need to be cleaned.
Go to step B to clean the encoder strip.
[If the print head is on the right side (The print head is hidden at the right corner)]
(The picture shown below is an example when the print head is hidden at the right corner.)
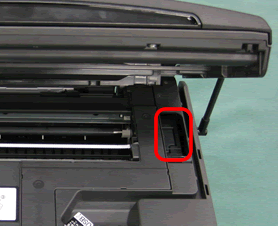
- Connect the power cord back into the power outlet. The LCD shows "Cover is Open".
- Press STOP/EXIT for approximately 5 seconds until the print head moves to the middle.
- Disconnect the machine from the power outlet.
Make sure to disconnect the machine. The print head may move and injure your hand.
- See if there is ripped paper or any foreign objects in the right corner and remove.
Tweezers may be used with caution to remove paper scrap or the foreign object.
The ripped paper may be very small. Using a flashlight will help you to find the ripped paper.
- Close the scanner cover and connect the machine back into the power outlet.
Be careful not to trap your fingers under the scanner cover. Always use the finger holds provided on both sides of the scanner cover when opening and closing it.
If the error message continues, or if no debris was found, the encoder strip will need to be cleaned.
Go to step B to clean the encoder strip.
Markings and debris can adhere on the surface of the encoder strip from the reasons listed below
- Touching the encoder strip with your hands can place smudge marks on the encoder strip.
- The removal of jammed paper can cause grease to get applied to the surface of the encoder strip.
To solve this problem clean the encoder strip following the steps listed below:
DO NOT use flammable substances or any type of spray to clean the inside or outside of the machine.
Doing this may cause a fire or electrical shock.
- Disconnect the machine from the power outlet.
- Lift the scanner cover using the plastic tabs or finger holds, located on the left and right side of the machine until it locks securely into the open position.
- Locate the Encoder Strip.
The encoder strip is a clear plastic strip in front of the white vinyl band.
(surrounded in red shown in the picture below)
- Clean both sides of the encoder strip with a dry lint free cloth.
- Do NOT use any type of paper products. Use only a dry lint free cloth.
- The encoder strip will have some slack to allow you to move around slightly to assist with cleaning.
- Do NOT pull on the strip with force. Too much force may damage the machine.
- Do not touch encoder strip with bare hands.
- Do NOT scrub hard the encoder strip. Doing this may cause scratches on its surface.
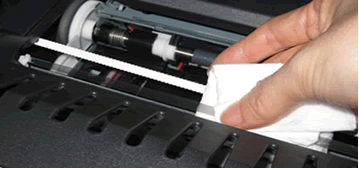
- Clean encoder strip from right to left. Make sure to stop just before the left corner.

- Clean encoder strip from left to right. Make sure to stop just before the right corner.
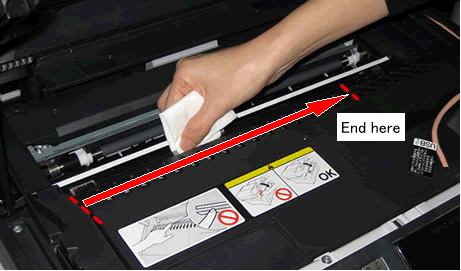
- Repeat steps 5 and 6 2 or 3 times to clean thoroughly.
- After cleaning the encoder strip, close the scanner cover.
- Connect the machine back into the power outlet.
If the problem still continues, your machine require repair. Please contact Brother Customer Service from "Contact Us".
