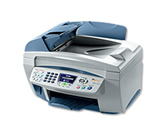
MFC-3820CN
FAQs & Troubleshooting |
Clear the paper jam or printer jam.
Follow the steps below to clear the paper jam or printer jam.
NOTE: Illustrations shown below are from a representative product and may differ from your Brother machine.
Case1: Paper is jammed at the front of the machine
Follow the steps below to clear the paper jam at the front of the machine.
- Unplug the machine from the AC power outlet (electrical socket).
- Unplug the telephone line cord from the machine.
- Pull the jammed paper toward you.

- Check inside the machine.

- Open the scanner cover by releasing the scanner cover release lever and lifting the scanner cover.
- Use your hand to move the print head and remove any pieces of paper remaining under the print head.
Unplug the machine from the power source before you move the print head using your hand.
- Carefully check the left and right side corners and remove any pieces of paper.
- Open the scanner cover by releasing the scanner cover release lever and lifting the scanner cover.
- Close the scanner cover.
- Plug the power cord back into the AC power outlet (electrical socket) and power the unit back ON.
- Plug the telephone line cord into the machine.
Case2: Paper is jammed in the paper tray
Follow the steps below to clear the paper jam in the paper tray.
- Unplug the machine from the AC power outlet (electrical socket).
- Unplug the telephone line cord from the machine.
- Remove any paper from the paper tray that is not jammed.

- Pull up the jammed paper to remove it.
If you have difficulty removing the jammed paper, press and hold the paper release lever as you pull out the page.

- Check inside the machine.
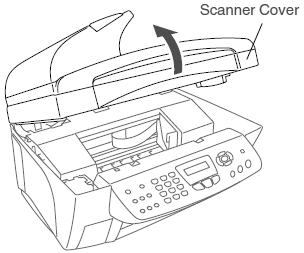
- Open the scanner cover by releasing the scanner cover release lever and lifting the scanner cover.
- Use your hand to move the print head and remove any pieces of paper remaining under the print head.
Unplug the machine from the power source before you move the print head using your hand.
- Carefully check the left and right side corners and remove any pieces of paper.
- Open the scanner cover by releasing the scanner cover release lever and lifting the scanner cover.
- Close the scanner cover.
- Plug the power cord back into the AC power outlet (electrical socket) and power the unit back ON.
- Plug the telephone line cord into the machine.
Case3: Paper is jammed inside the paper tray
Follow the steps below to clear the paper jam inside the paper tray.
- Unplug the machine from the AC power outlet (electrical socket).
- Unplug the telephone line cord from the machine.
- Pull the paper tray out of the machine.
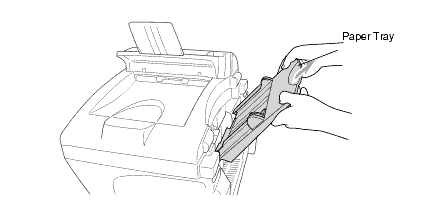
- Pull up the jammed paper to remove it.
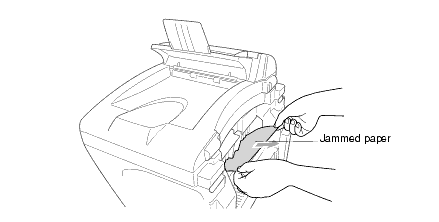
-
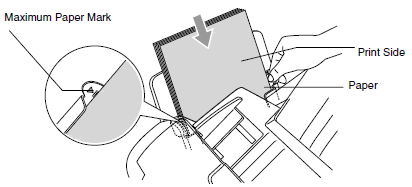
Fan the paper and reset it into the paper tray.
Make sure the paper is stacked below the maximum paper mark and adjust the paper guides to fit the width of the paper. If the paper appears to be skewing or crinkling, the guides may be too loose or too tight and should be adjusted accordingly.
- Check inside the machine.
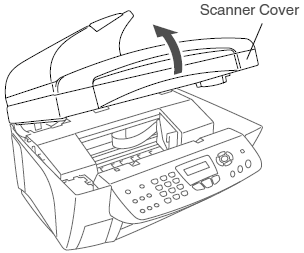
- Open the scanner cover by releasing the scanner cover release lever and lifting the scanner cover.
- Use your hand to move the print head and remove any pieces of paper remaining under the print head.
Unplug the machine from the power source before you move the print head using your hand.
- Carefully check the left and right side corners and remove any pieces of paper.
- Open the scanner cover by releasing the scanner cover release lever and lifting the scanner cover.
- Close the scanner cover.
- Plug the power cord back into the AC power outlet (electrical socket) and power the unit back ON.
- Plug the telephone line cord into the machine.
Case4: Paper is jammed inside the machine
Follow the steps below to clear the paper jam inside the machine.
- Unplug the machine from the AC power outlet (electrical socket).
- Unplug the telephone line cord from the machine.
- Check inside the machine.
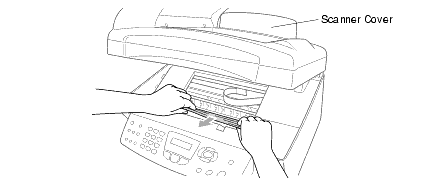
- Open the scanner cover by releasing the scanner cover release lever and lifting the scanner cover.
- Use your hand to move the print head and remove any pieces of paper remaining under the print head.
Unplug the machine from the power source before you move the print head using your hand.
- Carefully check the left and right side corners and remove any pieces of paper.
- Open the scanner cover by releasing the scanner cover release lever and lifting the scanner cover.
- Close the scanner cover.
- Plug the power cord back into the AC power outlet (electrical socket) and power the unit back ON.
- Plug the telephone line cord into the machine.
