NC-9100h
Întrebări frecvente şi depanare |
I'm using the Simple Network Configuration capabilities of Apple® Mac OS X. The printer appears in the "Print Center", "Printer Setup Utility", "Print & Fax", "Print & Scan" or "Printers & Scanners", but I cannot print.
The Simple Network Configuration capabilities of Mac OS X automatically sets the IP address of the printer (using the APIPA protocol). However, in some cases this can cause problems and your printer cannot print even though it appears correctly in the Print Center, Printer Setup Utility, Print & Fax, Print & Scan or Printers & Scanners.
There are generally two possible solutions:
1) Change Network settings
If your Macintosh computer has more than one network interface, or both the Ethernet and AirMac interfaces are being used, the APIPA protocol cannot bind itself to both network interfaces.
If you are using multiple networks and cannot print, try the following:
For Mac OS X 10.2 - 10.4 users:
- From System Preferences, select the "Network" icon.
- Make sure that by "Show" it says: "Network Port Configurations"
- Make sure that the "Port Configuration" order is set to include any remote networks that the printer may be connected to.
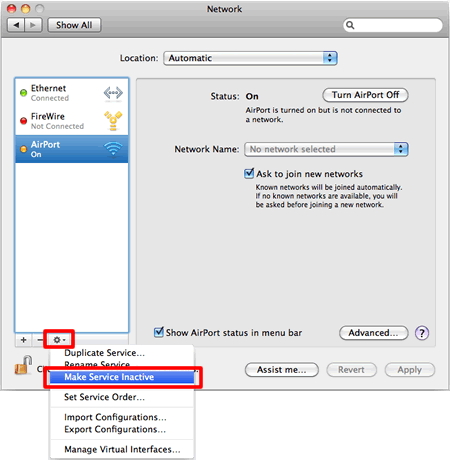
For Mac OS X 10.5 or later users:
- From System Preferences, select the "Network" icon.
- Choose the network not used.
- Choose "Make Service Inactive" from the action button under the window.

For example, if the printer is on a remote network and you have not configured your Macintosh OS system to communicate with that network, make sure that the TCP/IP settings in the "Built-in Ethernet" configuration is configured to communicate with different networks.
Also make sure that the appropriate Port configuration is active.
2) Configure a static IP address
Please consult a system administrator to get an IP address.
<Via machine panel>
-
Press the Menu or Menu/Set key then select LAN and press Set or Menu/Set.
-
Select TCP/IP or Setup TCP/IP and then select IP Address and press Set or Menu/Set.
-
Enter the IP Address.
-
Press Set or Menu/Set.
-
Press Stop/Exit.
Dacă nu aţi primit răspuns la întrebarea dumneavoastră, aţi verificat celelalte întrebări frecvente?
Dacă aveţi nevoie de asistenţă suplimentară, vă rugăm să contactaţi serviciul de asistenţă clienţi Brother:
Modele asociate
DCP-110C, DCP-7010, DCP-8020, DCP-8040, HL-2700CN, HL-5070N, HL-5170DN, HL-6050DN, HL-8050N, MFC-210C, MFC-3240C, MFC-3320CN, MFC-3820CN, MFC-410CN, MFC-425CN, MFC-5440CN, MFC-7420, MFC-7820N, MFC-8220, MFC-8420, MFC-8440, MFC-8840D, MFC-9420CN, NC-2200w, NC-6100h, NC-7100w, NC-8100h, NC-9100h
