Follow the procedure below to install additional memory.
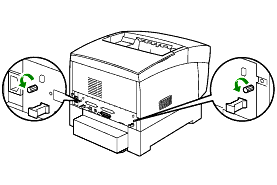
Turn the printer off, and then unplug the power cord from the AC power outlet/socket.
Before installing the optional accessories, turn the printer off and remove the power plug from the outlet/socket. Installing optional accessories without turning the printer off could result in an electric shock.
Loosen the two screws on the interface board located at the back of the printer.
Hold the two handles on the interface board and slowly pull the interface board towards you, then lay it on a desk or table.
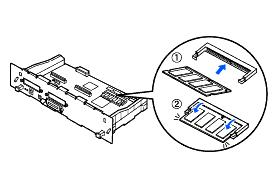
Hold the expansion memory module by the edges and align the notches in the module with the protrusions in the slot.
Insert the memory module diagonally (1), then tilt it toward the interface board until it clicks into place (2).
To remove the memory module, open the retaining clips on both sides of the module by pushing them outward, grasp both edges of the module and pull it out straight.
If your question was not answered, have you checked other FAQs?