HL-3260N
FAQs & Troubleshooting |
How do I factory reset the print server?
Before you factory reset the print server, we recommend that you print a configuration page before resetting the print server.
Steps to factory reset the print server are as below.
VIA THE TEST SWITCH (if applicable)
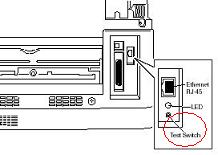
If your printer has a test switch, perform the following steps:
- Make sure that the printer is switched on.
- Locate the print server.
- Locate the TEST switch at the rear of the print server.
- Press and hold down the TEST switch for up to 20 seconds.
- The print server has reset itself when the flashing LEDs stop flashing and then start to flash again.
- Please note that the LED's only flash if the print server is connected to a live Ethernet network.

VIA THE BRADMIN PROFESSIONAL APPLICATION SOFTWARE
You can also factory reset the print server using the BRAdmin Professional application, to do this follow these steps:
<For BRAdmin Professional ver.2.xx Users>
- Start the BRAdmin Professional utility, by clicking Start => All Programs or Programs => Brother Administrator Utilities => Brother BRAdmin Professional Utilities => BRAdmin Professional.
- From the main BRAdmin screen double click the appropriate printer.
- Enter the print server password (The default password is "access").
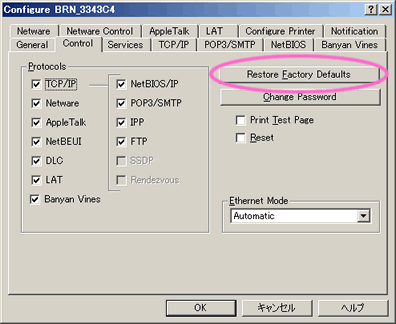
- Click the Control tab
- Click the Restore Factory Defaults button
- Click the OK button when you have read the warning message.
- The print server will then reset back to its default values.

<For BRAdmin Professional ver.3.xx Users>
- Start the BRAdmin Professional utility, by clicking Start => All Programs or Programs => Brother Administrator Utilities => Brother BRAdmin Professional 3 => BRAdmin Professional 3.
- From the main BRAdmin screen double click the appropriate machine.
- Enter the print server password (The default password is "access").
- Click Network Configuration tab, Control Panel and select Set Default.
- Click on Submit button.
- The print server will then reset back to its default values.

VIA A WEB BROWSER
Because web based management requires the TCP/IP protocol for communication, any reset option you see when managing the printer with a web browser, will not reset the IP address details that are set. If you wish to totally reset all the print server parameters we recommend you reset the print server using the TEST button or by using the BRAdmin application.
To reset the print server (excluding TCP/IP parameters) follow these steps:
- Connect to the printer using a web browser.
- Click the 'Network Configuration' page or 'Properties' page.
- Enter the print server password (the print server password is detailed in the user guide for the print server) if it's applicable.
- Click the 'Set Default' link or press "Restore Settings" button.
VIA THE PRINTER CONTROL PANEL (only for HL-5000/HL-5100 series Users)
- Switch the printer off.
- Make sure that the front cover is closed and the power cord is plugged in
- Hold down the Go button as you switch the printer on. All the LEDs light up. Keep the button pressed down until the Toner LED lights. When the Toner LED lights, release the Go button.
- Hold down the Go button until the Yellow Status LED lights. When the status LED lights, release the Go button.
- When all the LED's light, the printer will start warming up. The print server has now been reset to its factory defaults.
VIA THE PRINTER CONTROL PANEL (only for HL-8050N/HL-2700CN Users)
- Turn off the printer.
- Hold down the + button as you turn on the power switch. Keep the button down until the LCD display shows '--MEMU--' on the upper row .
- The print server has been reset to its default factory settings.
Related Models
DCP-8020, DCP-8025D, DCP-8040, HL-1270N, HL-1470N, HL-1650, HL-1670N, HL-1850, HL-1870N, HL-2460, HL-2600CN, HL-2700CN, HL-3260N, HL-3450CN, HL-4000CN, HL-4200CN, HL-5040, HL-5050, HL-5070N, HL-5140, HL-5150D, HL-5170DN, HL-6050D, HL-7050, HL-7050N, HL-8050N, MFC-5200C, MFC-8440, MFC-8820D, MFC-8840D, MFC-9880, NC-6100h
