SuperGalaxie 3000/3000C/3000D/3100D
FAQs & Troubleshooting |
How do I thread my machine?
Press 
 "BASIC OPERATION" key


 in that order to display a video example of the operation on the LCD.
Follow the steps explained below to complete the operation.
Be sure to thread the machine properly. Improper threading can cause the thread to tangle and break the needle, leading to injury.
-
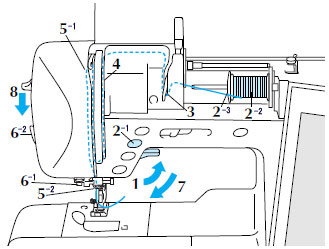
Raise the presser foot lever.
The machine has an upper threading shutter to insure proper threading.
The upper threading shutter opens when the presser foot is raised.
Upper threading can not take place if the presser foot is not raised.
 Upper threading shutter
 -
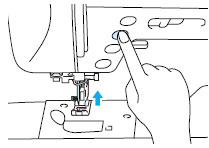
Press the "Needle Position" button to set the needle in the up position.
This step moves the thread take-up lever to a position in which it can be threaded.
Be sure to do this step before continuing.
Pivot the spool pin so that it angles toward the front of the machine.
Set the thread spool on the spool pin so that the thread unrolls from the front of the spool.
Push the spool cap onto the spool pin as far as possible, then return the spool pin to its original position.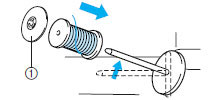
 Spool cap
- If the thread spool and/or spool cap are set incorrectly, the thread may tangle on the spool pin and cause the needle to break.
-
Use the spool cap (large, medium, or small) that is closest in size to the thread spool.
If a spool cap smaller than the thread spool is used, the thread may become caught in the slit on the end of the spool and cause the needle to break.
When sewing with fine, cross-wound thread, use the small spool cap, and leave a small space between the cap and the thread spool.
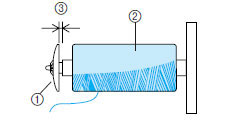
 Spool cap (small)
 Thread spool (cross-wound thread)
 Space
Space -
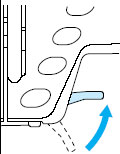
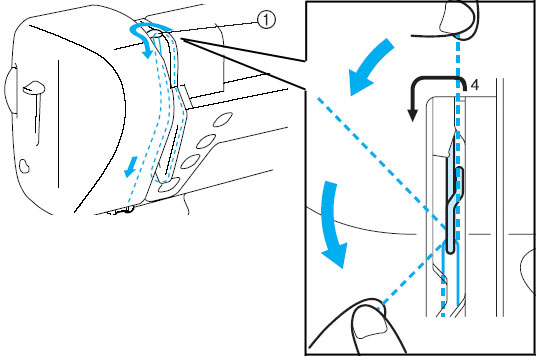
Hold the thread from the spool in both hands, and pass the thread around the plate in the thread guides.
Use both hands to set the thread around the thread guide plate.
Thread guide plate
-
Pass the thread through the groove according to the threading sequence numbers indicated on the machine.

-
To thread the take-up lever, pass the thread from the back right side to the front left side.
Threading the take-up lever
Set the thread behind the needle clamp thread guide on the needle bar.
To set the thread easily, hold the end of the thread with your left hand, and use your right hand to guide the thread behind the needle clamp thread guide.
-
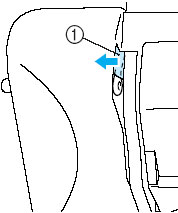
Set the thread securely into the slit of the disk in the thread guide.
Be sure that the thread catches the corner of the thread guide.
Use the thread cutter on the side of the machine to cut the thread.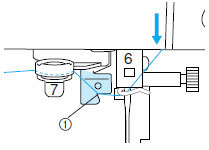 Corner of the thread guide

-
Lower the presser foot lever.
Be sure to lower the presser foot lever.
Continuing without lowering the lever may cause damage to the machine. -
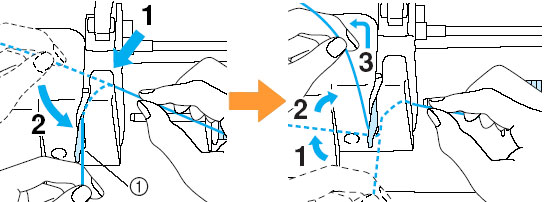
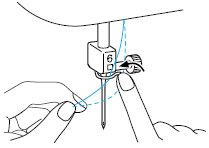
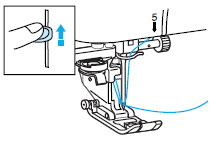
Push down the needle threader lever as far as possible.
The hook will rotate and pass through the eye of the needle.
Make sure that the hook does not catch the fabric or any other objects near the presser foot.
Slowly return the needle threader lever to its original position.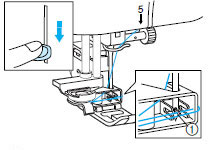 Hook
Hook
Check that the hook has pulled the thread through the eye, then release the lever.
-
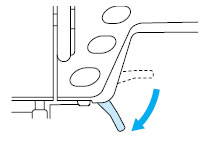
Pull the thread loop toward the back of the machine.
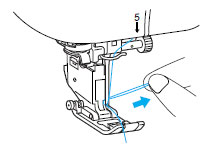
Do not pull the thread too strongly, as you may bend the needle.
The needle threader lever can only be used with home sewing machine needles size 75/11-100/16.
Check the table on page 1-45 for appropriate needle and thread combinations.
Note that, if you are using transparent nylon mono-filament thread, only needles in the range of 90/14-100/16 can be used.
-
Pass the thread under the presser foot, and pull it about 100 mm (3 inch - 4 inch) toward the back of the machine.
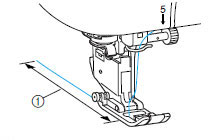 100mm (3inch - 4inch)
- If the threading is not successful, raise the presser foot lever and start again from step 5, setting the thread in the needle clamp thread guide.
-
There are certain decorative threads that can not be threaded using the needle threader lever.
When using these threads, set the thread behind the needle clamp thread guide (step 5), then thread the eye of the needle manually. Make sure the main power switch is OFF when threading the needle manually.