Innov-is VM6200D
FAQs & Troubleshooting |
How do I specify the sewing end point with the sensor pen for utility stitches/ character decorative stitches?
The following procedure is applied to the machine with software version 1.05 or later
- In order to specify the location accurately, use the sensor pen to touch the end point twice. Be sure to touch the same point.
- Before starting to sew, mark the end point.
- Before start sewing, test the pattern first from steps 1 to 6 to see if the stitch can be used with this function.
- Turn on the machine.
- Display the utility stitches screen.
- Select a stitch pattern you want to sew.
- Start sewing, and then stop the machine when the desired sewing end point enters the sensor pen touch range.
* In order to specify the location accurately, stop the machine at a location more than 70 mm (approx. 2-3/4 inches) away from the sewing end point.
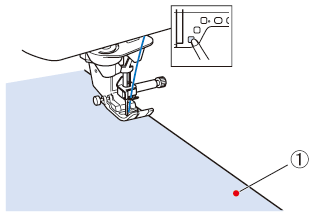
(1) the desired sewing end point
- Press
 (Sensor function key).
The sensor functions screen appears.
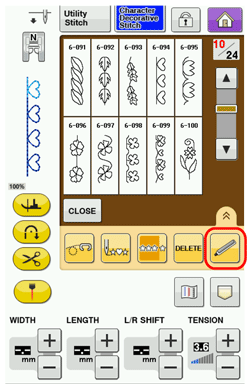
- The sensor functions screen appears. Press
 (Sewing end point setting key).
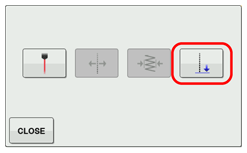
If
 (Sewing end point setting key) is not available, the sewing end point cannot be specified with the selected stitch pattern.
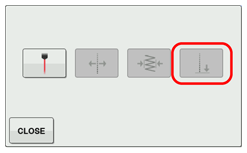
- The sewing end point setting screen appears.

- With the sensor pen, touch the location to be specified as the sewing end point.

- The distance from the current needle position to the touched location appears.
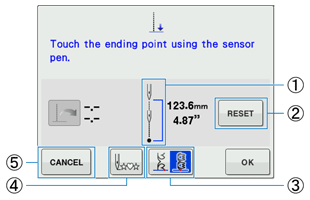

It shows how many times you need to touch the sewing end point, once or twice.


Touch once
Touch twice
* If the needle drop point is being specified with the sensor pen within 70 mm (approx. 2-3/4 inches) from the sewing end point, the machine will not require the second touch.

RESET key Press this key to erase the specified sewing end point. 
Stitch End Mode key Press this key to select whether or not sewing is ended with a complete pattern.
For details, refer to notes for "Stitch End Mode Key".
Back To Beginning key Press this key to begin sewing at the beginning of the pattern. 
CANCEL key Press to stop specifying a setting with the sensor pen.
Stitch End Mode Key:

The length of the stitch pattern is adjusted so that sewing will stop at the specified end point with a complete pattern. 
The end of stitching is not adjusted. When the end point is reached, sewing stops immediately, even if the stitch pattern is not complete.
- The stitch end mode key is not available with the following situations.
- When only
 is shown. The adjustment of the stitch end is not available with the selected stitch, and only one icon will be shown.
- When the stitch end mode key is grayed out.

- When specifying the sewing end point at the point that needs adjustment more than 20% of the length of a pattern, to finish a pattern completely.
- When only
- In order to end sewing with a complete pattern, we recommend reducing the size of the pattern.
Sewing with a long pattern may not end with a complete pattern.
- The displayed distance is not the length of a straight line connecting the current needle position and the location touched with the sensor pen.
It is the length of a perpendicular intersection for the location touched with the sensor pen and the sewing line.

(1) Displayed distance
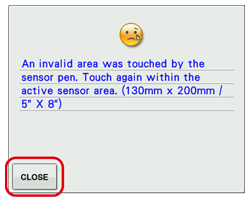
- The following error message appears if the area outside of the sensor pen touch range is touched.
Press CLOSE key, and then touch within the sensor pen touch range.
- When sewing with this setting, be sure to gently hold the fabric and feed it straight.
- When using the sensor pen to specify the sewing end point, be sure to hold the pen in the same way as when it was calibrated, otherwise the actual end point may be different from the point that you specified.
- For best results, sew test stitching using the same material and stitch pattern as those in the actual project.
- The stitch end mode key is not available with the following situations.
- Press OK key to apply the sewing end point setting.
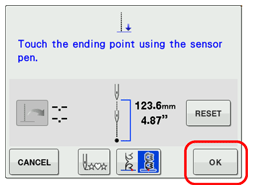
The setting can also be applied by long touching an adjustment area with the sensor pen.
- When a sewing end point setting is specified,
 appears in the upper-left corner of the screen.

- Start sewing again.
- When touching the sensor pen to specify the end point is only once, continue with step 17.
- When touching the sensor pen to specify the end point is twice, continue with next step.
- When touching the sensor pen to specify the end point is only once, continue with step 17.
- The machine automatically stops with the needle in the fabric, at about half the distance to the specified sewing end point, and the sewing end point setting screen appears.
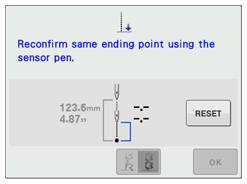
- With the sensor pen, touch again the location to be specified as the sewing end point.

* Be sure to touch the same point.

(1) The distance from the current needle position to the touched location appears.
- By using the sensor pen to touch the sewing end point twice, the distance will be accurately specified.
- The following error message appears if the location touched the second time is different than the location touched the first time.
Press CLOSE key, and then touch the correct location.

- The stitch end mode key cannot be used when specifying the sewing end point for the second time.
- By using the sensor pen to touch the sewing end point twice, the distance will be accurately specified.
- Press OK key to apply the sewing end point setting.
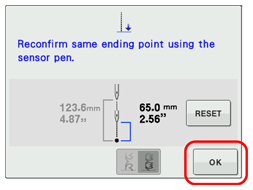
The setting can also be applied by long touching an adjustment area with the sensor pen..
- Start sewing again.
- The machine stops at the specified end point automatically.
For a better sewing results, take notice of the following things
- Be sure to hold the sensor pen in the same way as when it was calibrated.
Otherwise the actual end point may be different from the point that you specified.
- Be sure to gently hold the fabric and guide it to feed in a straight line.
Do not push or pull the fabric while sewing.
- Use the appropriate presser foot for the selected stitch pattern.
- Be sure to hold the sensor pen in the same way as when it was calibrated.
- When using the same fabric and pattern to sew the same length, the previous setting can be used again, instead of using the sensor pen to specify the sewing end point each time.
To use the previous setting, follow the steps below.
- Start sewing, and then stop the machine at the location where the distance to the sewing end point is equal to the previous setting.
- Press
 (Sensor function key).
The sensor functions screen appears.
- The sensor functions screen appears. Press
 (Sewing end point setting key).
- The sewing end point setting screen appears. Press
 ( Previous setting recall key).

- Press OK key.

- Start sewing again.
- The machine stops at the end point automatically.
- This resume function will only repeat the sewing distance that has been assigned within the 200 mm (approx. 8 inches) distance from the needle point to the sewing end point.
If you are already sewing and you stop the machine to specify the ending point, when pressing to duplicate the previous setting the machine will only repeat the distance from where you stop the machine to the ending point.
You can change the sewing end point after pressing by touching the new end point with the sensor pen.
For better result, however, it is rather recommended to specify the end point again from the beginning.
- The sewing end point cannot be recalled in the following situations. (The key is not available.)
- When the machine has been turned off.
- When a pattern is changed, added or deleted.
- When the stitch length is changed.
- When a pattern is flipped vertically.
- When the dual feed foot is attached/detached.
- When the feed position lever of the dual feed foot is raised/lowered.
- When the machine has been turned off.
- To cancel the previous setting, press
 .
.
- The sewing end point can be recalled; however, if the sewing conditions have changed, for example, different fabric is used, the sewing end point must be specified again from the beginning.
- This resume function will only repeat the sewing distance that has been assigned within the 200 mm (approx. 8 inches) distance from the needle point to the sewing end point.


