Innov-is VM6200D
FAQs & Troubleshooting |
How do I specify the sewing end point with the sensor pen for utility stitches?
* The following procedure is applied to the machine with software between version 1.01 and 1.04.
Before start sewing, test the pattern first from steps 1 to 6 to see if the stitch can be used with this function.
- Turn on the machine.
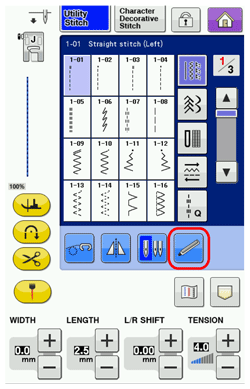
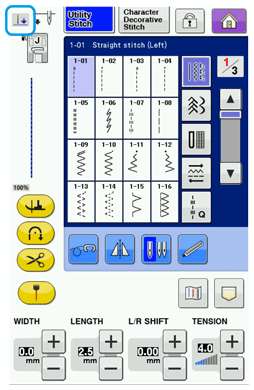
- Display the utility stitches screen.
- Select a stitch pattern.
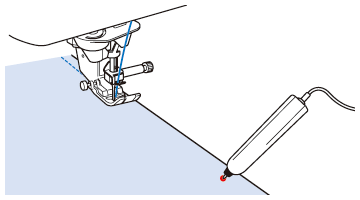
- Start sewing, and then stop the machine when the desired sewing end point enters the sensor pen touch range.
- Press
 (Sensor function key).
* The sensor functions screen appears.
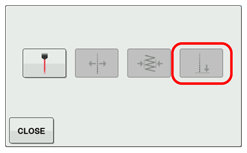
- Press
 (Sewing end point setting key).

If
 (Sewing end point setting key) is not available, the sewing end point cannot be specified with the selected stitch pattern.
Select a different stitch pattern.
- The sewing end point setting screen appears.

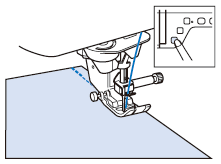
- With the sensor pen, touch the location to be specified as the sewing end point.
- The distance from the current needle position to the touched location appears.
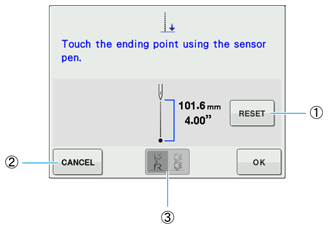
(1) To erase the specified sewing end point, press RESET key.
(2) To stop specifying a setting with the sensor pen, press CANCEL key.
(3) This key is not available when selecting the Utility Stitch patterns.
- The displayed distance is not the length of a straight line connecting the current needle position and the location touched with the sensor pen.
It is the length of a perpendicular intersection for the location touched with the sensor pen and the sewing line.
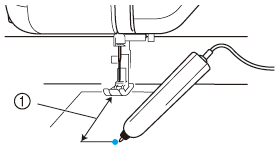
(1) Displayed distance
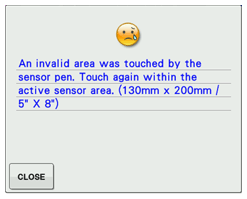
- The following error message appears if the area outside of the sensor pen touch range is touched. Press CLOSE key , and then touch within the sensor pen touch range.
- When sewing with this setting, be sure to gently hold the fabric and feed it straight.
- When using the sensor pen to specify the sewing end point, be sure to hold the pen in the same way as when it was calibrated, otherwise the actual end point may be different from the point that you specified.
- For best results, sew test stitching using the same material and stitch pattern as those in the actual project.
- The displayed distance is not the length of a straight line connecting the current needle position and the location touched with the sensor pen.
- Press OK key to apply the sewing end point setting.
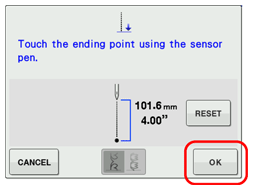
The setting can also be applied by long touching an adjustment area with the sensor pen.
- When a sewing end point setting is specified,
 appears in the upper-left corner of the screen.
If a different pattern is selected after the sewing end point has been specified, the end point setting is erased.
- Start sewing again.
* The machine stops near the specified end point automatically.
If the machine finishes sewing before arriving at the specified end point, sew manually to add stitches up to the desired sewing end point.
For a better sewing results, take notice of the following things.
- Be sure to hold the sensor pen in the same way as when it was calibrated.
Otherwise the actual end point may be different from the point that you specified.
- Be sure to gently hold the fabric and guide it to feed in a straight line.
Do not push or pull the fabric while sewing.
- Use the appropriate presser foot for the selected stitch pattern.
- Be sure to hold the sensor pen in the same way as when it was calibrated.