Innov-is VM6200D
FAQs & Troubleshooting |
How do I specify the stitchiing width and stitch position using the sensor pen?
The guideline marker is a laser; therefore, do not stare at the laser light directly. Otherwise it may cause blindness.
The zigzag width and “L/R SHIFT” value can be specified using the sensor pen.
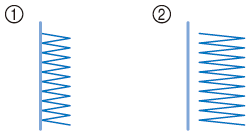
(1) Original stitching width/position (2) Adjusted stitching width/position
- Turn on the machine.
- Display the sewing screen.
- Select a stitch pattern.
-
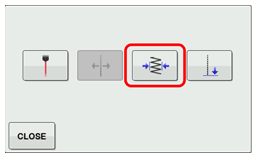
Press
 (Sensor function key).
The sensor functions screen appears.
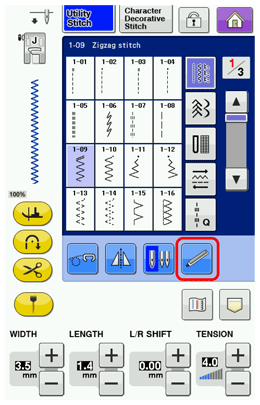
- Press
 (Stitch width setting key).
- The stitching width setting screen appears, and the guideline marker flashes at the present left side of the stitch width.

If
 (Stitch width setting key) is not available, the stitching width cannot be specified with the selected stitch pattern. Select a different stitch pattern.
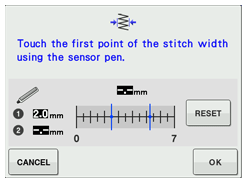
- With the sensor pen, touch the first point for the stitching width.
- The distance from the left reference line to the touched position appears in the stitching width setting screen.
- The guideline marker moves to the touched position and flashes.
The following error message appears if the area outside of the sensor pen touch range is touched.
Press CLOSE key, and then touch within the sensor pen touch range.

The position can be precisely adjusted by touching the adjustment areas with the sensor pen.
- The distance from the left reference line to the touched position appears in the stitching width setting screen.
-
Press OK key to apply the first point of the stitching width.
* The setting can also be applied by long touching an adjustment area with the sensor pen.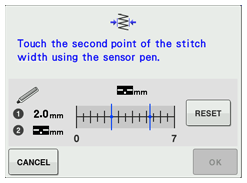
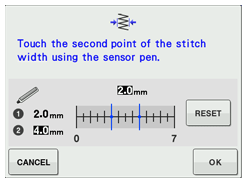
- With the sensor pen, touch the second point for the stitching width.
- The distance from the left reference line to the touched position appears in the stitching width setting screen.
- The stitch preview on the upper left side of the screen is updated according to the specified setting.
- The guideline marker moves to the touched position and flashes.
- If the distance between the specified first and second points is wider than the maximum stitch width for the selected stitch pattern, the second point cannot be specified. Specify a location closer to the first point.
- If the distance between the specified first and second points is narrower than the minimum stitch width for the selected stitch pattern, the second point cannot be specified. Specify a location further away from the first point.
- The distance from the left reference line to the touched position appears in the stitching width setting screen.
-
Press OK key to apply the second point of the stitching width.
* The setting can also be applied by long touching an adjustment area with the sensor pen.
- The needle moves to the specified position to start sewing.
- The stitch selection screen appears again, and the stitch width and “L/R SHIFT” change according to the settings specified with the sensor pen.
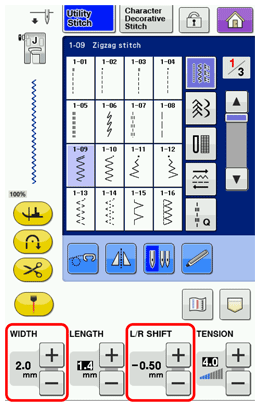
- With multiple patterns that have been combined, the specified stitching width is applied to the pattern with the largest stitch width. With patterns other than combined patterns, the stitch width is adjusted to the stitching width specified for the pattern with the largest stitch width.
- With multiple patterns that have been combined, the settings specified for the stitch width and "L/R SHIFT" in the stitch selection screen are for the first pattern to be sewn. The value may differ from the stitch width setting.
- With twin needle sewing, the stitching width is specified with the left needle as the reference.
- The needle moves to the specified position to start sewing.