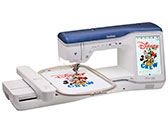
Innov-is XJ1
FAQs & Troubleshooting |
How do I clean the race?
Cleaning the race
-
Press
 (Needle position button) to raise the needle.
-
Turn the main power to OFF.
-
Remove the needle, presser foot and presser foot holder.
-
Remove the bobbin cover.
-
Slide the needle plate cover toward you to remove it.
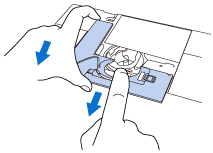
If the flat bed attachment is attached, the needle plate can be removed when the accessory compartment is opened.
-
Grasp the bobbin case, and then gently lift out.
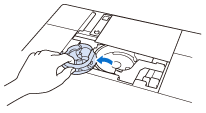
-
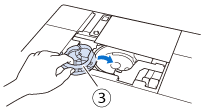
Use the cleaning brush or a vacuum cleaner to remove any lint and dust from the race and bobbin thread sensor and the surrounding area.
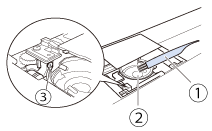
(1) Cleaning brush
(2) Race
(3) Bobbin thread sensor- Do not apply oil to the bobbin case.
- If lint or dust collects on the bobbin thread sensor, the sensor may not operate correctly.
-
Insert the bobbin case so that the
 mark on the bobbin case aligns with the
  mark on the machine.
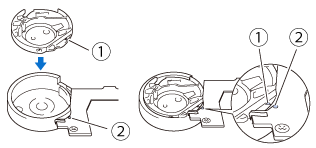
(1)  mark
mark
(2) mark
mark
(3) Bobbin case* Align the  and
and  marks.
* Make sure that the indicated points are aligned before installing the bobbin case. - Never use a bobbin case that is scratched, otherwise the upper thread may become tangled, the needle may break or machine performance may suffer. For a new bobbin case, contact your nearest Brother authorized service center.
- Be sure that the bobbin case is correctly installed, otherwise the needle may break.
-
Insert the tabs on the needle plate cover into the needle plate, and then slide the cover back on.
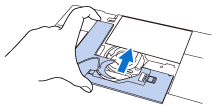
-
Reattach the bobbin cover.
Cleaning the cutter in the bobbin case area
The cutter below the needle plate should be cleaned. If dust or lint accumulate on the cutter, it will be difficult to cut the thread when ![]() (Thread cutter button) is pressed or the automatic thread cutting function is used.
(Thread cutter button) is pressed or the automatic thread cutting function is used.
Clean the cutter when the thread is not easily cut.
-
Follow steps 1 through 5 in the above section "Cleaning the race" to remove the needle plate cover.
-
Use the screwdriver included with the machine to unscrew and remove the needle plate.
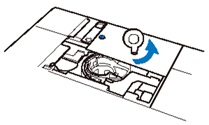
-
Use the cleaning brush or a vacuum cleaner to remove any lint and dust from the cutter in the bobbin case area.
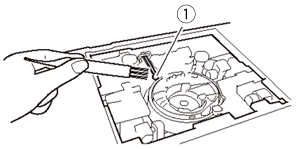
(1) Cutter - Do not touch the cutter, otherwise injuries may result.
-
Align the two screw holes in the needle plate with the two holes at the needle plate mounting base, and then fit the needle plate onto the machine.
-
Lightly finger-tighten the screw on the right side of the needle plate. Then, use the screwdriver included to firmly tighten the screw on the left side. Finally, firmly tighten the screw on the right side.
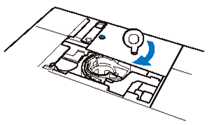
-
Replace the bobbin case and the needle plate cover following steps 8 through 10 in the above section "Cleaning the race".
-
If the needle plate has been removed, check machine operations to confirm that installation has been completed correctly.
For instructions, refer to "Checking machine operations" section of "Fabric is caught in the machine and cannot be removed".
-
If the needle plate has been removed, check machine operations to confirm that installation has been completed correctly.
Content Feedback
To help us improve our support, please provide your feedback below.
