MFC-640CW
FAQs & Troubleshooting |
Set up your Brother machine on a wireless network.
1. Before you set up your Brother machine
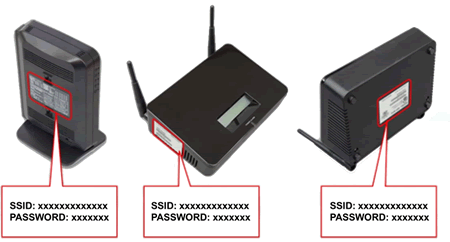
You must find out the wireless network settings of your wireless router or access point. Check and write down the current wireless network settings below (you will need this information later):
- Network Name (also known as "SSID" or "ESSID")
- Network Key (also known as "Password", "Security Key", or "Encryption Key")

How to find the Network Name (SSID) and Network Key (Password)
- Check the base or side of your wireless router or access point.
- See the documentation provided with your wireless router or access point.
Brother cannot provide this information. If you cannot find your wireless Network Name and Network Key, contact your Internet service provider or router manufacturer.
If you cannot find the Network Name (SSID) and Network Key (Password) of your wireless router or access point, see the following FAQs:
For Windows users
> Click here to see to find the wireless security information for Windows.
For Macintosh users
> Click here to see to find the wireless security information for Macintosh.
After checking the network information of your wireless router or access point, go to step 2 to set up your machine on a wireless network.
If your wireless router or access point uses WEP encryption with multiple WEP keys, write down and use only the first WEP key.
2. Set up a Brother machine on a wireless network
To set up your Brother machine on a wireless network:
-
Connect the power cord to your Brother machine and then connect it to an AC power outlet (electrical socket).
Turn your Brother machine on.If you have previously configured the wireless settings of the machine, you must reset the network LAN settings before you can configure the wireless settings, again.
> Click here to how to reset the network settings. -
Enable the Brother machine's WLAN interface.
> Click here to how to enable the Brother machine's network interface.
-
Press Menu.
-
Press the Up or Down arrow key to select the following:
-
Select LAN. Press OK or Set or Menu/Set.
-
Select Setup WLAN. Press OK or Set or Menu/Set.
-
Select Setup Wizard. Press OK or Set or Menu/Set.
This will start the wireless setup wizard.
-
Select LAN. Press OK or Set or Menu/Set.
-
The machine will search for your network and display a list of available Network Names (SSIDs).
When a list of SSIDs appears, press the Up or Down arrow keys to select the SSID you wrote down earlier.
-
Press OK or Set or Menu/Set.
-
Press the Up or Down arrow key to select one of the options below: If your network is configured for Authentication and Encryption you must match the settings used for your network.
Available authentication and encryption method depend on your model.
-
No Authentication or Encryption:
Select Open System, press OK or Set or Menu/Set then select None for Encryption Type and press OK or Set or Menu/Set.
To apply the settings, select Yes.
-
No Authentication with WEP Encryption:
Select Open System, press OK or Set or Menu/Set then use the Up or Down arrow key to select WEP for the Encryption Type and press OK or Set or Menu/Set.
Select the appropriate key number and press OK or Set or Menu/Set.
Enter the WEP key (Network Key), then press OK or Set or Menu/Set to apply your settings.
To apply the settings, select Yes.
-
Authentication with WEP Encryption:
Select Shared Key and press OK or Set or Menu/Set.
Select the appropriate key number and press OK or Set or Menu/Set.
Enter the WEP key (Network Key), then press OK or Set or Menu/Set to apply your settings.
To apply the settings, select Yes.
-
Authentication with WPA/WPA2-PSK (TKIP or AES) Encryption:
Select WPA/WPA2-PSK, press OK or Set or Menu/Set then use the Up or Down arrow key to select TKIP or AES for the Encryption Type and press OK or Set or Menu/Set.
Enter the WPA/WPA2-PSK password (Network Key), then press OK or Set or Menu/Set to apply your settings.
To apply the settings, select Yes.
-
No Authentication or Encryption:
-
The machine tries to connect to the wireless network you have selected.
-
If your Brother machine connected successfully
The machine's LCD displays Connected.
-
If the connection failed
The machine's LCD displays Connection Fail.
Make sure your access point is on, and verify your Network Settings collected in Step1.
Temporarily move your machine as close as possible to the access point or router. Try starting from Step 2-3 again.
-
If your Brother machine connected successfully
-
The machine will automatically acquire the correct TCP/IP address information from your access point/router if DHCP is enabled (DHCP is normally enabled as default for most access point routers).
Once the Brother machine is joined to the network and has a valid IP address, the wireless setup is complete.
3. Download and install your Brother machine's software
After setting up your Brother machine, you must install the driver. To download the driver:
For Windows users
> Go to the Downloads section of this website and download the Full Driver & Software Package.
Follow the installation instructions on the download page.
For Macintosh users
The installation instructions are available on the download page.
If you have completed the setup procedure but cannot connect,refer to listed below.
> Click here to see Wireless Network Troubleshooting for Windows.
> Click here to see Wireless Network Troubleshooting for Macintosh.
