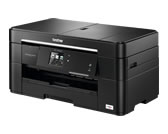
MFC-J5320DW
FAQs & Troubleshooting |
After replacement or repair of the Brother machine, uneven color streaks stand out when printing from the computer.
This product optimizes printing based on the information stored in the printer driver on the computer connected to your Brother machine.
When you replaced or repaired your machine, or the IP address of a printer driver is changed to another Brother machine, you need to update the product information in the printer driver manually.
If you print without updating the information in the printer driver, uneven color streaks may occurs since printing is performed based on the old information stored in the printer driver.
To resolve this issue, update the information in the printer driver installed in the computer.
For more details, click the link below for OS you are using,
For Windows
-
Connect your Brother machine to your computer with USB, wired LAN or wireless LAN.
Confirm that connection status of your Brother machine is ready.
-
Open Printing Preferences. (Click here to see the details of how to open Printing Preferences.)
-
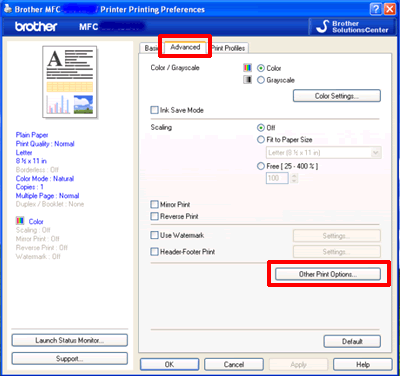
Click the Advanced tab and click Other Print Options.
-
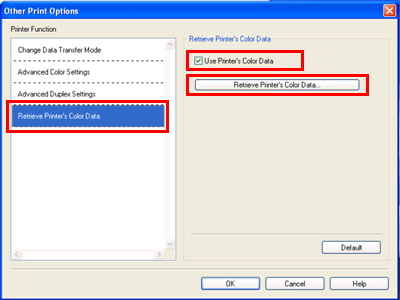
Click Retrieve Printer's Color Data in Printer Function on the left and confirm the Use Printer's Color Data check box is checked, then click Retrieve Printer's Color Data.
-
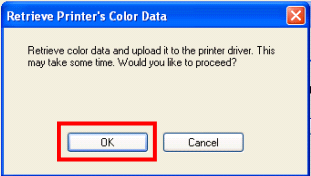
Click OK and wait for a while.
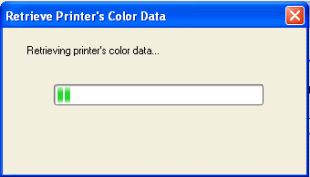
-
When the screen below appears, click OK to finish. Retrieving Printer's color data is now completed.
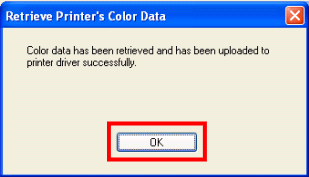
- If an error message stating "Communication with your device failed", please confirm that your machine and computer are connected correctly, and then repeat the procedures.
- This procedure does not need to be performed multiple times on the same computer. The data is saved into the computer if it is completed once.
- If your machine connects to several computers, perform this procedure for each computer.
- If you use your Brother machine in a Network Shared environment, this procedure can only be executed on the Server PC. The procedure does not need to be performed on the Client PC.
For Macintosh (Mac OS X 10.4 - 10.15)
-
Connect your Brother machine to your computer with USB, wired LAN or wireless LAN.
-
For Mac OS X 10.4 users:
Run the Printer Setup Utility (from the Go menu, choose Applications => Utilities), then choose your Brother machine. Click the Utility.
For Mac OS X 10.5 users:
Run the System Preferences, choose Print & Fax, then choose your Brother machine. Click the Open Print Queue... button, then click Utility.
For Mac OS X 10.6 - 10.15 users:
Run the System Preferences, choose Print & Fax, Print & Scan or Printers & Scanners, then choose your Brother machine. Click the Open Print Queue... button, then click Printer Setup or Settings. Choose the Utility tab then click Open Printer Utility.
-
Now the status monitor is turned on.
-
Go to the menu bar, click Control => Retrieve Printer's Color Data.

-
Click OK and wait for a while.

-
When the screen below appears, click OK to finish. Retrieving Printer's color data is now completed.

- If an error message stating "Communication with your device failed", please confirm that your machine and computer are connected correctly, and then repeat the procedures.
- This procedure does not need to be performed multiple times on the same computer. The data is saved into the computer if it is completed once.
- If your machine connects to several computers, perform this procedure for each computer.
- If you use your Brother machine in a Network Shared environment, this procedure can only be executed on the Server PC. The procedure does not need to be performed on the Client PC.
Related Models
DCP-J1100DW, DCP-J152W, DCP-J4110DW, DCP-J4120DW, MFC-J1300DW, MFC-J430W, MFC-J4510DW, MFC-J4620DW, MFC-J470DW, MFC-J4710DW, MFC-J480DW, MFC-J491DW, MFC-J5320DW, MFC-J5330DW, MFC-J5720DW, MFC-J5730DW, MFC-J5910DW, MFC-J5920DW, MFC-J5930DW, MFC-J5945DW, MFC-J625DW, MFC-J650DW, MFC-J6510DW, MFC-J6520DW, MFC-J6530DW, MFC-J6910DW, MFC-J6920DW, MFC-J6930DW, MFC-J6935DW, MFC-J6945DW, MFC-J825DW, MFC-J870DW
