DCP-J925DW
Vanlige spørsmål og feilsøking |
Scan and save a document in PDF format using the SCAN key on my Brother machine (Scan to File)
You can scan and save a document in PDF format to a preferred folder by pressing the SCAN key on the control panel of your Brother machine.
If you want to scan multiple pages into one file, please refer to FAQ, "Scan multiple pages into one file instead of each scan being saved as a separate file".
Follow the instructions below to configure and use the Scan to File feature.
NOTE: Illustrations shown below are from a representative product and operating system and may differ from your Brother machine and operating system.
NOTE: Illustrations shown below are from a representative product and operating system and may differ from your Brother machine and operating system.
STEP A: Configure the Scan to File feature
For Windows
-
Open the ControlCenter.
-
Brother Utilities supported models
-
Open Brother Utilities.
-
Windows 7 / 10
Click or
or  (Start) > (All Programs or All apps >) Brother > Brother Utilities.
 -
Windows 8
On the Start screen, click .
.
If is not on the Start screen, right-click somewhere on an empty spot, and then click, All Apps from the bar.
Click Brother Utilities.
-
Windows 7 / 10
- Select Scan.
- Click ControlCenter4.
-
Open Brother Utilities.
-
Brother Utilities unsupported models
Click (Start) > All Programs > Brother > [model name] > ControlCenter4.
-
Brother Utilities supported models
-
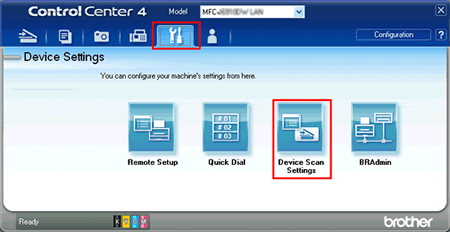
Open Device Scan Settings window.
In Home Mode:
Click Device Settings tab => Device Scan Settings.

In Advanced Mode:
Click Device Settings tab => Device Scan Settings.
-
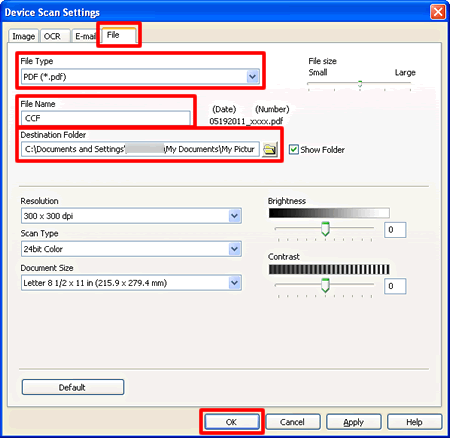
The Device Scan Settings window will appear. Click the File tab and select PDF(*.pdf) in File Type. Configure the settings and click OK. For example, you can set the prefix text used for the file name of the scanned data in the File Name box. You can also set the folder to save the scanned data in the Destination Folder box.
- Go to STEP B.
For Macintosh
-
Open the ControlCenter.
To open the ControlCenter2 application, click Go from the Finder bar, Applications > Brother > ControlCenter. Double click the ControlCenter.
The ControlCenter will open and an icon will be placed in the dock. -
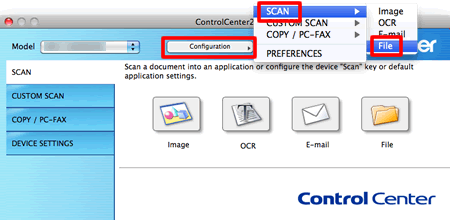
Click on Configuration => SCAN => File.
-
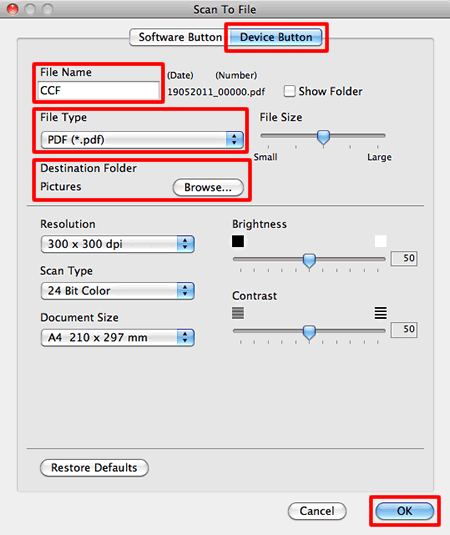
The Scan to File configuration window will appear. Click the Device Button tab and select PDF(*.pdf) in File Type. Configure the settings and click OK. For example, you can set the prefix text used for the file name of the scanned data in the File Name box. You can also set the folder to save the scanned data in the Destination Folder.
STEP B: Use the Scan to File feature from the SCAN key on my Brother machine
- Load your document.
-
Press the
 (SCAN) or Scan.
 - Press the LEFT OR RIGHT ARROW key to display to File.
- Press to File.
-
(For network users)
-
Press the UP OR DOWN ARROW key to display the destination computer you want to receive the data.
Note:
If the computer is not displayed, click here to see how to resolve the issue.
- Press the destination computer and press OK.
- If the LCD prompts you to enter a PIN number, enter the 4-digit PIN number for the destination computer on the control panel, and press OK.
-
Press the UP OR DOWN ARROW key to display the destination computer you want to receive the data.
- Press Black(Mono)Start or Color (Colour) Start.
You can scan from your computer with the useful application as ControlCenter. Refer to related FAQ's about how to use the ControlCenter with Windows/ Macintosh.
Beslektede vanlige spørsmål
- Scan and save a document in PDF format for Macintosh (Scan to File)
- Scan and save a document in PDF format for Windows (Scan to File)
- Change the scan settings for scanning from ControlCenter2 or the SCAN key (For Macintosh)
- Change the scan settings for scanning from ControlCenter4 or the SCAN key (For Windows)
- I cannot find the destination computer on the network when I try to scan a document using the machine's Scan key or control panel.
Tilbakemelding om innhold
Du kan hjelpe oss å forbedre kundestøtten vår ved å gi tilbakemelding nedenfor.