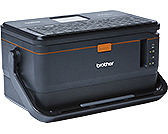
PT-E850TKW
FAQs & Troubleshooting |
Using the Device Settings (for Windows)
To use the Device Settings, please follow the steps below:
-
Open the Printer Setting Tool.
Refer to the FAQ: "Using the Printer Setting Tool (for Windows)".
-
Select Device Settings.
The Device Settings window appears.
-
Specify or change the settings.
See below for detailed information.Applying Setting Changes to Multiple Printers
Settings Dialog Box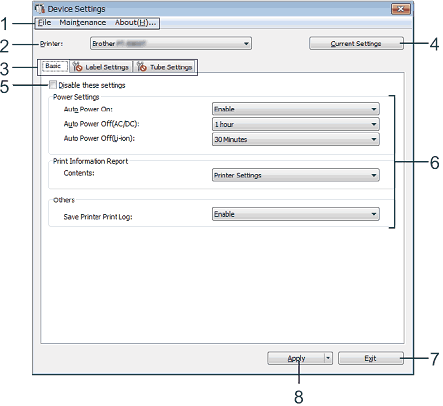
-
Menu Bar
Select a command contained in each menu from the list.
-
Printer
Specifies the printer whose device settings are to be configured.
If only one printer is connected, it is unnecessary to make a selection since only that printer will appear.
-
Settings Tabs
Contains settings that may be specified or changed.If
 appears in the tab, the settings in that tab cannot be specified or changed. In addition, the settings in the tab will not be applied to the printer even if [Apply] is clicked. The settings in the tab will also not be saved or exported when the [Save in Command File] or [Export] command is executed.
 -
Current Settings
Retrieves the settings from the currently connected printer and displays them in the dialog box. Settings will also be retrieved for parameters on tabs with .
.
-
Disable these settings
When this check box is selected, appears in the tab, and the settings can no longer be specified or changed.
Settings in a tab where appears will not be applied to the printer even if [Apply] is clicked. In addition, the settings in the tab will not be saved or exported when the [Save in Command File] or [Export] command is executed.
-
Parameters
Displays the current settings.
-
Exit
Exits [Device Settings], and returns to the main window of the “Printer Setting Tool”.
-
Apply
Applies the settings to the printer.
To save the specified settings in a command file, select [Save in Command File] from the drop-down list.
The saved command file can be used with the mass storage mode to apply the settings to a printer.
Menu Bar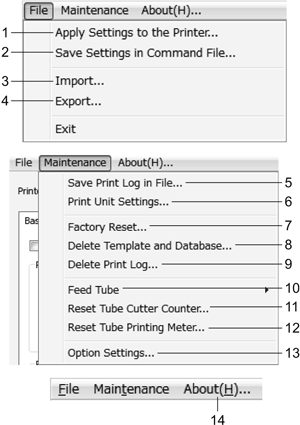
-
Apply Settings to the Printer
Applies the settings to the printer.
Performs the same operation as when [Apply] is clicked.
-
Save Settings in Command File
Saves the specified settings in a command file.
Performs the same operation as when [Save in Command File] is selected from the [Apply] drop-down list.
-
Import
Imports the exported file.
-
Export
Saves the current settings in a file.
-
Save Print Log in File
Saves the print log in a file in the CSV format.
-
Print Unit Settings
Prints a report containing firmware version and device setting information.
You can also print this report using the (Feed and Cut) button for more than 10 seconds.
When you print this report, use 36 mm tape.
-
Factory Reset
Resets all printer settings to factory settings.
-
Delete Template and Database
Deletes the templates and databases stored in the printer.
-
Delete Print Log
Deletes the print log stored in the printer.
-
Feed Tube
Adjusts the tube position by feeding a fixed amount of tube. The tube will be fed when [Forward] or [Backward] is clicked.
-
Reset Tube Cutter Counter
Resets the counter for the tube cutter.
-
Reset Tube Printing Meter
Resets the total length for the printed tubes.
-
Option Settings
If the [Do not display an error message if the current settings cannot be retrieved at startup] check box is selected, a message will not be displayed next time.
-
About
Displays the version information.
Basic Tab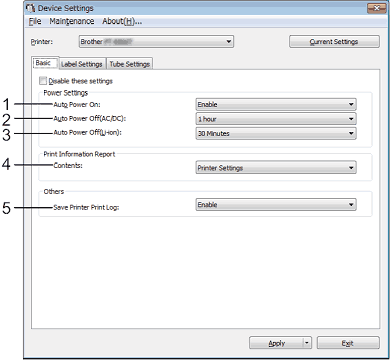
-
Auto Power On
Specifies whether or not the printer turns on automatically when the power supply cord is plugged into an electrical socket.
Available settings: [Disable], [Enable]
-
Auto Power Off (AC/DC)
Specifies the period of time that passes before the printer turns off automatically when connected to an electrical socket.
Available settings: [None], 10/20/30/40/50 Minutes, 1/2/4/8/12 hours
-
Auto Power Off (Li-ion)
Specifies the amount of time that passes before the printer turns off automatically when powered by the rechargeable Li-ion battery.
Available settings: [None], 10/20/30/40/50 Minutes, 1 hour
-
Contents
Specifies the printer information that will be printed.
Available settings: [All], [Usage Log], [Printer Settings], [Printer Transfer Data]
-
Save Printer Print Log
Select whether or not to save the printer's print log. If [Disable] is selected, [Maintenance] - [Save Print Log in File] cannot be selected.
Available settings: [Enable], [Disable]
Label Settings Tab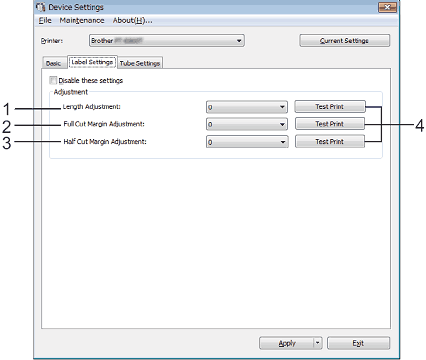
-
Length Adjustment
Adjusts the length of the printed label to correspond to the length of the label displayed on the computer.
Available settings: -4 to +4 (1 increments)
-
Full Cut Margin Adjustment
Adjusts the margin length when fully cutting labels.
Available settings: -2 to +2 (1 increments)
-
Half Cut Margin Adjustment
Adjusts the margin length when half-cutting labels.
Available settings: -2 to +2 (1 increments)
-
Test Print
Prints a test label to check the results of each adjustment.
Tube Settings Tab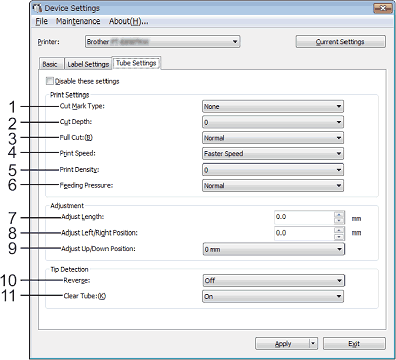
-
Cut Mark Type
Specifies the mark printed on tubes to indicate the tube cutting position.
Available settings: [None], [Dot], [Line]
-
Cut Depth
Adjusts the depth of half cuts.
Available settings: -3 to +3 (1 increments)
-
Full Cut
Adjusts the full cutting power.
Available settings: [Normal], [Strong]
-
Print Speed
Adjusts the printing speed.
Available settings: [Better Quality], [Faster Speed]If you use the printer in an environment with a temperature of 20°C or lower, we recommend setting [Print Speed] to [Better Quality].
-
Print Density
Adjusts the printing density.
Available settings: -3 to +3 (1 increments)
-
Feeding Pressure
Adjusts the feeding pressure to make the print result fainter or darker.
Available settings: [Normal], [Strong], [Soft]
-
Adjust Length
Adjusts the length of the printed tube to correspond to the length of the tube displayed on the computer.
-
Adjust Left/Right Position
Adjusts the printing position horizontally.
-
Adjust Up/Down Position
Adjusts the printing position vertically.
Available settings: -2.0 mm to +2.0 mm (0.5 mm increments)
-
Reverse
Turns the reverse action before printing on or off.
Available settings: [On], [Off]
-
Clear Tube
Specifies if you use the tube which cannot be detected by the tube sensor such as a clear tube or not.
Available settings: [On], [Off]
Applying Setting Changes to Multiple Printers-
After applying settings to the first printer, disconnect the printer from the computer, and then connect the second printer to the computer.
-
Select the newly connected printer from the [Printer] drop-down list.
-
Click [Apply].
The same settings that were applied to the first printer are applied to the second printer.
-
Repeat steps 1 - 3 for all printers whose settings you want to change.To save the current settings in a file, click [File] - [Export].
The same settings can be applied to another printer by clicking [File] - [Import], and then selecting the exported settings file.
-
Menu Bar
