TD-2120N
FAQs & Troubleshooting |
Using the Device Settings (for Windows)
The Device Settings in the Printer Setting Tool allows you to change default printer settings and specify more advanced settings than the printer driver. For TD-2120N/2130N, the settings for the touch panel display (optional) can also be changed.
To use the Device Settings, follow the steps below:
-
Open the Printer Setting Tool.
Refer to "Using the Printer Setting Tool (for Windows)". -
Click the [Device Settings] button.
The Device Settings window appears. -
Specify or change the settings.
See below for detailed information:> Menu Bar
> Panel Settings (1) Tab (TD-2120N/2130N only)
> Panel Settings (2) Tab (TD-2120N/2130N only)
-
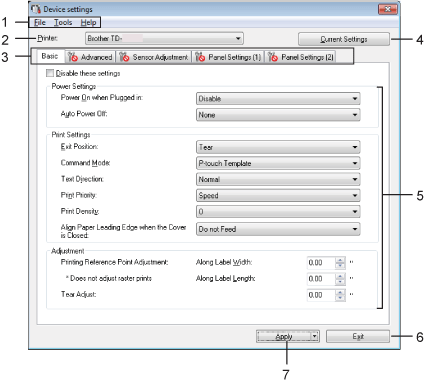
Menu Bar
Selects a command contained in each menu from the list. -
Printer
Selects the printer to be configured.
If only one printer is connected, it is unnecessary to select since only that printer will appear. -
Settings Tabs
Contains the settings to be specified or changed.In the tabs with
 , the settings cannot be specified or changed. In addition, the settings in the tab will not be applied to the printer even if you click [Apply]. They will also not be saved or exported when you execute the [Save in Command File] or [Export] command.
 -
Current Settings
Retrieves the settings from the currently connected printer and displays them in the dialog box. The settings can also be retrieved for the parameters in the tabs with .
.When the [Current Date/Time] button is clicked, the current time is retrieved from the computer and displayed for [Set Clock] in the [Panel Settings (2)] tab. (In order to specify the clock settings, the touch panel display must be attached.)
-
Parameters
Displays the current settings. Change the settings as necessary using the drop-down menus, direct entry or other appropriate methods. -
Exit
Exits [Device settings] and returns to the main window of the Printer Setting Tool. -
Apply
Applies the settings to the printer.
To save the specified settings in a command file, select [Save in Command File] from the drop-down menu.
The saved command file can be used with the mass storage feature to apply the settings to the printer.
Menu Bar
[File]
-
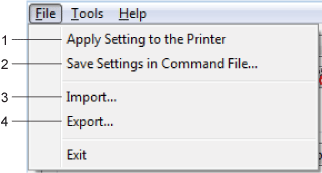
Apply Settings to the Printer
Applies the settings to the printer.
Performs the same operation as when the [Apply] button is clicked. -
Save Settings in Command File
Saves the specified settings in a command file.
Performs the same operation as when [Save in Command File] is selected from the [Apply] drop-down list. -
Import
Imports the exported file and applies the settings to this tool. -
Export
Saves the current settings in a file.
[Tools]
-
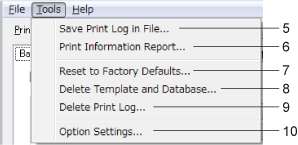
Save Print Log in File
Saves the print log in a file in the CSV format.
The following information is included in the print log: - Printing time/date (only when using the touch panel display. The time when printing finished is recorded for the time.)
- Key number*
- Template name*
- Name of database linked to template*
- Number of records in database*
- Number of copies printed
-
Error information
* Only when printing templates saved on the printer
The print log cannot be saved in a file if [Save Printer Print Log] in the [Advanced] tab has been set to [Disable] and the setting has already been applied to the printer.
-
Print Information Report
Prints the following printer settings.- Program version
- Printer usage history
- Missing dot test pattern
- List of transferred data
- Communication settings
The printer setup information can also be printed by using
 (the Print button).
 -
Reset to Factory Defaults
Returns all printer settings, including the communication settings, to their factory defaults. However, templates and databases stored in the printer and the print log are not deleted. -
Delete Template and Database
Deletes the templates and databases stored in the printer. -
Delete Print Log
Deletes the print log stored in the printer. -
Option Settings
If [Do not display an error message if the current settings cannot be retrieved at startup] is checked, a message will not be displayed next time.
[Help]

-
About
Displays the version information.
-
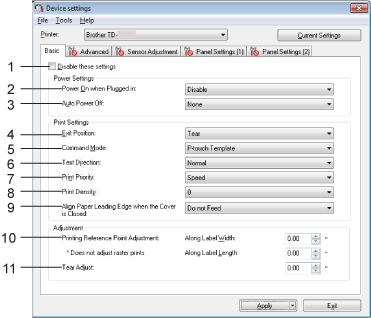
Disable these settings
When this item is checked, appears in the tab, and the settings can no longer be specified or changed.
The settings in a tab with will not be applied to the printer even if [Apply] is clicked. In addition, the settings in the tab will not be saved or exported when the [Save in Command File] or [Export] command is executed.
To apply the settings to the printer or save or export them, be sure to uncheck this item. -
Power On when Plugged in
Selects whether or not the printer turns on automatically when the AC power cord is plugged into an AC power outlet.
Available settings: [Enable], [Disable] -
Auto Power Off
Specifies the amount of time that passes before the printer turns off automatically.
Available settings: [None], [10 min.] to [60 min.] (10 min. increments) -
Exit Position (TD-2120N/2130N only)
Selects the media output location.
Available settings: [Tear], [Peeler] -
Command Mode
Selects the printer’s command format.
Available settings: [Raster], [ESC/P], [P-touch Template] -
Text Direction
Selects the printing orientation.
Available settings: [Normal], [Inverted 180 Degrees]
This setting is applied only when the printer driver is not used. When the printer driver is used, the setting specified in the printer driver will be applied. -
Print Priority
Selects the printer’s print quality.
Available settings: [Quality], [Speed][Print Priority] can also be changed using the printer driver. However, the setting will be erased when the printer is turned off. The setting changed using this tool will be retained even when the printer is turned off. If you print without using the printer driver, use this tool to change this setting.
-
Print Density
Adjusts the print density.
Available settings: [-5] - [+5] -
Align Paper Leading Edge when the Cover is Closed
Selects whether or not the paper is automatically fed when the cover is closed.
Available settings: [Feed], [Do not Feed] -
Printing Reference Point Adjustment
Adjusts the position of the reference point (point of origin for printing). This corrects printing misalignments resulting from differences in printer models or from the fixed margins of some applications.
The reference point cannot be adjusted for raster printing. -
Tear Adjust
Adjusts the tear bar tear off position for paper media.
Available settings: [-0.39"] - [0.39"] ([-10.0 mm] - [10.0 mm])
-
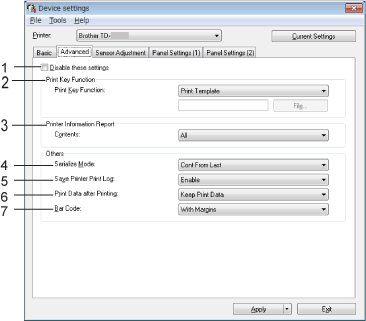
Disable these settings
When this item is checked, appears in the tab, and the settings can no longer be specified or changed.
The settings in a tab with will not be applied to the printer even if [Apply] is clicked. In addition, the settings in the tab will not be saved or exported when the [Save in Command File] or [Export] command is executed.
To apply the settings to the printer or save or export them, be sure to uncheck this item. -
Print Key Function
Selects the operation that is performed when (the Print button) is pressed.
If [Program Settings] is selected, click the [File] button and select the command file.
Available settings: [Print Template], [Printer Information Report], [Disable Key], [Program Settings]
-
Print Information Report
Selects which sections to print for the printer setup information.
Available settings: [All], [Usage Log], [Printer Settings], [Printer Transfer Data]
-
Serialize Mode
Selects whether or not to serialize from the last number printed.
Available settings: [Cont From Last], [From Starting#] -
Save Printer Print Log
Selects whether nor not to save the printer’s print log.
If [Disable] is selected, [Tools] - [Save Print Log in File] cannot be performed.
Available settings: [Enable], [Disable] -
Print Data after Printing
Selects whether or not to erase print data automatically after it is printed.
Available settings: [Erase All Print Data], [Keep Print Data] -
Bar Code*
Selects whether or not to add margins around barcodes.
Available settings: [With Margins], [No Margins]
* If this parameter does not appear in the tab, update the printer driver to the latest version from the [Downloads] section of this website.
[ Back To Top ]
Sensor Adjustment Tab
If RD Rolls are being used, it is unnecessary to adjust the sensors.
-
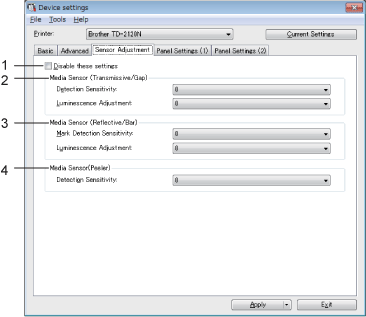
Disable these settings
When this item is checked, appears in the tab, and the settings can no longer be specified or changed.
The settings in a tab with will not be applied to the printer even if [Apply] is clicked. To apply the settings to the printer, be sure to uncheck this item.
 -
Media Sensor (Transmissive/Gap)
Adjusts the following transmissive/gap sensor parameters.
[Detection Sensitivity]
Adjust the precision of the sensor that detects the gaps (spacing) for die-cut labels.
Available settings: light emitted by the transmissive/gap sensor.
Available settings: [-2] - [+2]
[Luminescence Adjustment]
Adjust the amount of
-
Media Sensor (Reflective/Bar)
Adjusts the following reflective/black mark sensor parameters.
[Mark Detection Sensitivity]
Adjust the precision of the sensor that detects the black marks.
Available settings: [-2] - [+2]
[Luminescence Adjustment]
Adjust the amount of light emitted by the reflective/black mark sensor.
Available settings: [-2] - [+2] -
Media Sensor (Peeler) (TD-2120N/2130N only)
Specifies the settings when the label peeler (optional) is used.
Adjust the precision of the sensor that detects whether the label has been peeled.
Available settings: [-2] - [+2]
Panel Settings (1) Tab (TD-2120N/2130N only)
Specify the settings when the touch panel display (optional) is used (TD-2120N/2130N only).
-
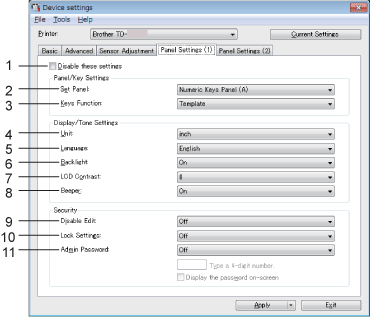
Disable these settings
When this item is checked, appears in the tab, and the settings can no longer be specified or changed.
The settings in a tab with will not be applied to the printer even if [Apply] is clicked. In addition, the settings in the tab will not be saved or exported when the [Save in Command File] or [Export] command is executed.
To apply the settings to the printer or save or export them, be sure to uncheck this item.
-
Set Panel
Selects the touch panel to be used.
Available settings: [Numeric Keys Panel (A)], [One Touch Keys Panel (B)] -
Keys Function
Selects the type of data assigned to keys in the one-touch panel.
To assign templates, select [Template].
To assign databases linked to a single template, select [Database].
Available settings: [Template], [Database] -
Unit
Selects the measurement units for displayed settings.
Available settings: [mm], [inch] -
Language
Selects the language of the touch panel display.
Available settings: [Dansk], [Deutsch], [English], [Español], [Français], [Italiano], [Nederlands], [Norsk], [Português], [Suomi], [Svenska], [ ], [
], [  ]
]The possible display languages differ depending on the printer model. If the selected language cannot be used for the touch panel display, the display language will not be changed. Make sure that the touch panel display supports the selected language.
-
Backlight
Selects whether the LCD display backlight is turned on.
Available settings: [On], [Off] -
LCD Contrast
Selects the LCD display contrast.
Available settings: [-2] - [+2] -
Beeper
Selects whether the printer beeps when a touch panel key is pressed.
Available settings: [On], [Off] -
Disable Edit
Selects whether or not label layouts can be edited.
Available settings: [On], [Off] -
Lock Settings
Selects whether or not settings selected by pressing (the Settings key) on the touch panel display can be changed.
Available settings: [On], [Off] -
Admin Password
Sets a password for accessing basic settings specified by pressing (the Admin key) on the touch panel display. Set a 4-digit password. If
[Display the password on-screen] is checked, specified passwords will be displayed in the computer's windows.
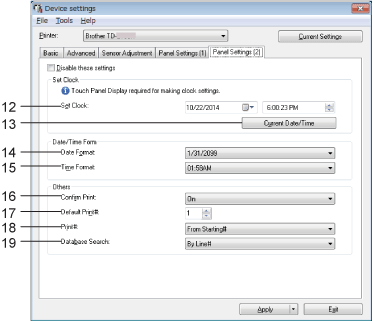
Panel Settings (2) Tab (TD-2120N/2130N only)
-
Set Clock
Sets the date and time for the touch panel display.
In order to specify the time settings, the touch panel display must be attached. -
Current Date/Time
Retrieves the current date and time from the computer and displays them.
-
Date Format
Selects the date format for the clock.
-
Time Format
Selects the time format for the clock.
-
Confirm Print
Selects whether a message appears so that the number of copies can be confirmed before printing.
Available settings: [On], [Off]
-
Default Print#
Specifies the default number of copies that appears when printing.
Available settings: [1] - [999] -
Print#*
Selects whether or not the number of copies set from the TDU remains after printing
This TDU setting will be applied until the printer is turned off.
Available settings: [From Starting#], [Cont from Last] -
Database Search*
When using a template with a linked database, selects whether to search for database records by their line number or by their data.
Available settings: [By Line#], [By Data]
