ADS-1350W
FAQ 및 문제 해결 |
Set up your Brother machine on a wireless network (Windows/macOS)
1. Before you set up your Brother machine
You must find out the wireless network settings of your wireless router or access point. Check and write down the current wireless network settings below (you will need this information later):
- Network Name (also known as "SSID" or "ESSID")
- Network Key (also known as "Password", "Security Key", or "Encryption Key")

How to find the Network Name (SSID) and Network Key (Password)
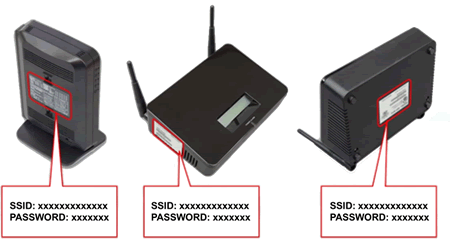
- Check the base or side of your wireless router or access point.
- See the documentation provided with your wireless router or access point.
- If you need assistance during setup and want to contact Brother customer service, make sure you have your SSID (Network Name) and Network Key ready. We need this Information to assist you, so please get ready them.
- If you do not know this information (SSID and Network Key), you cannot continue the wireless setup.
- If you cannot find your wireless Network Name and Network Key, contact your Internet service provider or router manufacturer.
After checking the network information of your wireless router or access point, go to step 2 to set up your machine on a wireless network.
If your wireless router or access point uses WEP encryption with multiple WEP keys, write down and use only the first WEP key.
2. Configure the wireless settings
Follow the steps below.
NOTE: The screens may differ depending on operating system being used and your Brother machine.
- Place the Brother machine as close to the network access point/router as possible with minimal obstructions.
- Make sure your Brother machine is ON.
- Make sure your computer is ON and you are logged on with Administrator rights.
-
Do one of the following:
(Windows)
(Mac)
(Windows)
-
Go to Downloads section of this website and download Full Driver & Software Package. First, follow the installation instructions on the download page. Once the installation screen appears, follow the steps from STEP b.
> Click here to download Full Driver & Software Package in the Downloads section. - Select your model (if applicable).
-
Select your language, and then click Next.
When the User Account Control screen appears, click Allow or Yes.
-
When the License Agreement window appears, read the license agreements carefully.
Check the I accept these license agreements box if you agree to the License Agreement, and then click Next. -
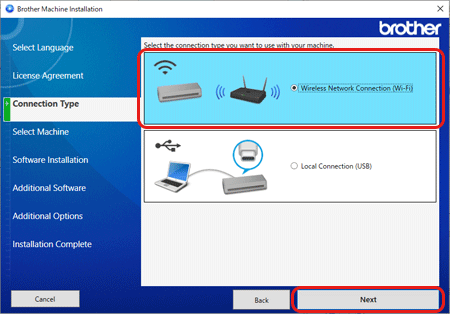
Select Wireless Network Connection (Wi-Fi), and then click Next.

- Follow the on-screen instructions to configure the wireless settings of your Brother machine.
-
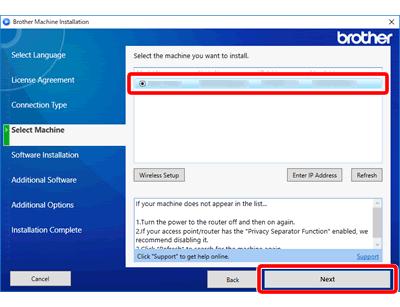
When the screen for selecting your Brother machine appear, select your Brother machine from the list. Then click Next.

- Follow the on-screen instructions to install the driver for network connection. Even if you have scanned with USB connection, you need to install the driver for network connection.
(Mac)
-
To configure your Brother machine for a wireless network, install Wireless Device Setup Wizard.
> Click here to download Wireless Setup Wizard in the Downloads section.
Follow the installation instructions on the download page. - Once the wizard screen appears, follow the on-screen instructions to configure the wireless settings of your Brother machine.
-
Go to Downloads section of this website and download Full Driver & Software Package. First, follow the installation instructions on the download page. Once the installation screen appears, follow the steps from STEP b.
