MFC-J2720
FAQ 및 문제 해결 |
Install starter ink cartridges
Follow the steps below to install the ink cartridges:
NOTE: Illustrations shown below are from a representative product, and may differ from your Brother machine.
Make sure you install the Starter Ink Cartridges or Introductory Ink Cartridges included with your machine first.
- Make sure that the power is turned on.
-
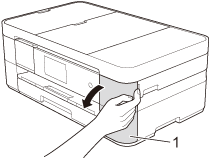
Open the ink cartridge cover (1).
-
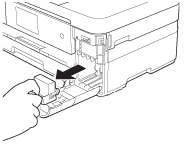
Remove the orange protective part.
-
Unpack the ink cartridge.
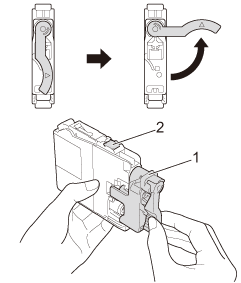
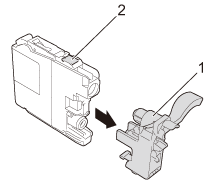
Turn the green release lever on the orange protective packing (1) counterclockwise until it clicks to release the vacuum seal. Then remove the orange protective packing as shown.
-
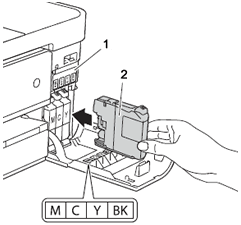
Take care to match the sticker color (1) with the cartridge color (2) as shown in the diagram below. Install each ink cartridge in the direction of the arrow on the label.
-
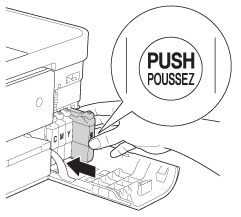
Gently push the area marked "PUSH" until the ink cartridge latches. After all the ink cartridges are installed, close the ink cartridge cover.
The machine will prepare the ink tube system for printing. This process will take approximately 4-6 minutes. Do not turn off the machine.
-
When the preparation process has finished, the machine's display (hereinafter called Touchscreen or LCD) displays Load paper and press [OK] or Load Paper and Press Color (Colour) Start. Press OK or Color (Colour) Start.
(For models with second paper tray)
Make sure there is paper in Tray #1, the upper tray, when checking the print quality. -
Check the quality of the four color blocks on the sheet. (black/yellow/cyan/magenta)
- If all lines are clear and visible, press No to finish the quality check or press the Left or Right arrow key to choose No, and then press OK.
- If lines are missing, press Yes or press the Left or Right arrow key to choose Yes, and then press OK, and follow the steps on the Touchscreen or LCD.
OK Poor 

내용 피드백
지원을 개선하는 데 도움이 되도록 아래에 피드백을 제공하십시오.
