MFC-J825DW
FAQ 및 문제 해결 |
Keep my Brother machine's PhotoCapture Center from automatically cutting off part of a large photo
The factory Cropping setting is On.
This means that if your photo is too long or wide to fit the available space on your chosen layout, part of the image will automatically be cropped.
If you want to print the whole image, turn Cropping setting Off. When you turn Cropping setting Off, also turn Borderless Printing setting Off.
To turn Cropping and Borderless Printing settings Off, follow these steps:
-
Make sure you have put the memory card or USB Flash memory drive in the proper slot on the Brother machine.
-
Press Photo or PHOTO CAPTURE.
-
Do one of the following:
-
If you are using the Brother machine's LCD to preview and choose the images you want to print, follow these steps:
-
Press View Photo(s).
-
Do one of the following:
-
If you want to choose images to print or print more than one copy of an image, go to STEP c.
-
If you want to print all photos, follow these steps:
-
Press
 on the screen.
-
Press Yes to confirm.
- Go to STEP f.
-
Press
-
If you want to choose images to print or print more than one copy of an image, go to STEP c.
- Four thumbnails are displayed at a time. The current page number and total number of pages are listed under the thumbnails.
- Press the Left or Right arrow repeatedly to scroll through the images.
- Hold down the Left or Right arrow to fast-forward and fast-rewind through the thumbnail pages.
- Press to start a slide show.
-
Press the thumbnail you want to print.
-
Enter the number of copies you want by pressing number box on the screen or by pressing + or -.
-
Press OK.
-
Repeat STEPS c through e until you have chosen all the images you want to print.
- After you have chosen all the images, go to STEP f.
-
Repeat STEPS c through e until you have chosen all the images you want to print.
-
Press OK.
- Go to STEP 4.
-
Press View Photo(s).
-
If you are printing specific images from the Thumbnail Index, follow these steps:
-
Press Index Print.
-
Press Print Photos.
-
Use the buttons on the screen to enter the image number you want to print.
-
Repeat this step until you have entered all the image numbers you want to print.
-
You can choose multiple image numbers at once by using a comma or a hyphen.
For example, press 1, 3, 6 to print images No.1, No.3, and No.6, or press 1 - 5 to print image No.1 through image No.5.
- You can enter up to 12 characters (including commas) for the image numbers you want to print.
-
Repeat this step until you have entered all the image numbers you want to print.
-
Press OK.
-
Enter the number of copies you want by pressing number box on the screen or by pressing + or -.
- Go to STEP 4.
-
Press Index Print.
-
If you are using the Brother machine's LCD to preview and choose the images you want to print, follow these steps:
-
Press Print Setting(s) on the screen.
-
Press the Up or Down arrow on the touch panel to display Cropping.
-
Press Cropping.
-
Press Off.
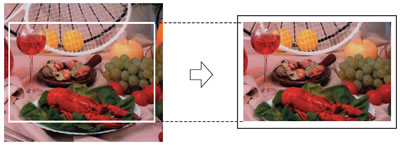
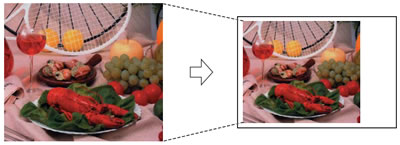
Examples:
Cropping: On
Cropping: Off
-
Press
 or
or  .
.
-
Press Print Setting(s) on the screen.
-
Press the Up or Down arrow on the touch panel to display Borderless.
-
Press Borderless.
-
Press Off.
-
Press
 or
or  .
.
- Press Start or Color (Colour) Start to print.