DCP-8020
FAQs & Troubleshooting |
How do I install additional memory?
The memory expansion board is installed on the main controller which is located inside the machine.
To add the memory, we recommend you to use the following DIMMs:
| 32MB TECHWORKS 12457-0001 |
| 64MB TECHWORKS 12458-0001 |
| 128MB TECHWORKS 12459-0001 |
In general, the DIMM must have the following specifications:
| Type | 100 pin and 32 bit output |
| CAS Lantency | 2 or 3 |
| Clock Frequency | 100MHz or more |
| Capacity | 32, 64, 128MB |
| Height | 35mm (1.4 inches) or less |
| Parity | NONE |
| DRAM Type | SDRAM 4 Bank |
Some DIMMs might not work with this DCP/MFC.
To add the optional memory board, please follow the instructions below:
- Do not touch the surface of the main board within 15 minutes of turning the power off.
- Before installing the optional memory board, make sure there are no faxes in the memory.
-
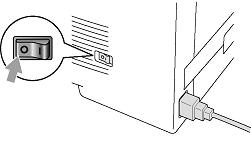
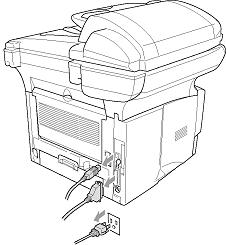
Disconnect the telephone line cord, turn the DCP/MFC power switch off, unplug the DCP/MFC power cord from the AC outlet, and then disconnect the interface cable.
Turn the DCP/MFC power switch off, before installing (or removing) the memory board.
-
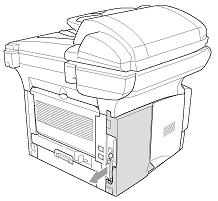
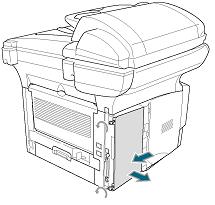
Remove the side cover. Loosen the two screws, and then remove the metal shield plate.
-
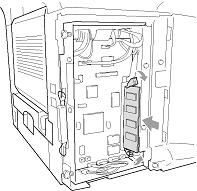
Unpack the DIMM and hold it by the edges.
DIMM boards can be damaged by even a small amount of static electricity. Do not touch the memory chips or the board surface. Wear an antistatic wrist strap when you install or remove the board. If you do not have an antistatic wrist strap, frequently touch the bare metal on the printer.
- Hold the DIMM with your fingers on the side edges and your thumb on the back edge. Line up the notches on the DIMM with the DIMM slot. (Check that the locks on each side of the DIMM slot are open or facing outwards.
-
Press the DIMM straight into the slot (press firmly). Make sure the locks on each side of the DIMM click into place.
(To remove a DIMM, you must release the locks.) -
Put the metal plate back on and secure the metal plate with the two screws.
-
Put the side cover back on.
-
Reconnect the telephone line cord.
-
Reconnect any additional interface cables that you removed.
-
Reconnect the power cable and then turn on the DCP/MFC power switch.
- To check that you have installed the DIMM correctly, print the printer settings by using the selection in the driver and check the printout to make sure it shows the additional memory.
- You can check the current memory size in the user setting list. (See the NC-9100h Network User's Guide on the CD-ROM.)
If the Status LED turns Red for a Service Error, please call Brother Customer Service.