Innov-is A16
FAQs & Troubleshooting |
Upper thread tightened up
Symptom
- The upper thread appears as a single continuous line.
- The bobbin thread is visible from the right side of the fabric. (Refer to the illustration below.)
- The upper thread has tightened up, and comes out when pulled.
- The upper thread has tightened up, and wrinkles appear in the fabric.
-
The upper thread tension is tight, and the results do not change even after the thread tension is adjusted.
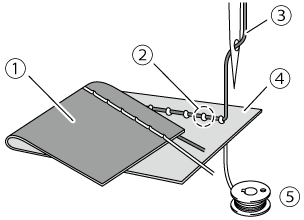
(1) Wrong side of fabric
(2) Bobbin thread visible from right side of fabric
(3) Upper thread
(4) Right side of fabric
(5) Bobbin thread
Cause
Incorrect bobbin threading.
If the bobbin thread is incorrectly threaded, instead of the appropriate tension being applied to the bobbin thread, it is pulled through the fabric when the upper thread is pulled up. For this reason, the thread is visible from the right side of the fabric.
Remedy/check details
Correctly install the bobbin thread.
Use a bobbin that has been correctly wound with thread, otherwise the needle may break or the thread tension will be incorrect.
 |
-
Turn on the machine.
-
Press
 (Needle position button) once or twice to raise the needle.
-
Turn off the machine.
Before inserting or changing the bobbin, be sure to turn off the machine, otherwise injuries may occur if the "Start/Stop" button or any other button is pressed and the machine starts operating.
-
Raise the presser foot lever.
-
Slide the bobbin cover latch to the right and remove the bobbin cover.

-
Insert the bobbin into the bobbin case so that the thread unwinds to the left.

-
Lightly hold down the bobbin with your right hand (A), and then guide the end of the thread around the tab of the needle plate cover with your left hand (B).
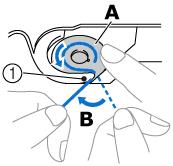
(1) Tab Be sure to hold down the bobbin with your finger and unwind the bobbin thread correctly, otherwise the thread may break or the thread tension will be incorrect.
-
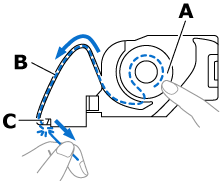
While lightly holding down the bobbin with your right hand (A), guide the thread through the slit in the needle plate cover (B) and lightly pull it with your left hand (C).
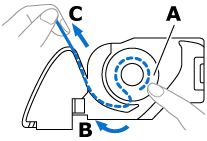
By guiding the thread around the tab of the needle plate cover, passing the thread as shown by 2 in this illustration, then lightly pulling the thread at 3, the thread will enter the tension spring of the bobbin case to apply the appropriate tension to the bobbin thread during sewing.
-
While lightly holding down the bobbin with your right hand (A), continue guiding the thread through the slit with your left hand (B). Then, cut the thread with the cutter (C).
Be sure to complete the bobbin threading correctly according to these instructions. If the thread is simply placed in the slit in the needle plate cover, the bobbin thread will not be correctly threaded, resulting in poor sewing performance or incorrect thread tension.
-
Reattach the bobbin cover.
Insert the tab of the bobbin cover into the notch of the needle plate cover (A), and then lightly press down on the right side (B).
