DCP-B7535DW
FAQs & Troubleshooting |
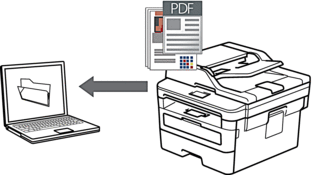
Save Scanned Data to a Folder as a PDF File
Scan documents and save them to a folder on your computer as PDF files.
Use the Scan button on the machine to make temporary changes to the scan settings. To make permanent changes, use Brother's ControlCenter software (Windows®) or Brother iPrint&Scan (Mac).
- Load your document.
- Press
 (SCAN).
 - Press
 or
or  to select the [Scan to PC] option, and then press OK.
 - Press or to select the [File] option, and then press OK.
- If the machine is connected over the network, press or to select the destination computer.
- Press OK.

If the LCD prompts you to enter a PIN, enter the four digit PIN for the destination computer on the LCD and then press OK.
- Do one of the following:
- To change the scan settings for this document, press Options or Copy/Scan Options and then go to the next step.
- To use the default scan settings, press Start.
The machine starts scanning. If you are using the machine's scanner glass, follow the LCD instructions to complete the scanning job.
In order to change scan settings, Brother's ControlCenter software must be installed on a computer connected to the machine.
- Select the scan settings you want to change:
- [Scan Type]
- [Resolution]
- [File Type]
- [Document Size]
- [ADF Auto Deskew] (available for certain models)
- [Remove Bkg Clr]
(available only for the [Colour] and [Grey] options.)
- Press OK.
- Press Start.The machine starts scanning. If using the machine's scanner glass, follow the LCD instructions to complete the scanning job.
Related FAQs
- Scan multiple pages into one file instead of each scan being saved as a separate file.
- Change the scan settings for scanning from ControlCenter4 or the SCAN key (For Windows)
- Save Scanned Data to a Folder as a PDF File Using ControlCenter4 Home Mode (Windows®)
- Save Scanned Data to a Folder as a PDF File Using ControlCenter4 Advanced Mode (Windows®)
Content Feedback
To help us improve our support, please provide your feedback below.