MFC-L5900DW
FAQs & Troubleshooting |
Send Scanned Data directly to your email address when the network security feature is enabled. (Active Directory® Authentication / LDAP Authentication / Secure Function Lock)
If Active Directory® Authentication, LDAP Authentication or Secure Function Lock is enabled, you can scan documents and send them directly to your email address from the machine.
NOTE: The screens may differ depending on operating system being used and your Brother machine.
- Before Configuring Scan to My E-mail
- Configure Active Directory® Authentication, LDAP Authentication or Secure Function Lock
- Configure Your Mail Server Settings
- Enable Send to My E-mail
- Send Scanned Data to your E-mail address
STEP I: Before Configuring Scan to My E-mail
In order to use the Scan to My E-mail the machine must have the required version firmware (Main: L / Sub: 1.14 or later).
> Click here to see how to check the firmware version.
If your machine's firmware version is earlier than Main: L / Sub: 1.14, update the machine's firmware.
> Click here to download the Firmware Update Tool and see more information in the Downloads section.
STEP II: Configure Active Directory® Authentication, LDAP Authentication or Secure Function Lock
This function can be enabled when Active Directory Authentication, LDAP Authentication or Secure Function Lock is active.
Configure the network security features that are applicable for your case.
-
Active Directory Authentication / LDAP Authentication
Configure the Active Directory Authentication or LDAP Authentication and server settings that are applicable for your case.
> Click here to see how to configure Active Directory® Authentication using Web Based Management.
> Click here to see how to configure LDAP Authentication using Web Based Management.
-
Secure Function Lock
To send scanned data to your email address, you must allow the scan function in the Restricted Functions menu, and type the user's email address in the User List menu.
> Click here to see how to restrict the functions available on your Brother machine and the number of prints.
STEP III: Configure Your Mail Server Settings
Configure your email server settings using Web Based Management.
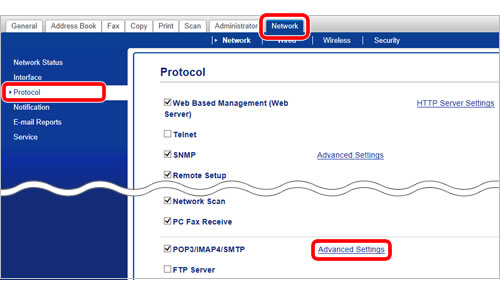
- Click the Network tab.
- Click Protocol in the left navigation bar.
-
In the POP3/IMAP4/SMTP field, click Advanced Settings.
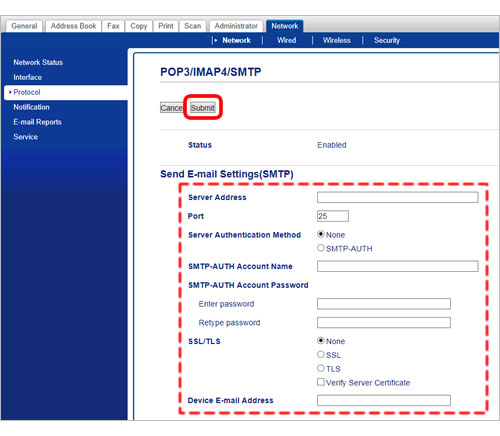
- In the Send E-mail Settings(SMTP) field, enter the necessary settings for the mail server.
-
When finished, click Submit.
-
The Test Send/Receive E-mail Configuration dialog box appears.
Follow the instructions in the dialog box to test the current settings.
STEP IV: Enable Send to My E-mail
Enable Send to My E-mail using Web Based Management.
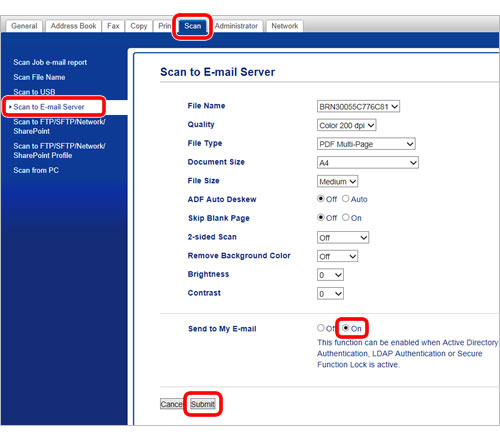
- Click the Scan tab.
- Click the Scan to E-mail Server menu in the left navigation bar.
- In the Send to My E-mail field, choose On.
-
Click Submit.
- Close the web browser.
STEP V: Send Scanned Data to your E-mail address
Scan documents and send them directly to your email address from the machine.
- Load your document.
-
On the machine's control panel, use the machine's display (hereinafter called Touchscreen) to log on to the machine.
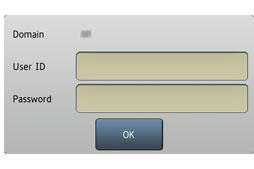
Active Directory Authentication / LDAP Authentication
Enter your User ID and Password, and then press OK.
Secure Function Lock-
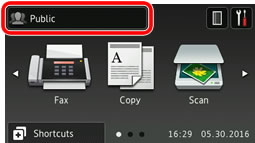
Press
 (Public mode) or
  (Individual user) on your machine Touchscreen.
 - Press Change User.
- Choose your user name.
-
Enter your four-digit user password and press OK. Make sure the user name you have chosen is displayed on the Touchscreen.
You can log on by touching a NFC compatible card to the NFC Reader if you have registered one. (Available only for certain models)
-
Press
- Press Scan.
-
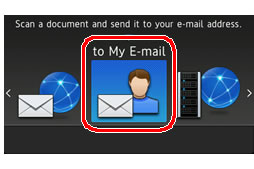
Swipe left or right to move to My E-mail, and then press to My E-mail.
-
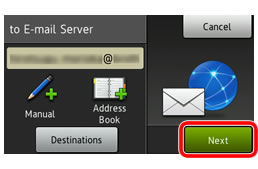
Press Next.
-
Press Start.
The machine starts scanning. If you are using the machine's scanner glass, follow the Touchscreen instructions to complete the scanning job.
